Administration – Accounts Tab
Managing User
Accounts
Many functions of the BNTouch CRM are
linked to the specific user account used to log into the system. Businesses
with multiple users can create accounts for each, manage active user accounts,
and customize the access privileges of each in the Accounts Tab of the
Administration menu. In the User Menu in the upper-right corner of the screen,
click “Administration.” The Account List will display by default, but you can
always open it by clicking the “Accounts” tab. Only administrative users can
access this area of the CRM; please contact your administrator if you need help
with user accounts and do not have access.

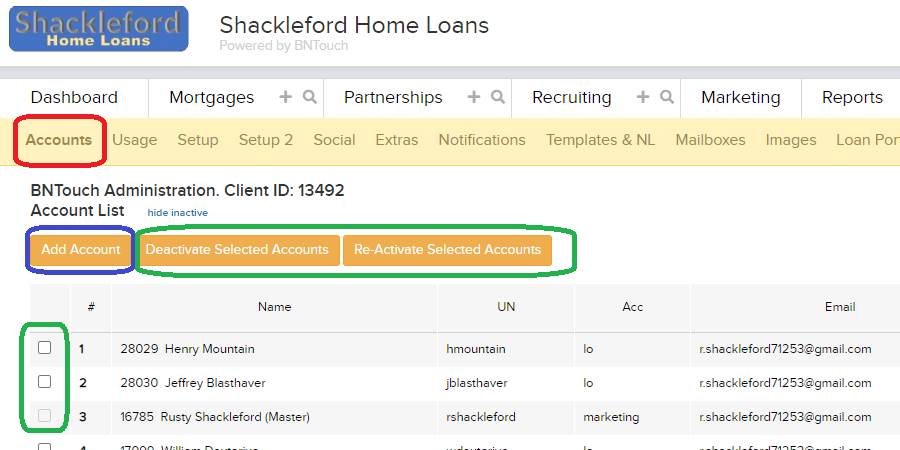
Account List
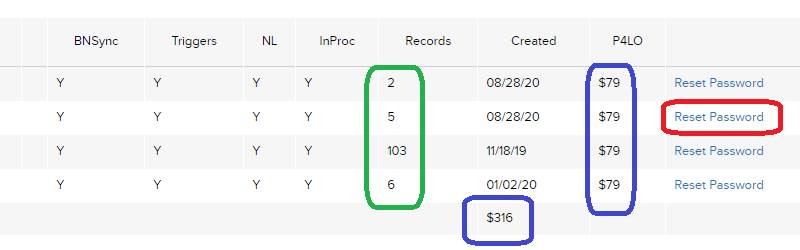
Here, you’ll see a list of all users for
your BNTouch account. Each user will have account information listed, including
the username, account type, email address, access privileges, number of active
records, age of the account, and monthly cost of user access. A link to the
right of each account can be used to reset the password for the account. At the
bottom of the list, you’ll see a charge summary for the number of active users
in your account.
Creating User
Accounts
Above the list, you can add new user
accounts by clicking the “Add User” button. Your monthly fee is based on the
number of active user accounts, so be aware that adding more users will results
in a higher fee.
Below, you can choose what type of
account the user will need. Loan Officer accounts have access to all of their own records, while Marketing accounts have
access to records that they own and that are owned by other accounts. You can
also include it in any user groups. Next, you can enter login and contact
information for the new user. Note that the username you choose for the account
needs to be unique; if the name is already in use, you will need to enter a
different username.
When you click the “Add User” button, an
email will be sent to the listed email address with links and instructions to
log in; if you want this email to be sent to a different address than the
user’s account address, you can list a separate one here.

Configuring User
Access
You can also manage which user accounts
are active from the Account List. Using the checkboxes to the left of a user
and the buttons above the list, you can deactivate and reactivate user
accounts. Note that you will be charged for all active accounts for each month.
You can also choose whether to show or hide inactive user accounts using the
link above the list.
Want to Learn More?