Mobile App – the Mobile Dashboard
Navigating Your
Mobile Dashboard
Much like the Dashboard Tab in the web browser version of
your BNTouch CRM, the Mobile Dashboard in your BNTouch app lets you organize
your daily activities, review important updates to your records, and stay
in-the-know with your co-workers. This dashboard serves as a heads-up display
for recent activity in your CRM, so it is a good place to start your work each
day.
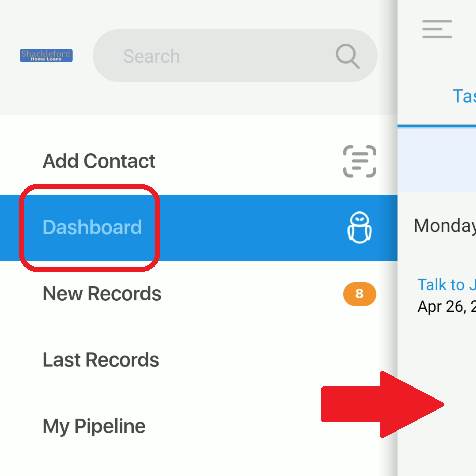
When you log into the BNTouch app, you
can quickly access the Dashboard by swiping from left to right and tapping
“Dashboard” in the menu. Be sure to tap on the words to the left; the Robot
icon to the right will open communication with Maia, your Mortgage AI
Assistant. You can also talk to Maia while working in the Dashboard by tapping
the same icon in the upper-right corner.
The Dashboard has several features
available for use, and you can navigate between them by using the icons at the
bottom of your screen. Each will show notification numbers to let you know how
many new tasks, alerts, campaigns, or assignments need your attention.
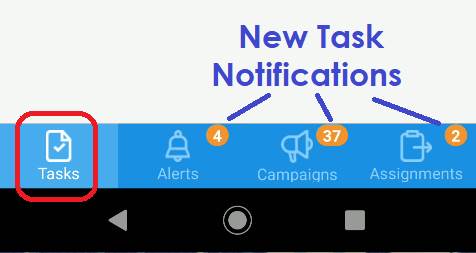
Task Management
The first category available in your
Mobile Dashboard is “Tasks”. Here, you can set reminders for yourself, schedule
calls and appointments, review anything you’ve missed, and maintain a to-do
list for less time-sensitive events. At the top of the screen, you can tap the
sub-tabs to switch between the different task lists.
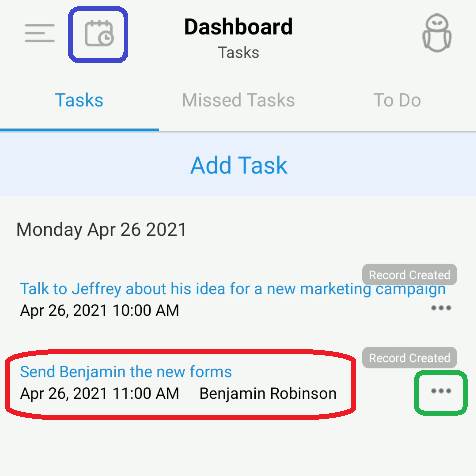
The “Tasks” sub-tab will, by default,
show any tasks you have scheduled for the current day. You can select a
different day using the calendar icon in the upper-left corner of the screen.
Below, that day’s tasks will be listed with the time and description. If the
task was created from a client or partner record, that person’s name will also
be listed.
You can tap a task to edit its type,
time, reminder status, recurrence frequency, and description. Any details you
change will be updated when you click “Save” at the top. You can instead create
a new task by tapping the “Add Task” button, which will open a similar screen
where you can enter details for it.
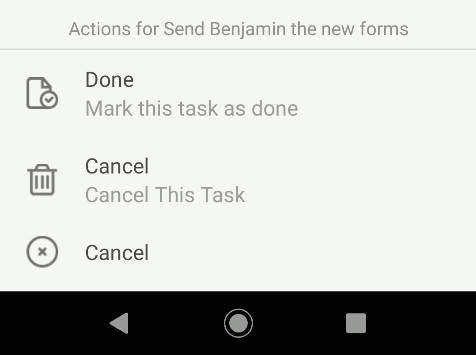
For each task in the list, you can tap
the Actions Icon to the right to mark it as “Done” or cancel it.
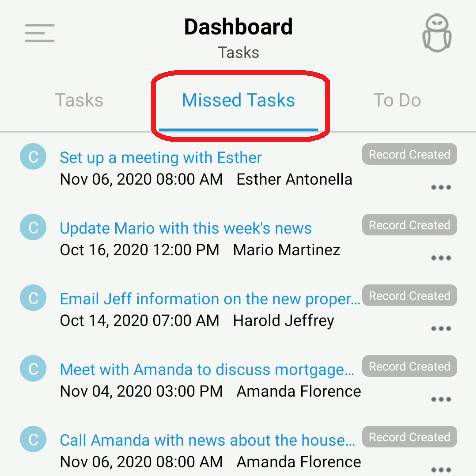
The next sub-tab focuses on “Missed
Tasks” that have passed their scheduled date without being canceled or marked
as “Done”. These will be listed below just like the daily tasks, and you can
edit, cancel, or mark them as “Done” in the same way.
Lastly, the “To Do” sub-tab will show a
list of tasks you have entered that don’t have specific completion dates
associated with them. Instead, these will be organized by Priority, which will
display as a color and number to the left of each item in the list. You can add
new To Do items by tapping “Add Entry” above, which will let you choose a priority
and enter a description.
For To Do list items, you can tap the
circles to the left of the entry to select it, then tap either “Mark as Done”
or “Delete” above to take actions on all chosen items. If you wish to complete
or remove all items on the list, just tap “Select All”.

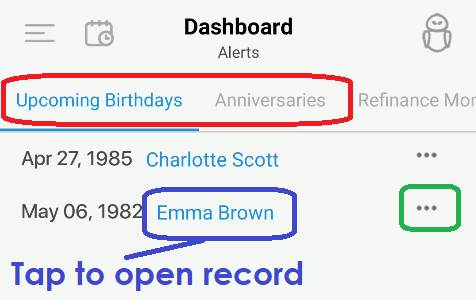
Dashboard Alerts
The “Alerts” section of the Mobile
Dashboard will keep you up to date on any upcoming birthdays and loan
anniversaries, refinance opportunities for your clients and partners, and new
property listings.
For the first two annual events, you will
be able to see a list of all occurrences of each type coming in the next 15
days. The date will display to the left, and a link to the person’s record in
your CRM will appear next. Tapping this name will open their record in your
mobile app. You can instead tap the actions icon to the right to get in touch
with that client or partner, whether by phone call, SMS text message, email,
video message, or other form of communication you have available.
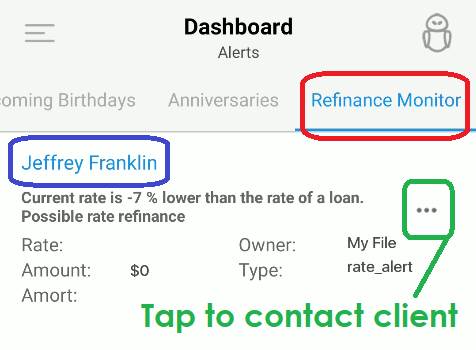
The third sub-tab in the Alerts section
is for your “Refinance Monitor”. Each night, your loans will be checked
automatically, and any clients in your records with rates above the rate you
have currently set will be listed here. Like the other sub-tabs, you can open
client records using the blue “Name” links, and you can contact borrowers or
add CRM tracker events to their record using the “Actions” icons.
To learn more about configuring the
Refinance Monitor or entering new dates, which can only be done via a web
client, please check out the “Alerts” article or training video in our
“Dashboard” series.
The last Alerts tab, “Listed Properties”,
will display new property listings that are near the Mailing or Property
addresses of your contact records. Each morning, BNTouch will automatically
check for properties that match your mortgage database that have changed their
MLS status to either “Active”, “Pending”, or “Contingent”. Any that update to a
“Sold” or “Fail” status will be moved to the “Inactive” sub-tab, and any you
have “dismissed” will go to that sub-tab.
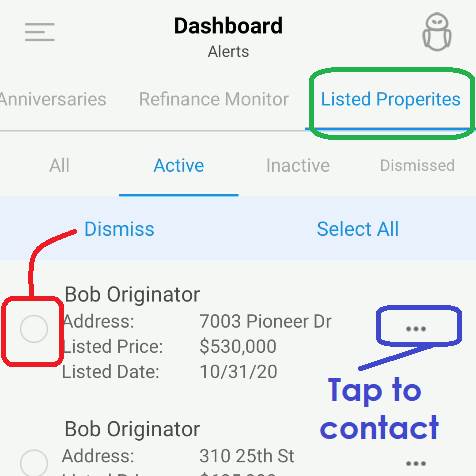
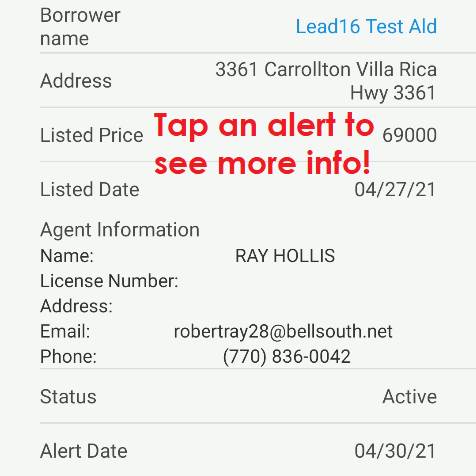
Each listing will show an address, listed
price, and date; more details can be seen by tapping on this information. You
can tap the borrower’s name to open their record, tap the “Actions” menu to add
tracker notes or contact the client, or tap the circles to the left to
“Dismiss” the alerts with the button above the list. If you want to see only
listings for a specific time period or property
address, tap the “Filter” button in the upper-right corner.
To learn more about these alerts and the
actions you can take from them, please check out our “Listed
Property Watch Alerts” article or training video.
Campaigns
Overview
The “Campaigns” section will show a
summary of your current, pending, and recent marketing campaigns.
At the top of this section, you will see
an overview display of your recently completed campaigns, including statistics
for how many campaigns were completed today, yesterday, this week, and in the
previous week. Next, you can review how many were sent in the current and
previous month and year.
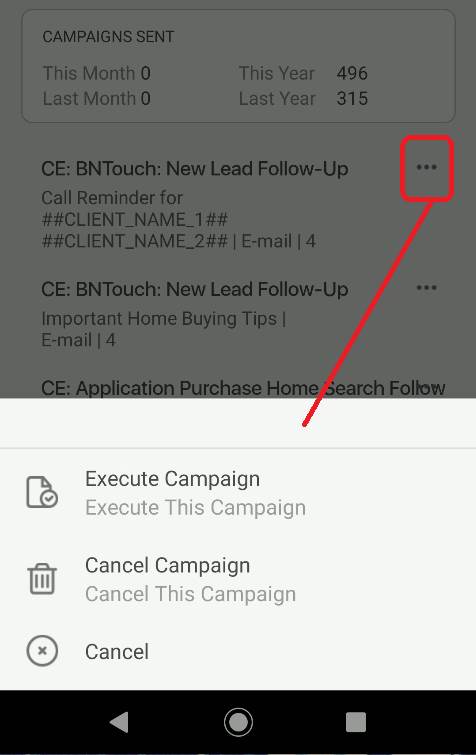
If “Safe Mode” is enabled for your
account, any campaigns that are pending confirmation before being sent will
appear below. You can see the campaign name and some of the steps it contains
in this list, and you can either execute or cancel a campaign by tapping the
Actions icon to the right. In order to edit a campaign, you will need to open
the Marketing Tab in your web client.
Record
Assignment
The final section of the Mobile
Dashboard, “Assignments”, will list any records you have assigned to other
users or that have been assigned to you, whether sent to yourself or from
another user.
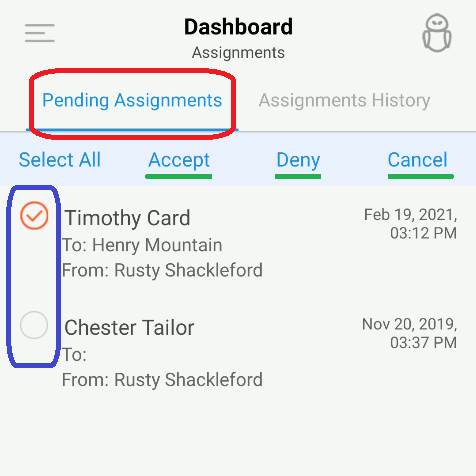
The first list, “Pending Assignments”,
will show any assignments that have not yet been accepted or denied. You can
see who the record is being assigned to and from below the record name, and the
date the assignment was sent will show to the right. Using the circles to the
left, you can select incoming records you want to accept or deny, then tap the
corresponding button above the list. For outgoing assignments you have sent to
other users, you can only choose to “Cancel” the assignment.
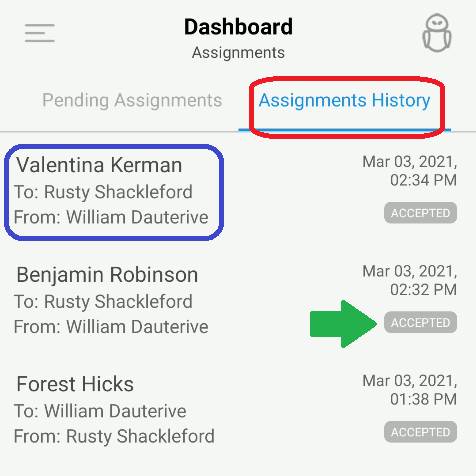
The second sub-tab, “Assignments
History”, will instead show a list of assignments that have been successfully
accepted or denied. For each record, you can see which user assigned it to whom
below, the date of the assignment to the right, and the completed status below
that.
Want to Learn More?