Quick Start – Marketing Basics
Welcome to
BNTouch!
Once you have set up your CRM and started
adding clients and partners to your databases, the next step is to put these
resources to use via Marketing Campaigns. This article will explain the basic processes
involved with marketing in your BNTouch CRM, including what a “Campaign” represents,
how to add already-built campaigns to your account from the Context Exchange,
adding steps to your campaigns, and configuring various options for your
marketing steps.
This guide assumes you have already ‘taken
the tour’ of your new CRM and understand at least the basic capabilities at
your disposal. If you have not yet explored our “CRM
Basics” manual or training video, we recommend you do so before learning
about marketing options here.
If you would instead like to start a full
training for your CRM in which you learn what each feature does in each tab,
you should begin our Initial Training series with the first part, “Account
Setup”. This article and video will help you configure options for your
account, and the rest of the Initial Training series will progress through each
section of your CRM in order, giving you a more complete understanding of its
capabilities and the opportunities available for your business.
Understanding
Marketing Campaigns and Steps
In the BNTouch CRM, a Campaign is a
general piece of marketing—but not just an individual email. A campaign represents your marketing
communication around a particular concept. For example, you may make many marketing
emails that go out to new leads, but you can handle many of these together with
a single campaign. Each campaign can have several steps, which represent the
various communication events that happen for each campaign. That new lead
campaign may have steps that send emails to your clients, remind you to call
those clients after a few days, etc.
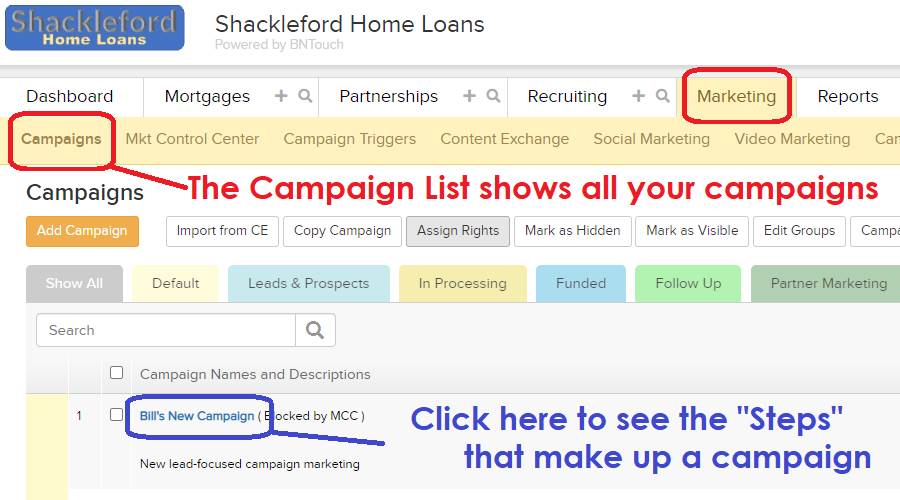
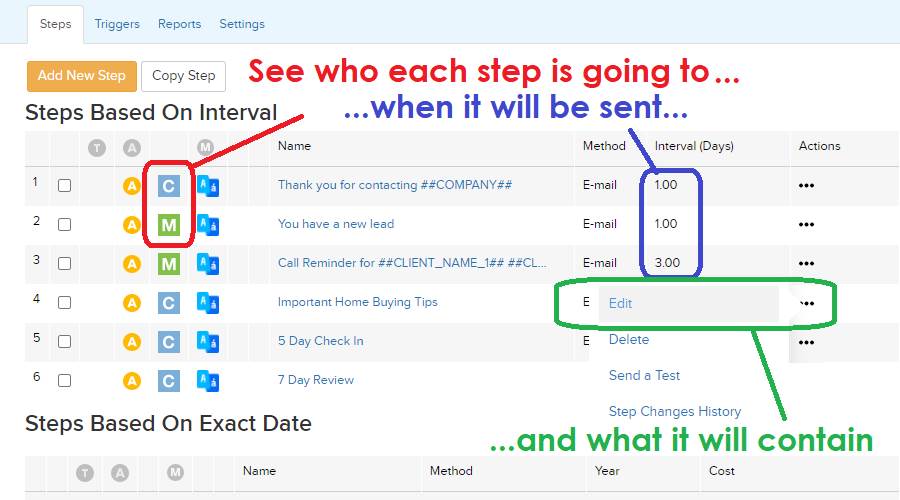
When you open a campaign in the Marketing
tab, you’ll see a list of the steps involved in it. Each can be set up from a
basic template (a “T” icon for non-default templates), can be automated using
triggers to determine when it is activated (the “A” icon), and can be sent to
various target recipients (including borrowers, partners, staff members, or
yourself, as indicated by the letter in the third column). The steps for these
campaigns are organized into separate lists depending on whether they will be
triggered on an interval—after a certain number of days, like a birthday—or
triggered on specific dates for holidays and special events.
In this example, you’ll see that when a
client is added to this New Lead campaign, an email is sent to the client the
day they are added to the campaign. In this case, a reminder would also be sent
to you on that day.
Editing Campaign
Steps
You can click a step title to see a preview
of the communication, or you can click the icon in the “Actions” column to
edit, test, or delete them. Here, you can configure exactly who the
communication is being sent to, the subject line of the email, and what will be
included in it. If you have a default template selected, that will
automatically be applied; otherwise, you can quickly choose from various style
templates for your various campaign steps using the “Templates” menu here.
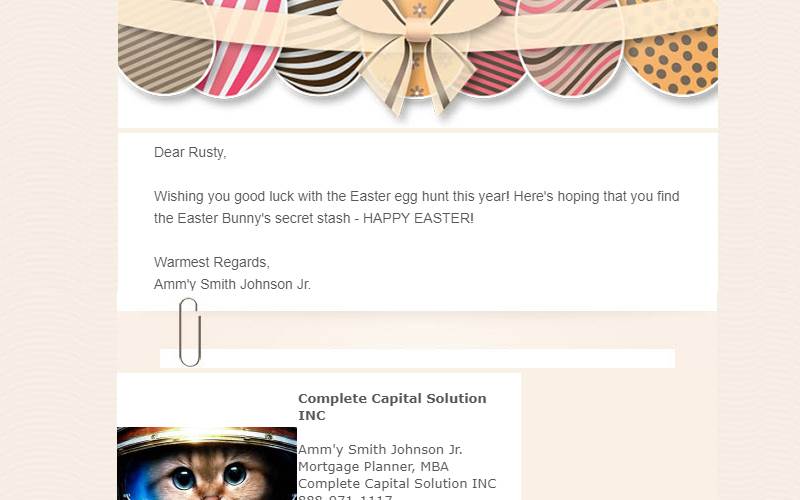
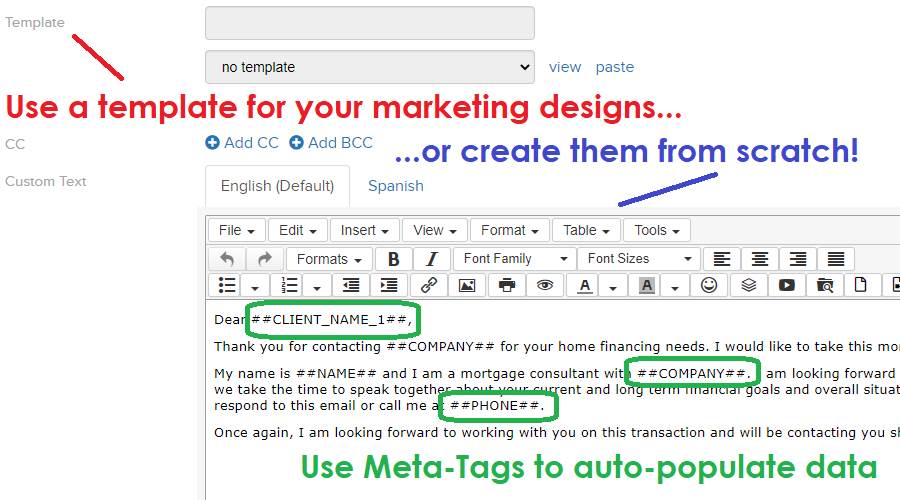
In the text editor, you may also notice
strange “##CLIENT_NAME##”
sections. These won’t appear as they look here in each email. These are called
‘meta-tags’, and they will automatically replace themselves with
record-specific information in each email sent with this step. In this case,
each email will have the name of the client pulled from your Mortgages tab and
automatically inserted into the mail. These meta-tags save an incredible amount
of time, and you can search through all the available tags using the button in
the text editor. There are very many of these tags, so you can really
personalize your communication without having to compose emails one-at-a-time.
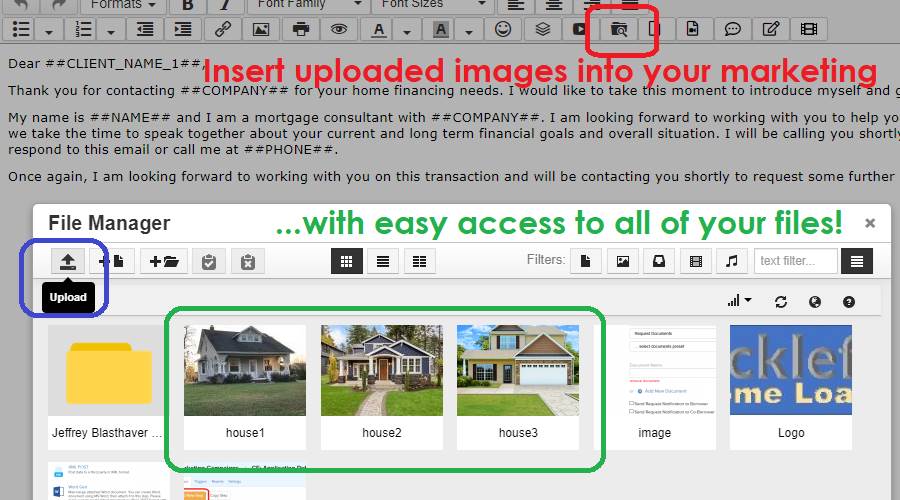
The text editor has several tools and
options available—your emails don’t have to just be boring blocks of text. You
can add pictures, links, and videos, change the fonts and presentation of your
text, and much more using the buttons above the text box. For example, you can
use the File Manager button to upload an image from your computer, then click
the image from the list below to instantly add it to your campaign step!
Below, you’ll see various types of
communication available for the step. This step can be sent as a task to your
calendar, an email, or even a text message if you use the BNTouch Voice module.
You can also set the campaign to update various fields in your CRM, which can
help to automatically move records through the marketing pipeline.
If you want to take advantage of the
automated nature of these steps, be sure to check the box labeled, “Yes, I
would like it to be sent automatically.” If your Safe Mode is “On”, triggered
campaigns steps won't automatically be sent out; they will go to a ‘pending
campaigns’ section of your dashboard and await your approval. We want you to
become comfortable with turning this Safe Mode setting “Off”, as this will let
your campaign triggers run automatically and start saving you time.
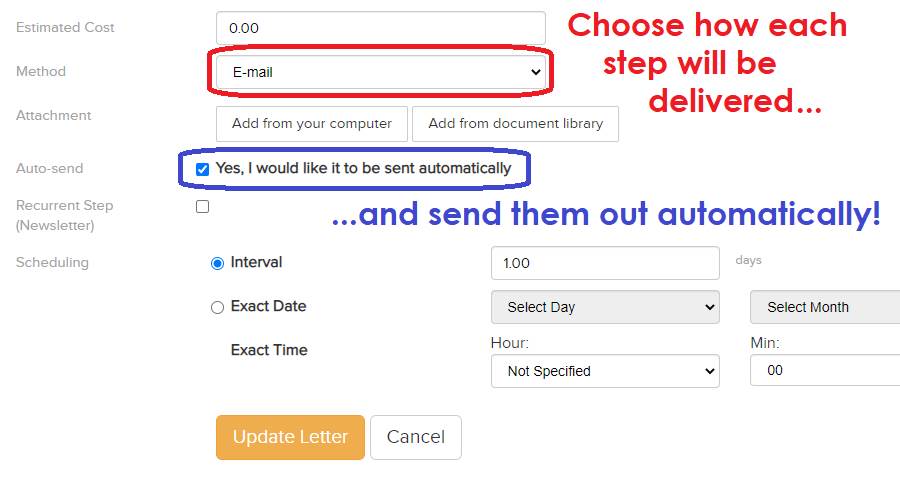
If this step needs to be sent out now and also regularly afterward, like a newsletter, be sure to
check the “Recurrent Step” checkbox. You can then set a recurrence interval (in
days) to have it sent every time that interval elapses. If you instead need to
have it send on specific dates afterward, just make a separate step for each
date. This is easy when you copy steps—but we’ll get to that soon.
When you make any changes here in a step,
be sure to click the “Update” button at the bottom of the page. This will save all
changes you have made to that step.
Adding and
Copying Steps
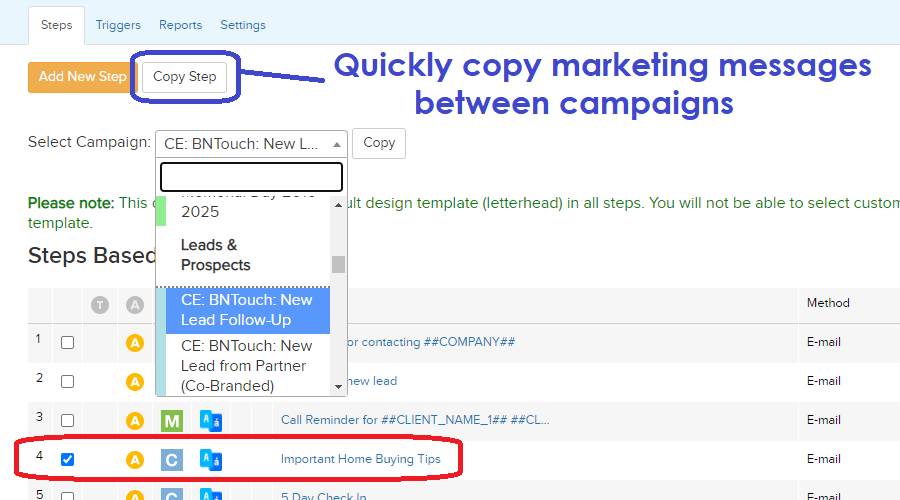
Back in the Campaign screen, you’ll
notice that you can add new steps to each campaign using the button at the top
of the list. You can also check the boxes to the left of a step and hit “Copy
Step” to duplicate it; this can save considerable time when setting up your
marketing communication, as you can copy these steps then edit them to change
what needs to be different in each case. Be sure to edit the word “COPY” from
the step name and adjust the interval or date on which you would like your copy
to be sent.
When adding new steps, you can choose who
the step is targeting, what method it will be delivered through, and then
brought to the Edit Step screen you saw before. If you want to include meta-tag
information in your email title, just add the meta-tag to your text box, copy
it using the “ctrl” and “C” buttons on your keyboard, and paste it into the
title section using “ctrl” and “V”. This way, you can include your clients’
names in their email titles.
Adding a New
Campaign
Now that you understand how Steps work in a campaign, you should also know how to create
new campaigns for further marketing opportunities. Adding new campaigns is very easy; your CRM will walk you through the process. In
your Marketing tab, you can do this by clicking the “Add Campaign” button.
First, you’ll be prompted to choose a group for the campaign. These are used
for your own organization. As an example, imagine you want to make a campaign
targeting funded clients titled, “Keeping in touch with you.” You can add a
short description for your own records, and you can copy the title of the
campaign into the “Name Visible on Unsubscribe” field. This will allow them to
choose to opt-out of specific campaigns if they wish.
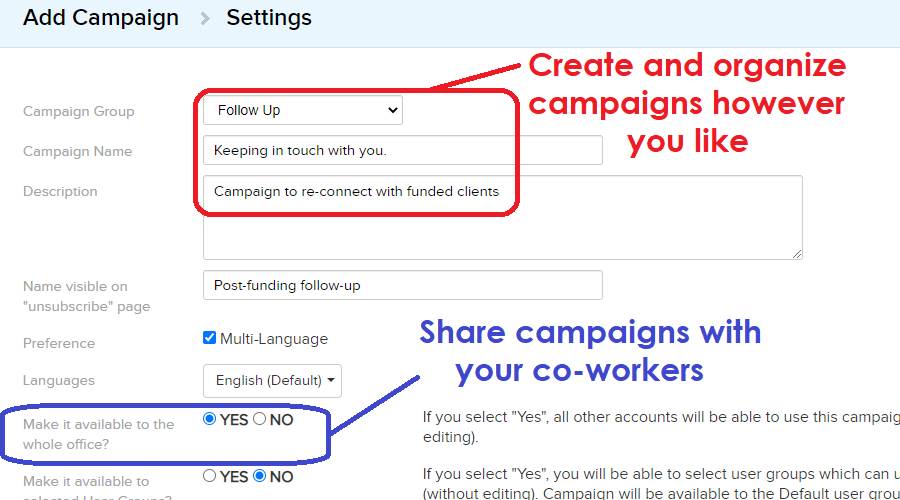
“Make Available to the Whole Office” can
be used when making campaigns that other users in your office may put to use. You can have emails go out on behalf of yourself
or the record owner (in case you are a marketing-focused user creating content
for a loan officer). Other options
include whether emails will be sent on weekends, whether the campaign can be
sent to a single client more than once, duplicate target options, and more. You
can often just use the default settings here, but you can always change these
as needed. When ready, just hit “Add Campaign” to get it started!
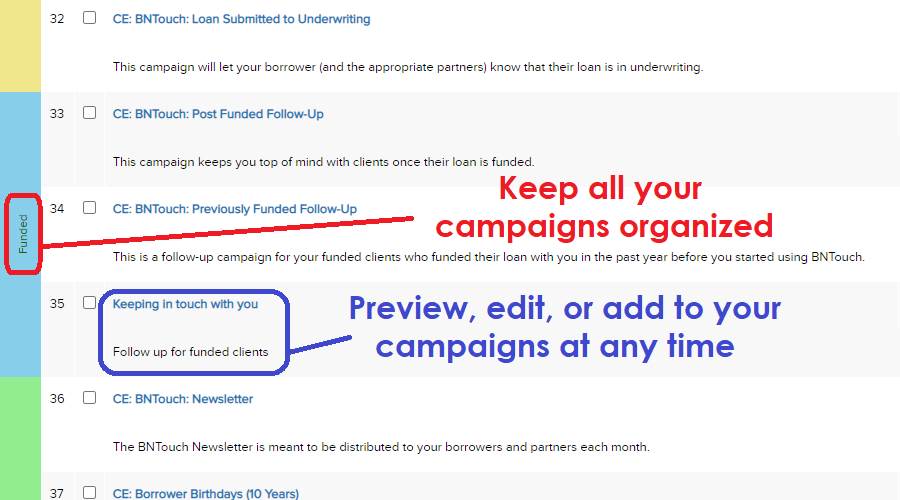
Once saved, you’ll see the Campaign List
screen again. This will be organized by the Campaign Group; you could find the example
campaign you just made by looking under “Funded”. When you open it up, you can
then start adding individual steps to the campaign by clicking the “Add New
Step” button and choosing a Step Method. Again, you will choose the target,
enter a subject, and add the text you want to appear in the email. You could
then find a meta-tag for the client’s first name to personalize it, then write
it out like a normal email. The difference is that this email will be one that
can be sent out time and time again. To finish, you would check the “Send
Automatically” box, set an interval of “1” to have it sent out immediately, and
hit “Update” to save the step.
Using the
Content Exchange
While you can certainly design all of your own marketing communications, you may want to
save some time and find material that BNTouch and its users have made available
via the “Content Exchange”. In your Marketing Tab, you can hit the “Content
Exchange” button, and you’ll see a large list of campaigns built by BNTouch and
its users. You can search through these campaigns, preview what they look like,
and add them to your account. These pre-made campaigns include several for
different holidays and anniversaries, and we strongly recommend you look
through these always-available options to find campaigns your business can use.
These are all ready-to-go campaigns that you are free to use or customize, but be sure to carefully review any content
shared by other users for compliance as well as hard-typed data that doesn’t
apply for you.
The Marketing
Control Center
Some businesses will have the default
screen for their Marketing tab set to the Marketing Control Center. This screen
will show all of the campaigns that are available and
whether they are set up with any automated rules, which lets you activate or
disable campaigns quickly. This will show or hide the campaign when other users
in the office access the Marketing tab. This control center can also be used to
activate or disable individual steps in a campaign. For example, this can be
used to stop a campaign from emailing you as a reminder if you don’t want to
get an email every time the campaign activates for a client.
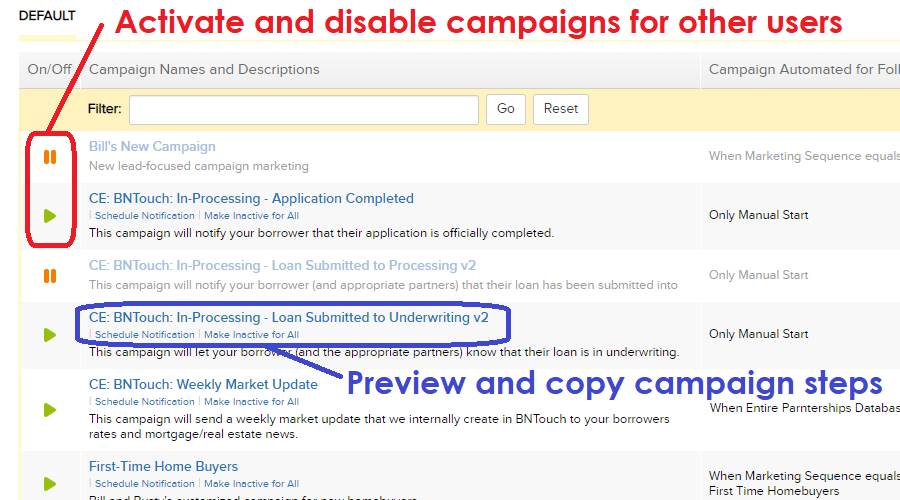
This setup can be very
helpful for offices that don’t want each user to have the same editing
rights for campaigns. Say, for instance, that a user doesn’t have access to the
ability to edit a campaign step made available in the Marketing tab. They can
instead select the campaign step and create a copy of it to customize the
campaign step to a version for themselves without modifying the original
campaign step that other users may need to access. The user can then edit the
new copy of the campaign step and rename it—replacing the “COPY” part—to
whatever they need. They can then edit the campaign as needed for their own
marketing.
What should I do
next?
If you would like to learn more general
tips about the marketing possibilities available in your CRM, please watch our “Marketing
Automation” or “Managing
Partners and Co-Branded Marketing” training videos.
Want to Learn More?