Options – Automatic Lead Distribution
Creating Filters
and Configuring User Settings
Instead of assigning each lead in your
CRM to your team members one-at-a-time, Automatic Lead Distribution allows you
to distribute records among accounts based on customizable rules and a
schedule. Based on the criteria you set, your CRM will assign records to
appropriate users in your account. Every time a record is assigned, the user
will receive a notification, and they can then accept them or wait until they are
reassigned to another user.
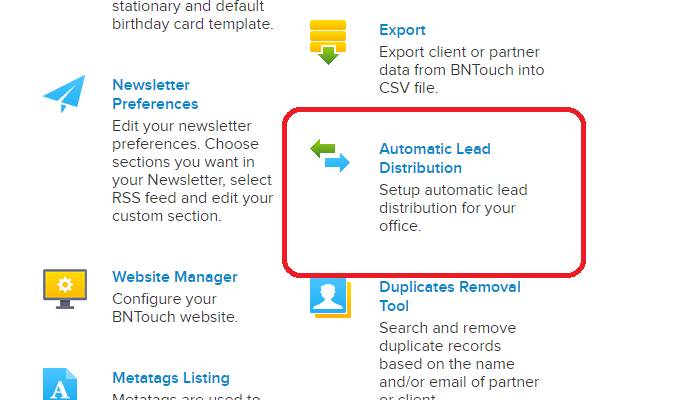
In the Options tab of your CRM, you can
configure this feature in the “Automated Lead Distribution” section. Here, you
will see options and settings separated into two sub-tabs.
Distribution
Filters
In the Options tab of your CRM, you can
configure this feature in the “Automated Lead Distribution” section. Here, you
will see options and settings separated into two sub-tabs. In “Users &
Filters”, the first section allows you to set Filters for your lead
distribution. These rules are similar to Marketing
Triggers, and they can be used to determine what leads are distributed or not
based upon various record fields.
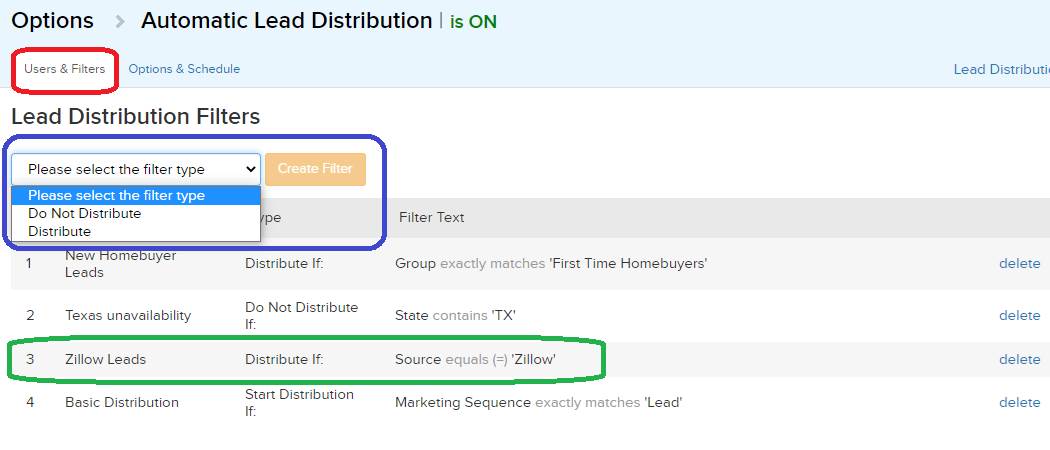
To create a filter, first choose the
filter type from the drop-down menu. The first filter you create needs to be the
“Start Filter” type, as this will allow you to set the most general criteria
that is used to determine whether a record should be auto-assigned.
This filter will be applied to all users in the distribution
“Distribute” can be used to make
additional criteria for automating distribution, but this type of filter can be
applied to only selected users if desired. Records that match the criteria you
set will be automatically assigned to users that have this filter active.
If you select “Do Not Distribute”, records
that match the criteria will be exempted from automated distribution. This type
can also be applied to specific users.
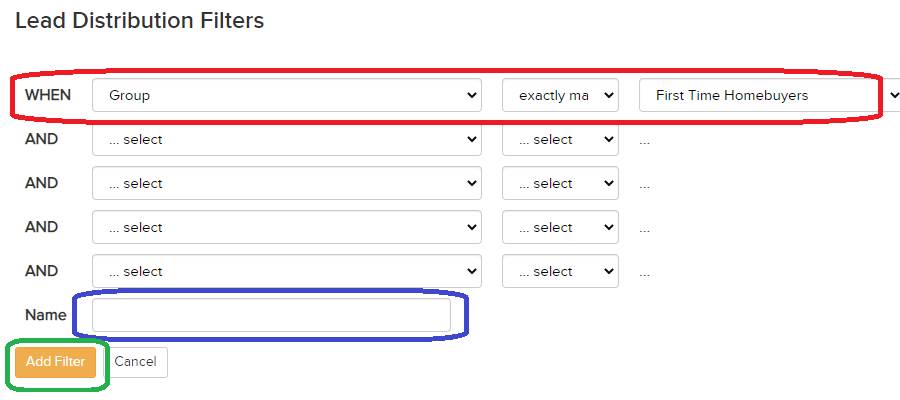
Once you have selected a filter type,
click the “Create Filter” button. You can then enter the criteria you want the
filter to use. Select which field the filter will search, then choose what the
filter will search for and how it will find matching records. Lastly, you can
enter a name for your own organizational use.
For example, you may have your “Start
Filter” use the “When” “Marketing Sequence” “Exactly Matches” “Lead” criteria.
This will make all new records in the “Lead” step of your pipeline distribute
automatically. Once you have your first filter set, you can add additional
rules, like “Distribute” “if” “Source” “Equals” “Zillow”.
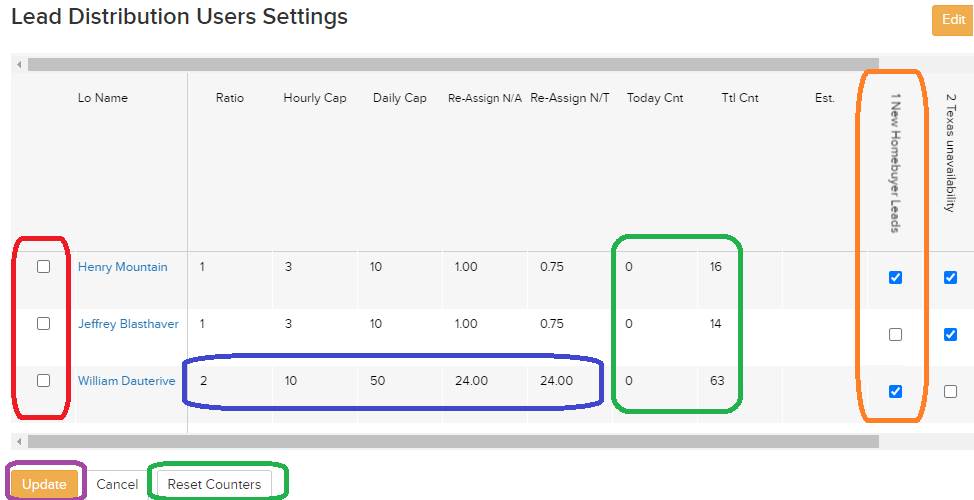
User Settings
Below the Filters section, a list of all
other users in your account will display. Here, you can set the distribution
options for each user. To enable Automated Lead Distribution for any of these
users, just check the box to the left of their name. Any that aren’t checked
will not be assigned leads by this feature. To modify any values on this list,
click the “Edit” button.
To the right of each user, various values
can be entered for the following settings.
The “Ratio” number is a multiplier for
lead distribution. A user with a “2” in this value will be assign twice as many
eligible lead records as a user with “1” here.
The “Hourly” and “Daily Cap” values limit
how many leads can be assigned to a particular user in the specified time frame.
If you want leads that are assigned to a
user to be re-assigned if not interacted with in an allotted time, you can
enter the number of hours in the “Re-Assign” fields. For these, “N/A”
represents time before a lead is Accepted, and “N/T” the time before a lead is
Touched. If a user accepts a lead but no new tracker events are created for the
lead in the “touched” time, it will be reassigned. For partial hours, use
decimal values, not minute values. For example, if you want leads that aren’t
accepted within 15 minutes to be reassigned, enter “0.25” in this field.
The “Today Count” and “Total Count”
fields show the number of assigned, though not necessarily accepted, leads that
a user has been distributed in a given day or in
total. “Est.” will show an estimated number of leads that the user will be
assigned of the next “X” leads, based upon the value in the “Ratio” field.
Lastly, numbered columns will appear to
the right of the other options on this list. These columns correspond to the
Filters you have set for your account above. This way, you can apply specific
filters to designated users. If you only want leads from Zillow to be assigned
to a specific group of users, you can check the box of the corresponding column
for those users here.
If you make any changes on this page,
they will only be saved when you click the “Update” button below the list. If
you wish to reset all user distribution tallies to zero, just click “Reset
Counters” here. New leads distributed to users will start counting from zero after
you do so.
Lead
Distribution Options
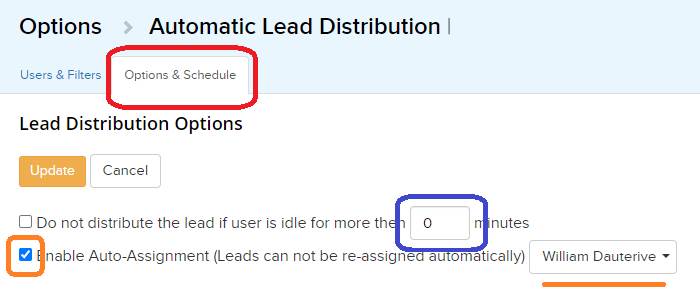
In the second sub-tab, “Options &
Schedule”, the first section allows you to set two general options for your
lead distribution configuration. If the first box is checked, users will not be
eligible for automatically distributed leads if they have been idle for a
specified amount of time.
The second option allows you to
auto-assign leads via the automated distribution, removing the need for CRM
users to ‘accept’ incoming leads. If this box is checked, leads distributed to
users selected in the drop-down menu will not be able to be automatically re-assigned.
If you make any changes to any options on
this page, they will only be saved if you click the “Update” button at the top
or bottom of this page.
Distribution
Schedule Settings
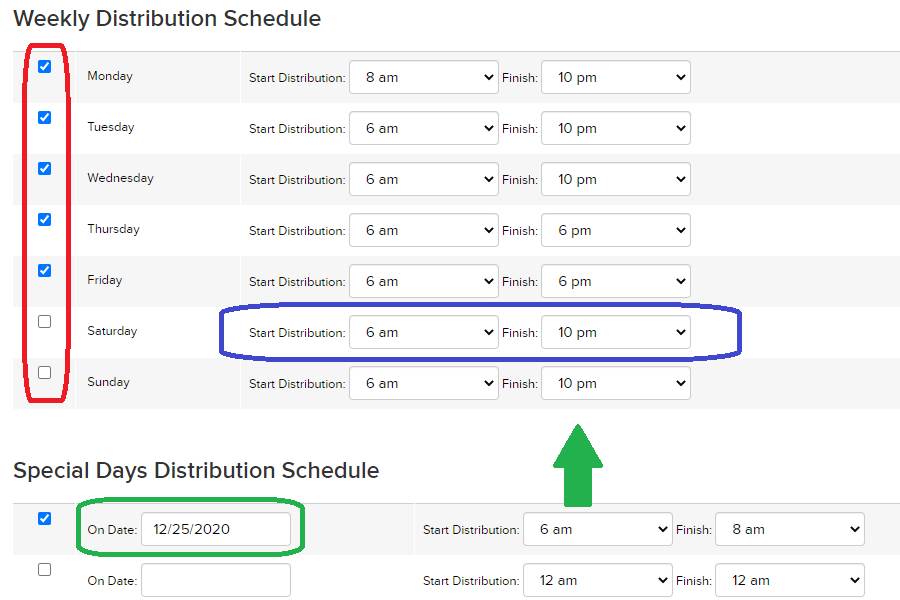
The next sections are used to configure
when leads will be distributed to your CRM users. In the first list, “Weekly
Distribution Schedule”, you can check boxes to the left of days that you would
like incoming leads to be automatically assigned to your users. Then, using the
“Start” and “Stop Distribution” drop-down menus, you can determine the time period during which new leads will be distributed.
Below this, the “Special Days
Distribution Schedule” list can be used to set unique distribution schedules for
specific days of the year. The times you set for dates here will override the
general weekly schedule set above. This list can be used to set special
schedules for holidays or other events during which your distribution of leads
needs to be different than normal.
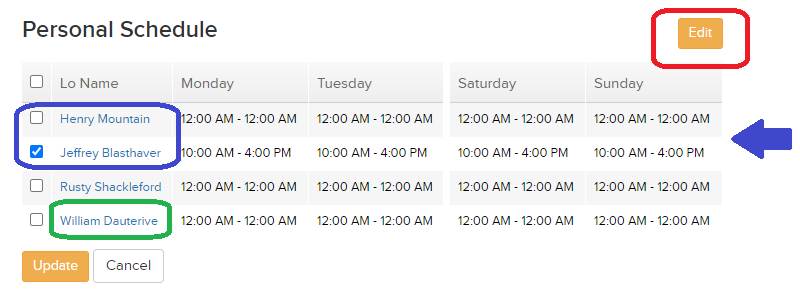
User-Based
Personal Schedules
Next, you will have the option to set
specific distribution availability times for your CRM users. For each user that
you would like to have a customized schedule different from the weekly schedule
set above, check the box to the left of their name. You can then select unique
start and stop times for each day of the week that will only apply to that
user’s lead distribution.
Additionally, you can click on any of the
users’ names to open a Lead Distribution Report for that user, which will show
statistics regarding the leads distributed to that user for the last week by
default.
State
License-Specific Distribution
The final section of this sub-tab allows
you to distribute leads between your users depending upon the states in which
each user is licensed. This check will use the “Property State” field in a
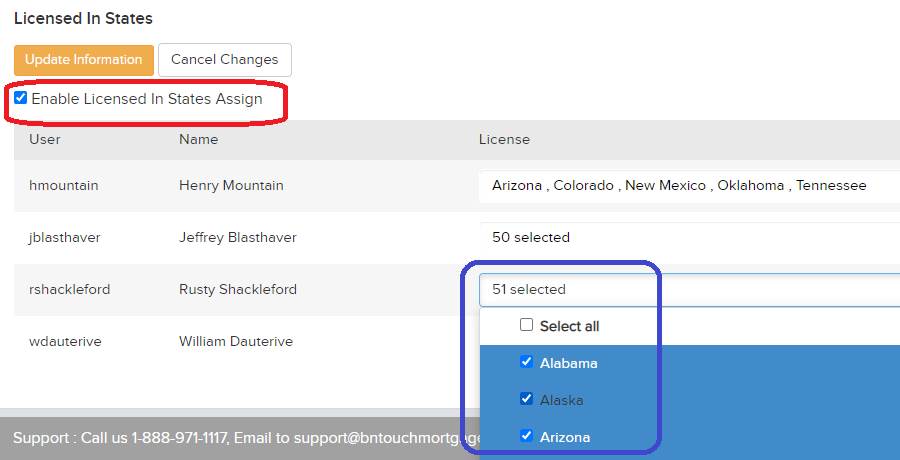
client’s record to match applicable mortgages to your users. If the “Enable
Licensed in States Assign” box is checked, users will only be eligible to
receive leads from states that are selected for that user in this list.
For each user in your CRM, choose states
from the drop-down menu to the right of their username. Multiple boxes can be
checked in this list. When finished entering state license information for your
users, be sure to click the “Update Information” button above the list to save
any changes.
Distribution
Summary Report
Multiple reports are available to see how
leads are being distributed between your users, how your users are interacting
with leads they are assigned, and how long they are taking to act upon these
leads. This allows you to easily track the flow of your leads. You can view
these reports while configuring Automated Lead Distribution settings by clicking
the link in the upper-right corner of the screen.
Note that the values in these reports
show how many leads are assigned to each user, not how many of those leads are
accepted.
You can switch between the various
Automated Lead Distribution reports using the sub-tabs at the top of the page.
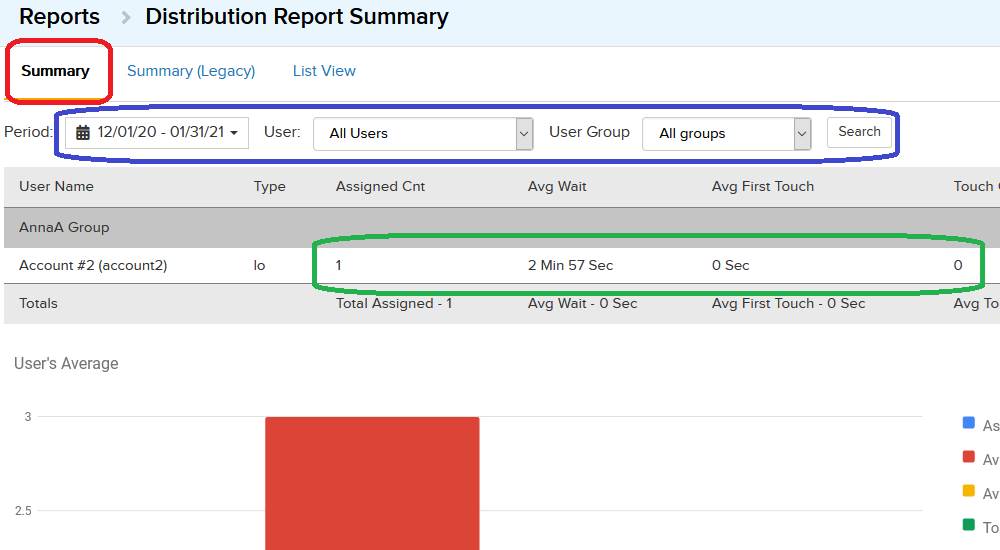
By default, the first report that will display is a general summary of the lead
distribution for your business. You can select a time period
for the report to analyze using the “Period” drop-down menu at the top of the
page. You can also filter the user list below by user or group. To refine the
results by these filters, click the “Search” button to the right.
Below, a list of users in your CRM will
display, organized by user group. For each user, the user type will appear,
followed by the total number of leads that have been assigned to the user
during the selected time period. This number
represents the number of distribution attempts that the system has processed.
The average wait time for leads to be distributed will also be listed.
Next, the average time between receiving
a lead and ‘touching’ it will display, along with the number of leads that the
user has ‘touched.’ In this case, users ‘touch’ a lead when they take any
action on it that results in a tracker event being logged in the client’s record.
At the bottom of the list, you can see
total leads distributed to the listed users as well as the average wait time,
touch time, and touch count. These numbers are calculated based upon all users
in the list above, so new values will tally if you use different filters.
Below this list, a graph of the listed
data will appear to help you compare values between selected users.
Legacy Summary
Report
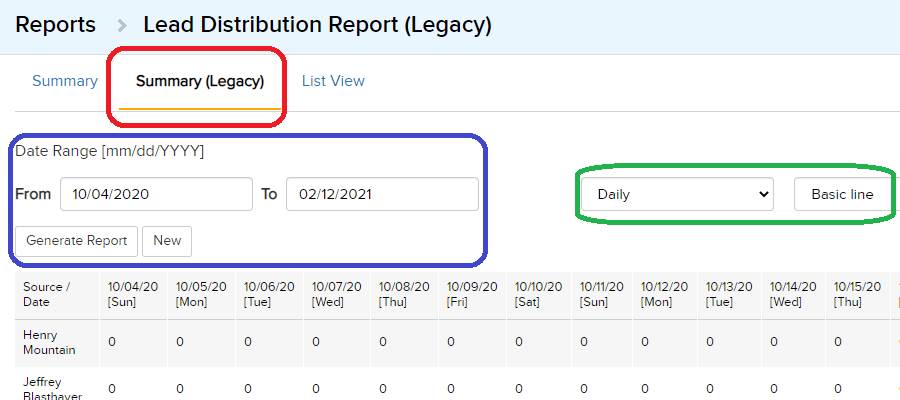
The previously available summary report
can still be accessed if need be. For this report, you will need to select
users to be reported on using the checkboxes to the left, then click the
“Select & Continue” button below. This report will then display the number
of lead distribution attempts for each selected user for each date in the range
set above.
A graph is displayed below for user
comparison, and you can hover over points in the graph for more information.
The icon in the upper-right of the graph can be used to change the display
type.
List View Report
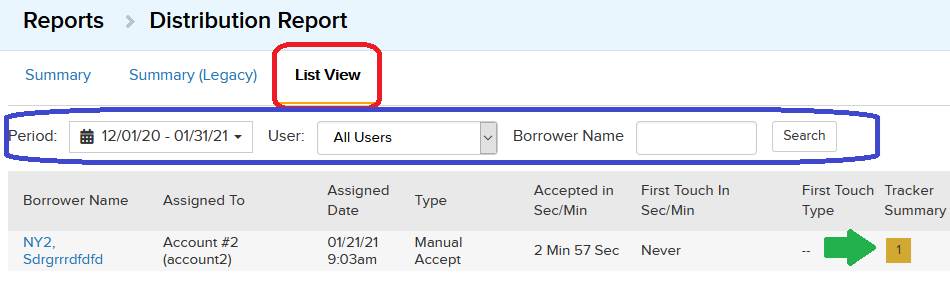
The “List View” report will display each
of the leads that were automatically assigned during the date range selected
using the drop-down menus at the top of the page. You can refine this list by
user via the drop-down list, and you can find specific borrower entries using
the “Borrower Name” search box.
For each assigned lead, the user to which
it was assigned will be listed along with the date it was distributed. Next,
the distribution type for the assigned user will display. If you have not
enabled “Auto-accept” for the user, “Manual Accept” will appear along with the
time elapsed between the lead being assigned and the user accepting it.
If the user has interacted with the
assigned record, the “First Touch” time will show how much time elapsed between
the record being assigned and the user creating a tracker event for it. If so,
the type of action taken will also be listed, along with a summary of the
tracker event types that have since been created for the record in your CRM.
You can also click the blue name of any
lead on this list to open that borrower’s record in your Mortgages Database.
Want to Learn More?