Initial Training – Account Setup
Configuring Your
BNTouch CRM for Your Business
When you log in to BNTouch for the first
time, the first thing you should do is customize your CRM for your business.
The best place to start is the Options Tab. If the tab doesn’t appear at the
top-right corner of your CRM, you can click the “More” tab to display a
drop-down menu with any options that have been hidden due to the size of your
browser window.
Each of the sections listed in the “Options”
tab will contain settings related to various parts of the BNTouch CRM. The
first three sections should be configured first, as the settings in these three
will be used throughout other parts of the CRM.
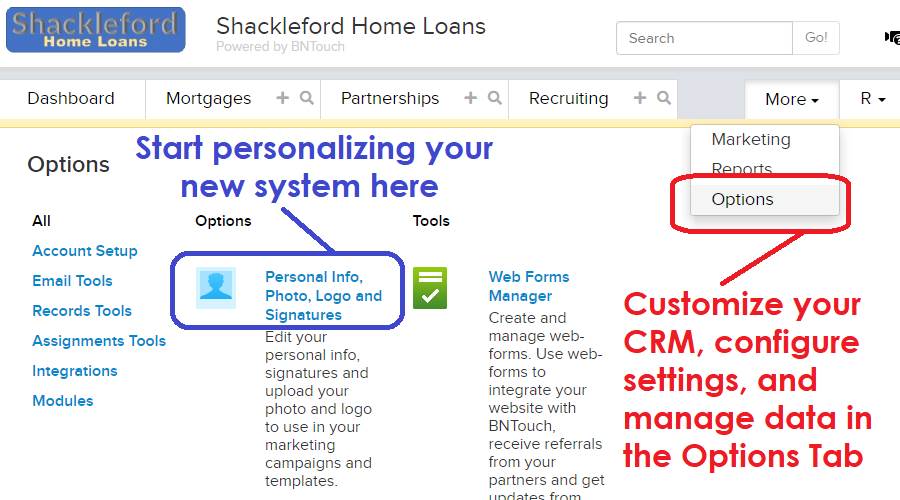
Personal Info,
Photo, Logos, and Signatures
Click the first section labeled, “Personal Info, Photo, Logo, and Signatures.”
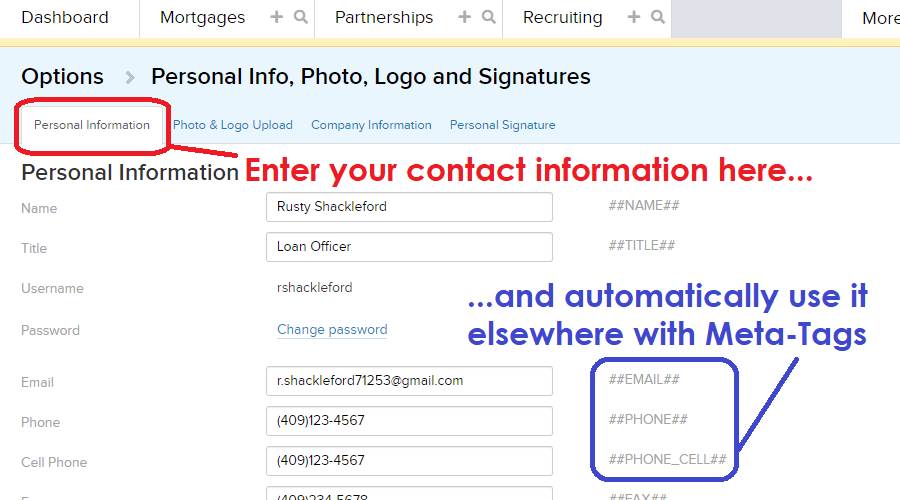
Details for your account should be entered in the “Personal Information”
sub-tab, including your name, contact information, website information, and
social networking links. Information entered here can be automatically inserted
elsewhere in the CRM through the use of Meta-Tags. By
using the hashtag phrases to the right of any of these fields, you can pull the
relevant information from this page into emails, templates, campaign steps, and
more.
In the “Photo & Logo Upload” sub-tab,
you can upload custom images to represent your office in your communication and
marketing. You can upload both high- and low-resolution versions of your photo
and logo.
The “Company Information” sub-tab will
show your BNTouch account information. These fields can only be modified by an
administrator account.
A customized signature can be configured
for emails and in-system communication in the “Personal Signature” sub-tab.
“Social Icons” can be added or removed here to provide links to your social
media platforms in your signature.

Predefined
Templates
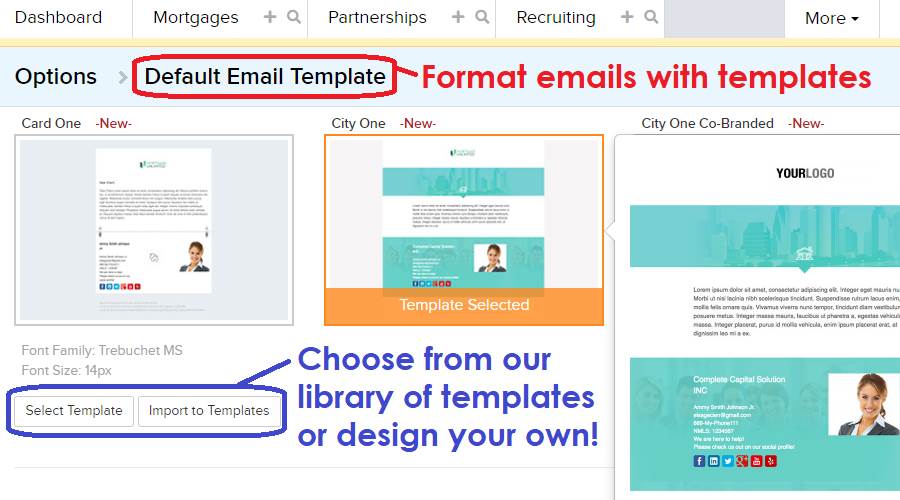
Back in the Options Tab, the “Predefined Templates” section can be used to
customize the formatting of the emails sent from your BNTouch CRM. Instead of
using a plain, text-only email, a template will automatically include your
contact information, photo, logo, and more. Click the “Select Template” button
to make any of the listed templates your default.
Created or uploaded templates can be
accessed using the drop-down menus at the bottom of the screen. Templates
specifically for Borrower or Co-Borrower Birthday emails can be selected as
well.
Mailbox
Preferences
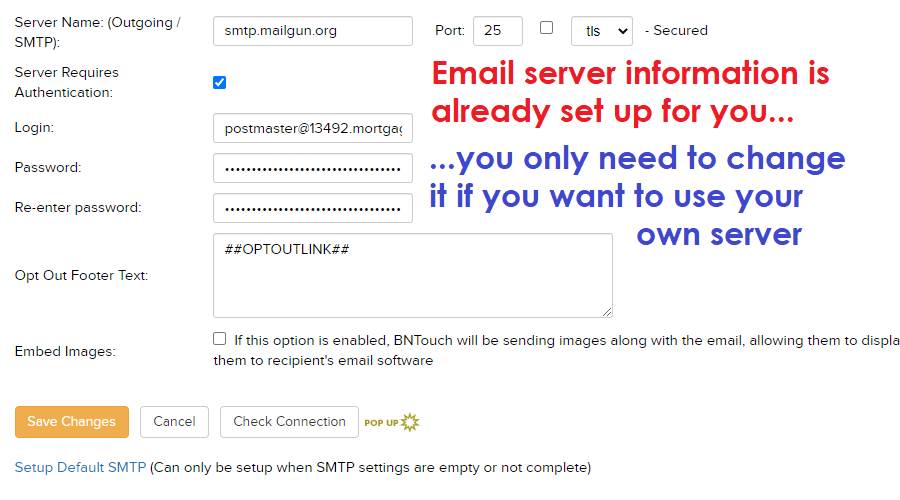
Email server settings can be modified in
the “Mailbox Preferences” section of the Options
Tab. By default, these preferences will be set to the BNTouch email server.
Unless you are very familiar with email server
settings, we recommend leaving the options here as they are.
If recipients of your emails ever report
your communications being erroneously reported as spam, you can use your own
email server by entering the relevant details here.
Importing Data
to BNTouch
Now that you have configured some
important options for your CRM, the next step is to start populating it with
borrower and partner information. Most software will allow the exporting of
data as a “.CSV” file, which can be imported to BNTouch. Alternatively, many
lead providers and LOS systems can sync with BNTouch to instantly update data
without needing to export a file and import it to your new CRM. Check with the
software or system you will be bringing data from to see which process will
work for you.
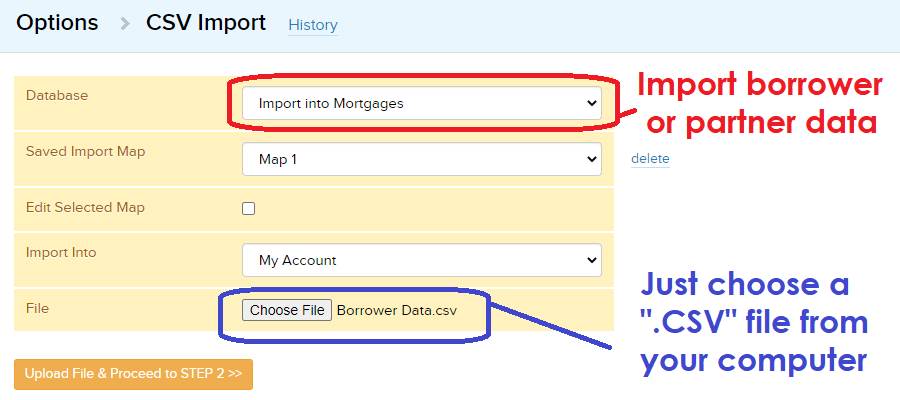
If you need to import data from a “.CSV”
file, open the Options Tab, scroll to the “Tools” section, and click “Import.” Choose whether you are importing
Mortgage/Borrower data or Partnership data using the drop-down menu. The
“mapping” options can be used when uploading future files to follow the same
pattern used in previous uploads. Click the “Choose File” button to select the
file you saved to your computer, then click “Upload File & Proceed to STEP
2.”
In “Step 2” of the import process, you
will first choose which fields in the “.CSV” file correspond to the fields in
your BNTouch CRM. Choose which fields match the fields in your data file,
making sure to select the “First Name,” “Last Name,” and “Email Address”
fields. Below, preferences for the imported data can be configured, including
the pipeline status and group for the imported records, duplicate record
identification and processing, and import map saving options. When finished,
click “Import with selected options” to bring the information into your CRM.
A summary of the imported records will
display. If any errors or mistakes have occurred, you can still reverse this
import by clicking the “History” link above. There, just find the import action
you accidentally performed and click the “Remove Records” link to the right.
Marketing “Safe
Mode”
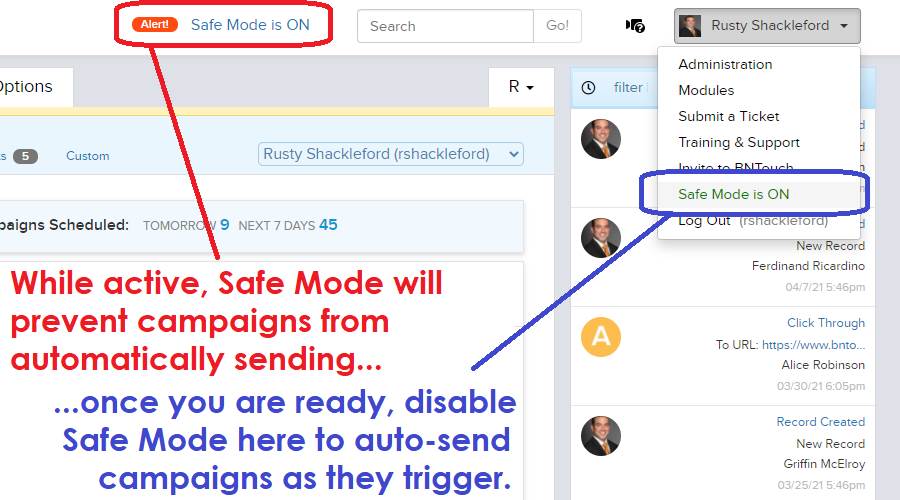
At the top of the screen, you may have
noticed an alert that “Safe Mode is ON.” Safe Mode prevents marketing campaigns
from sending automatically when triggered, instead holding them in a “pending”
area of your Dashboard Tab where you can choose which campaigns are sent and
when.
When you are confident with your
understanding of automated marketing in BNTouch, you can turn Safe Mode off
from the User Menu in the upper right corner of the screen. This will allow
your marketing campaigns to be sent automatically. Please note that any campaigns
held as “Pending” will be sent when you turn off Safe Mode. You should check
the “Campaigns”
sub-tab of your Dashboard and cancel any campaigns you do not wish to be sent
when you disable Safe Mode for your account.
What should I do
next?
Now that you have set up your account,
you’re ready to get the most out of your BNTouch CRM. To learn more about the
tools, features, and options available in BNTouch, please continue with the
rest of our Initial Training series. These articles and videos will walk you
through each tab of your new CRM and show you common workflows you can use in
your business. The next step in your Initial Training focuses on the Dashboard Tab, the first screen you will see
when you log in every day that serves as a “heads-up display” of your mortgage
business.
To learn more about any particular feature, check out our training video library and
online manual. You can access these at any time in the user menu in the
upper-right corner of your screen.
Want to Learn More?