Marketing – Quick-Setup Marketing Wizard
Automated
Marketing with the Quick-Setup Wizard
Automating your marketing campaigns is
the best way to save time and reach more clients and partners. However,
automated marketing involves many moving parts, and this complication can make
the entire process seem difficult or daunting. In the BNTouch CRM, you can use
the Quick-Setup Wizard to easily configure automation for your new marketing
campaigns. This tool will walk you through initial configuration of a campaign,
including the process of determining who the recipients of the campaign should
be, when the campaign should be applied to new records, and what criteria are
used to ‘trigger’ the campaign.
Starting Quick
Setup
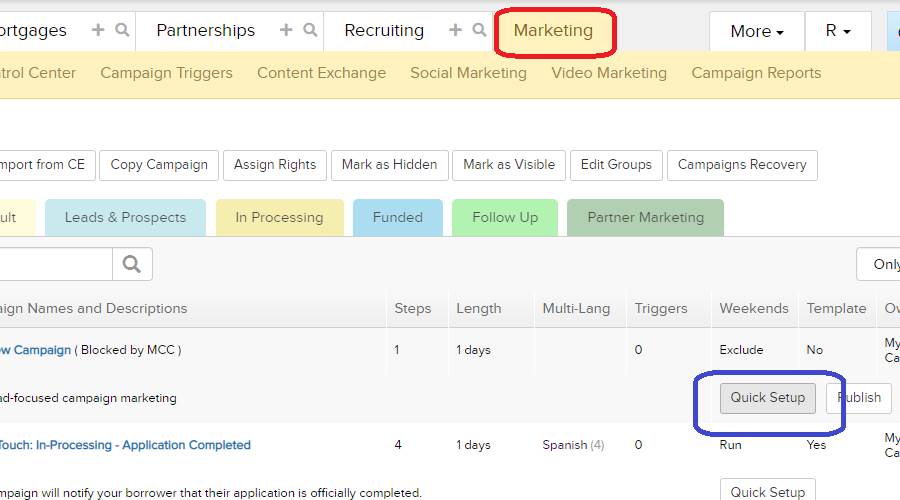
In the Marketing Tab of your CRM, the
first screen you should see is the Campaign List. If you are working elsewhere
in the tab, just click the “Campaigns” sub-tab to view this page. For each
campaign in your CRM, you’ll see a “Quick Setup” button to the right. When you
click this button, you’ll get a confirmation message; click “OK” to start the
Wizard.
The Quick-Setup Wizard will ask you a
series of questions about your campaign; your answers here will help configure
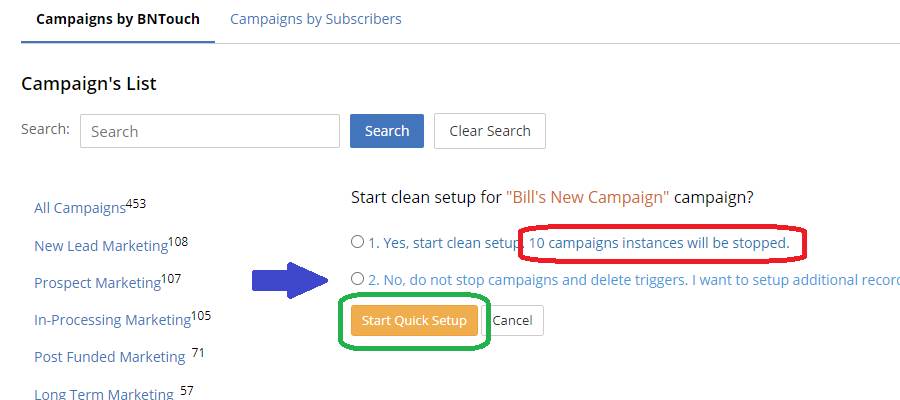
various campaign settings. The step is to decide whether you want to start a
clean setup for the campaign. If you choose “Yes”, the campaign will be stopped
for all current records and any existing triggers will be deleted. This option should only be chosen if you are
starting a new campaign. If you are simply adding new recipients to an existing
campaign that already is running for clients or has triggers set up, choose
“No” to avoid resetting it.
Once you have selected an option here,
click “Start Quick-Setup” to proceed to the next question.
Automated
Marketing & Campaign Target
The next question will determine what
records the campaign will add and start for automatically. For all answers that
start with “Yes,” the campaign will use automation triggers to add records
(according to the selected rules), then start for those records as soon as the
Wizard is finished. Additionally, records added in the future that meet these
criteria will be added to the campaign and started immediately. For the final
answer, “No, I will manually start campaigns”, the campaign will not use automation
to add recipients or initialize the campaign process. These campaigns will need
to be targeted and started manually.
Among the “Yes,” options, the answers
will determine what types of records will be added as recipients for the
campaign. “...for all records” will add all clients and partners to the
campaign with no further criteria. If you want only borrowers or only partners
to receive a campaign, use the “...for records in selected databases” option
and choose the appropriate database. If you select “Mortgages Database”, you
can use the “Add Extra Mortgage Conditions” to further refine the records for
the campaign. This way, you can only include borrower records with specific
sources, statuses, funded dates, loan purposes, loan terms, or fixed periods.
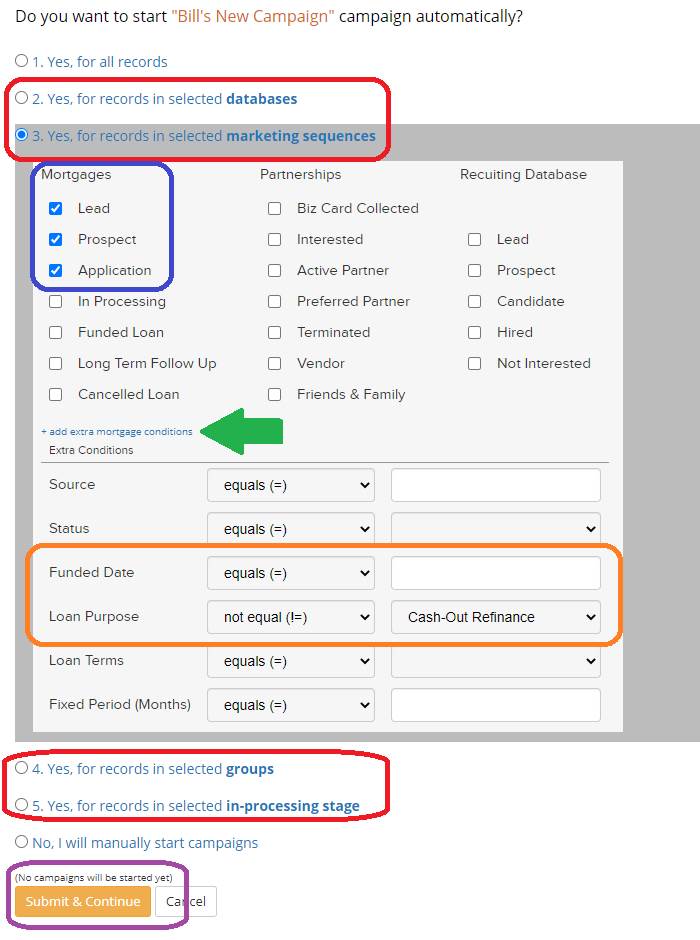
Alternatively, you can target a campaign
for only clients or partners that are in specific stages of your marketing
sequence. “...for records in selected marketing sequences” allows you to check
which stages will be eligible for the campaign. Like before, you can use “Add
extra mortgage conditions” to refine this process further.
Similarly, you can add only records of
specific groups to a campaign using “...for records in selected groups”. If the
campaign targets only records that are currently in processing, you can use
“...for records in selected in-processing stage” to choose which steps will
make a record eligible for the campaign.
Once you’ve made your selection, click
the “Submit & Continue” button below. This will not send out any campaign
steps yet.
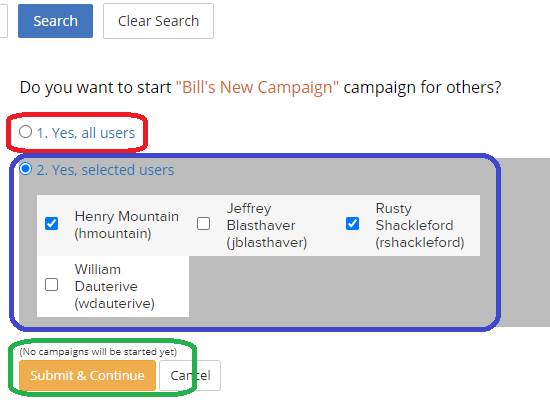
If you are logged into a marketing user
account, the next question will ask whether you want the campaign to start for
all user accounts or for only selected ones. If you choose the second option,
you will be able to choose users from your account list. If your user account
is not a marketing account, this question will not appear.
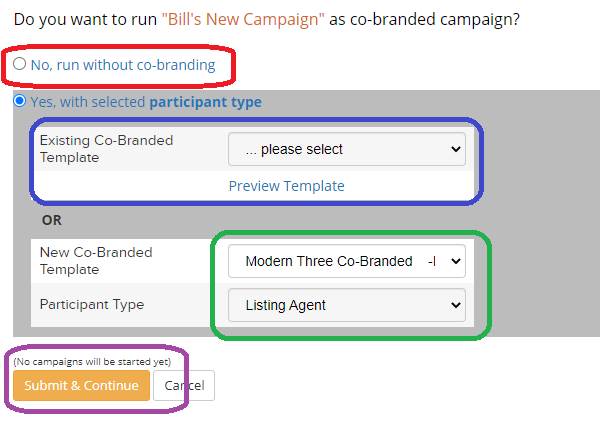
Co-Branding
Next, you will be asked if you are
creating a co-branded campaign. If you want both your own branding and that of
your participating partners to be added to the marketing material for this
campaign, click “Yes, with selected participant type.” You will be able to
choose from either an existing template for your account or select a new one,
and you can choose the partner types that you would like included in the co-branding
using the “Participant Type” menu.
If this campaign only needs your own
branding, simply choose “No, run without co-branding”.
When ready, click “Submit &
Continue”.
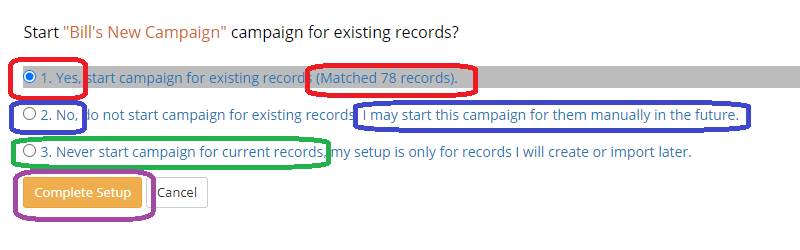
Current Record
Eligibility
The final step of the wizard is to choose whether
current records in your databases are applicable for this campaign. If you want
the campaign to be started for all applicable records, both those already in
your system and those you add in the future, choose “Yes, start campaign for
existing records”. The number of records that match the criteria you have set
will display.
If you don’t want the campaign to start for
your current records but do want it to start automatically for any new records
that match your criteria, choose the second or third options. “No, do not start
campaign for existing records” will not include records already in your system,
but will allow you to add them on a case-by-case basis in the future if you
desire. “Never start campaign for current records” will permanently exclude any
records currently in your system from being added to this campaign. Only
records that you create after this campaign is started can be added to it if
this option is selected.
Setup
Confirmation
Once you’ve made your final choice, click
the “Complete Setup” button below. A confirmation screen will appear, and
statistics will display representing the change that you made to the campaign.
If you performed a clean setup of an existing campaign, this will
show you how many records were removed from the campaign and how many triggers
were deleted. For all other options, you’ll also see how many records were
added to the campaign (from your current records) and how many triggers were
created according to your criteria.
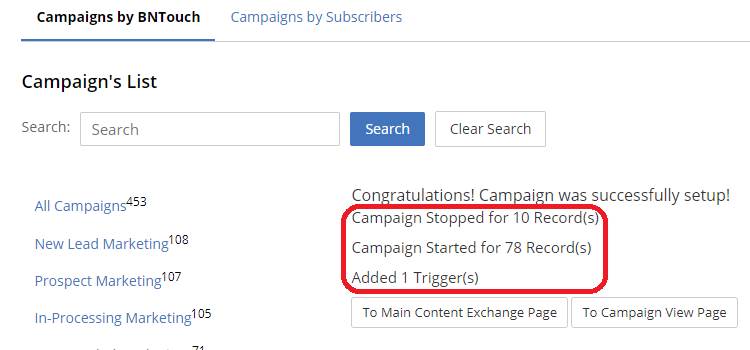
You can then use the “To Campaign View
Page” button to return to the Campaign List screen or “To Main Content Exchange
Page” to open the Content Exchange.
Quick Setup from
the Content Exchange
The Quick Setup Wizard can also be run
when you first import a campaign from the BNTouch Content Exchange. If you
aren’t familiar with this feature, please watch our “Downloading
Campaigns from the Content Exchange” training video in this series.
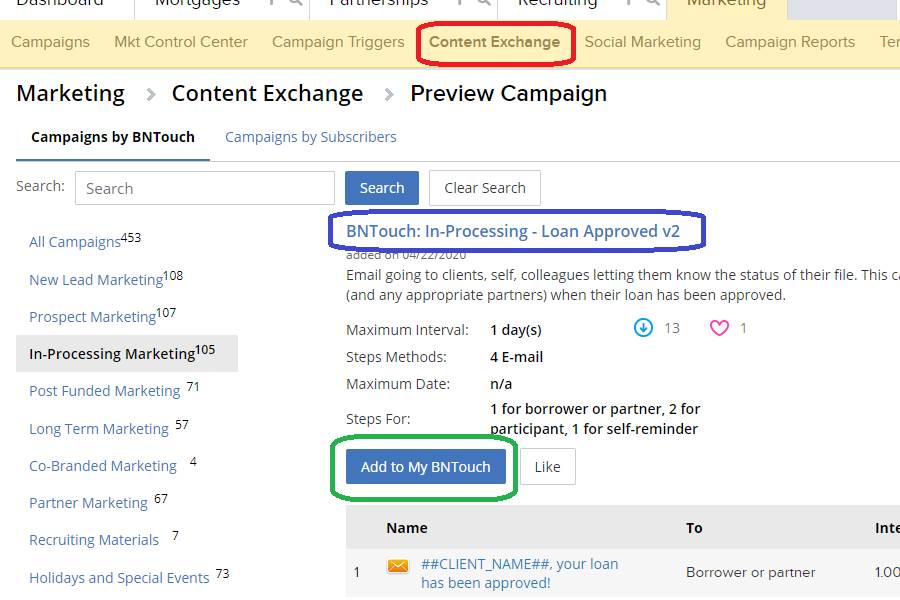
In the Content Exchange sub-tab, when you
find a campaign from BNTouch or another user that you want to add to your
account, you can click on the blue title to view more information about it. On
this screen, you can click the “Add to My BNTouch” button to start the
Quick-Setup Wizard and add the campaign to your Campaign List. The process will
be the same as before, but starting from the Content Exchange will let you
quickly bring new marketing campaigns into your CRM.
Want to Learn More?