Initial Training – Dashboard Tab
Stay on Top of
Your Business with the CRM Dashboard
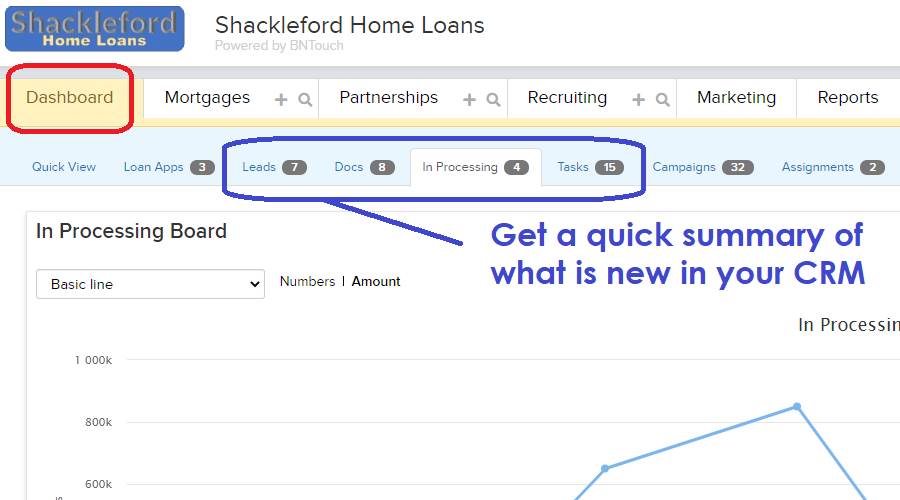
The first page you will see when you log
into BNTouch is the Dashboard Tab. This page will help you
understand and organize your daily tasks, and the information available here
will help you build your business. You can access the Dashboard from other
areas in your CRM at any time by clicking the “Dashboard” tab in the upper-left
corner of the screen.
Dashboard Tabs –
Record Information
Your BNTouch Dashboard is organized into
several sub-tabs, each containing useful tools and information. Most of these
tabs will show a number to the right if any new information is available that
has changed or been added since you last logged in.
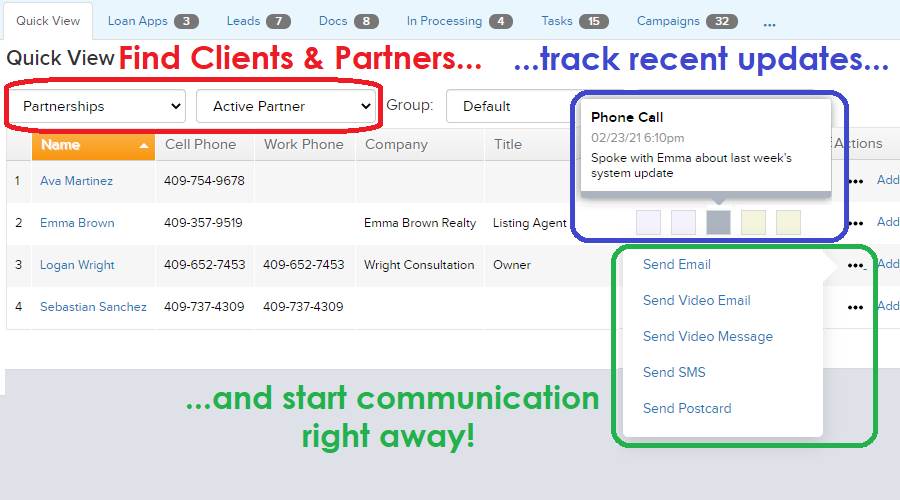
The first sub-tab, “Quick View,” allows you to search through your
records. Here, you can filter records by type, status in the pipeline, group,
and age. Records matching your criteria will list below, and you can open any
record by clicking the “Name” link. The “Actions” links to the right can be
used to communicate with the contact or add an event to the record.
“Loan Apps” will display a list of loan
applications that your borrowers have completed using the BNTouch online 1003
form. This list can be filtered to show incomplete, complete, or dismissed
applications, and any of the associated records can be opened directly by
clicking the “Borrower Name.”
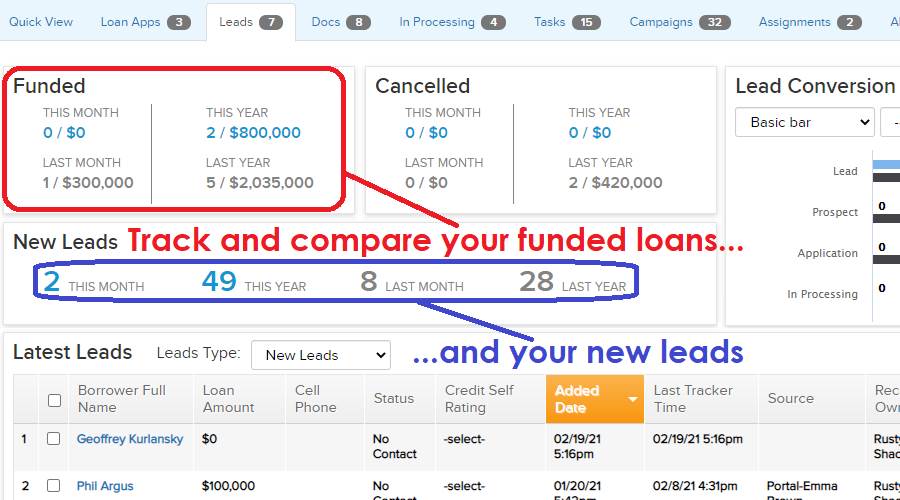
The “Leads” sub-tab provides a series of graphs and
statistics representing your new and progressing leads. Various chart styles
can be accessed using the “Lead Conversion” drop-down menu, and the data can be
filtered by source or month. Any chart displayed here can be printed or
downloaded using the context menu icon.
The “Docs” sub-tab can be used to review uploaded
documents in your records. By default, this list will show all documents
without a status. A document does not have any status when it is uploaded in
your CRM or by a borrower via a portal site, so this tab allows you to quickly
review, accept, or deny newly uploaded documents. You can filter the list by
document status, upload date, and file name using the menu at the top of the
page; this can be used to easily find documents throughout all mortgage and
partnership records.
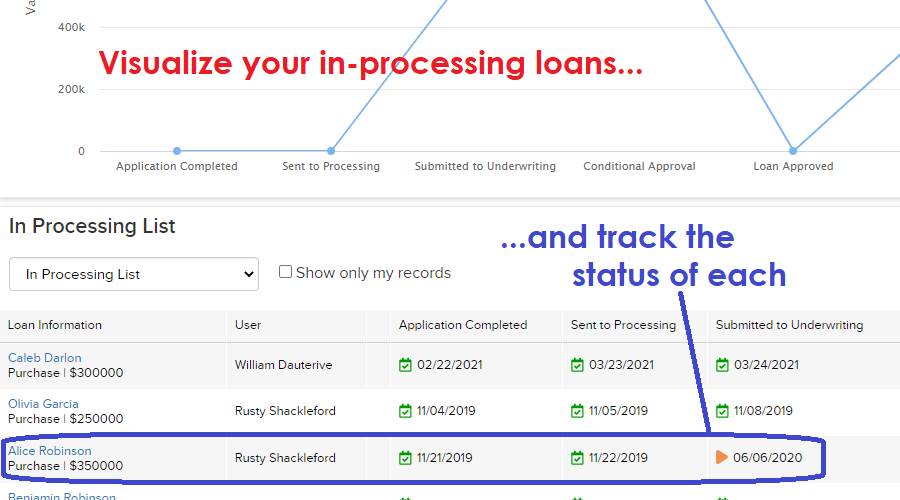
The “In Processing” board will provide a graphical
representation of your in-processing pipeline. As before, charts can be
changed, filtered, printed, or downloaded. Below, records in process can be
listed or displayed as reports.
Dashboard Tabs –
Task Management
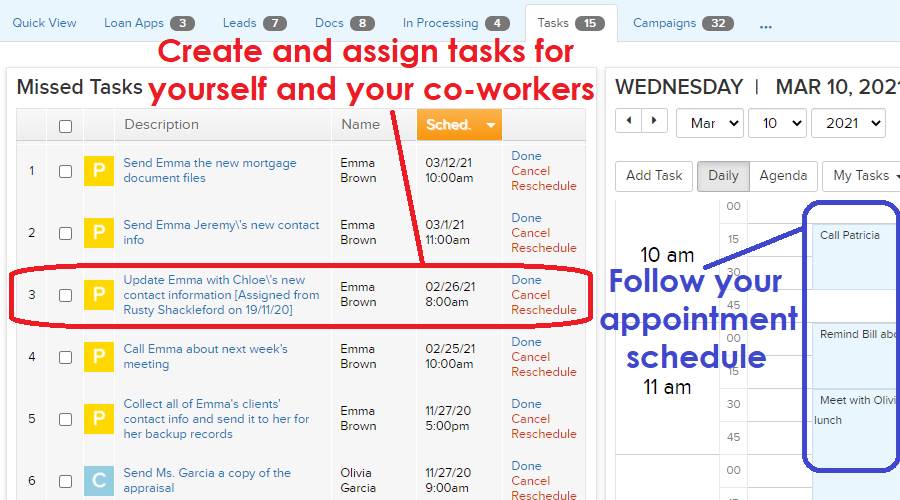
The “Tasks” sub-tab will display three
organizational tools: the Missed Tasks list, To-Do List, and Calendar. These
panels can provide a concise summary of your daily tasks in BNTouch.
Any tasks that have been assigned to you
elsewhere in the system and passed their deadline will automatically appear in
your Missed Tasks list. Here, you can mark them as “Done” or cancel them
outright using the checkboxes to the left and the buttons below. Tasks can also
be rescheduled individually. If the Phoneburner
module is enabled, you can send the records for any missed tasks to the dialer
queue from this list.
The To-Do List is used to remind yourself
to complete tasks that are not date-specific. New
entries can be added and assigned a priority using the “Add Entry” tab. The
list can be sorted and filtered by priority, and entries can be marked as
“done,” canceled, or deleted from the list using the checkboxes to the left and
buttons below. Multiple entries can be modified at once using the “Edit List”
tab, and a full list of all To-Do entries can be accessed using the “History”
tab. “Canceled” entries will still appear on this list, but “Deleted” ones will
not.
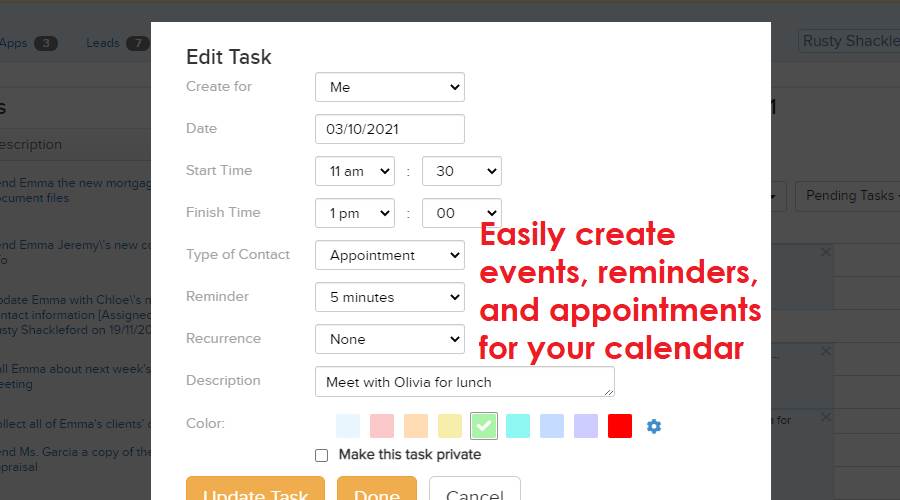
The Calendar can be used to set up tasks
and reminders for yourself. To create a new task, click the “Add Task” button
or click an open time on the calendar. Choose who the event is for, enter the
date, time, and type of event, and include a brief description. You can set a
reminder to appear for the event, which can be one-time or recurring. Private
tasks will only be visible by the user they are created for. When finished,
click “Add Task” to save the event in the calendar. Tasks added to the calendar
here will not be directly linked to a mortgage or
partnership record; however, tasks created from the Mortgages or Partnerships
tabs will be linked.
Days can be navigated using the arrow
buttons, the “Today” button, or selecting a date and clicking “Show.” To edit a
task on the calendar, simply click it. Any changes you make will save upon
clicking “Update Task.” Tasks can be filtered by user or status using the
drop-down menus. You can also sync your BNTouch calendar with other calendaring
programs by clicking the “iCal” button, copying the link, and updating your
calendaring program. This sync is one-way; external events cannot be imported
to the BNTouch calendar.
Dashboard Tabs –
User Interaction
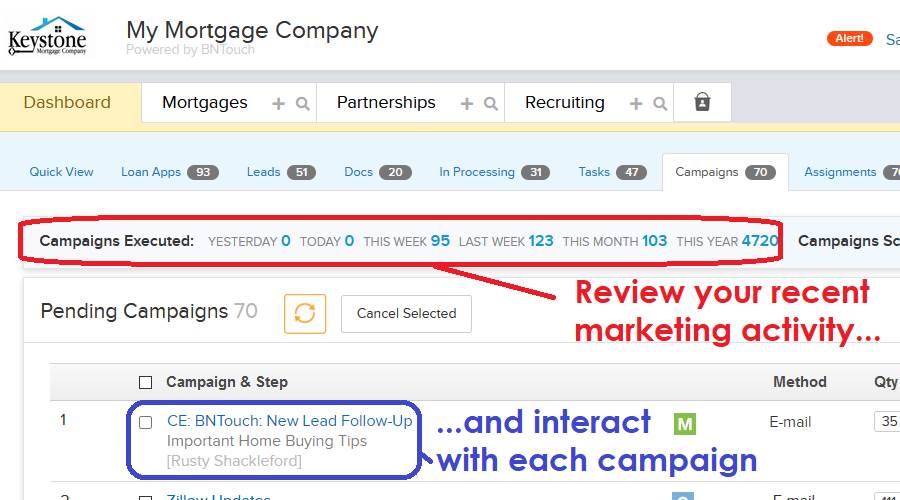
The “Campaigns” sub-tab will show a summary of your
current, pending, and recent marketing campaigns. This list can be updated
using the button above, and campaigns can be canceled from the list using the
checkboxes to the left and the “Cancel Selected” button. Campaign steps can
also be sent directly from this panel; in this way, emails can be sent while
still in “Safe Mode.”
“Assignments” will list any records pending
assignment to you, whether sent to yourself or from another user. These
assignments can be accepted, denied, or canceled here, and a history of your
assigned records can be found below. Records cannot be assigned here; they can
be assigned to you or others in the Mortgages or Partnerships tabs.
The “Alerts” sub-tab will keep you up-to-date on
any upcoming birthdays or loan anniversaries for your clients and partners.
These reminders are separate from any birthday- or anniversary-related
campaigns. You can click any of the names here to access the corresponding
records, and actions can be taken directly from these lists to contact the
relevant people.
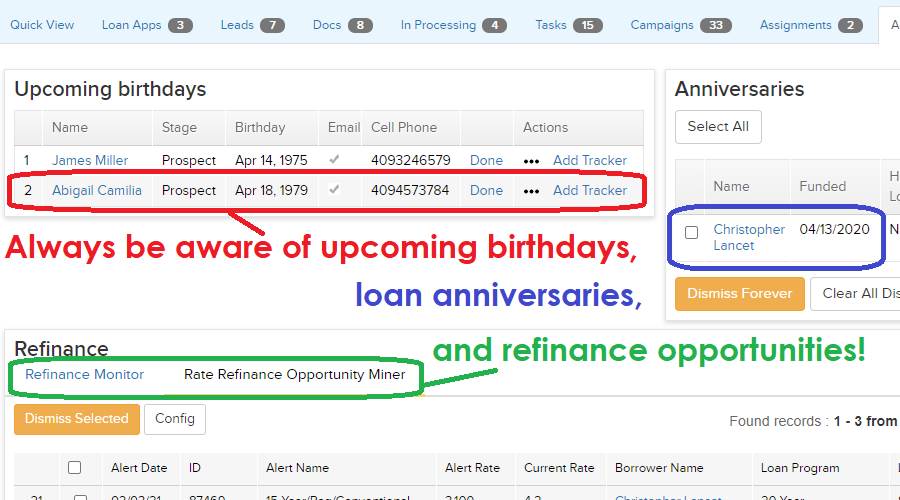
Below, the Refinance Monitor panel will
appear. Current refinancing rates can be set here using the “Change” link. Each
night, loans will be checked automatically and any clients in your records with
rates above the newly-changed rate will be listed
here.
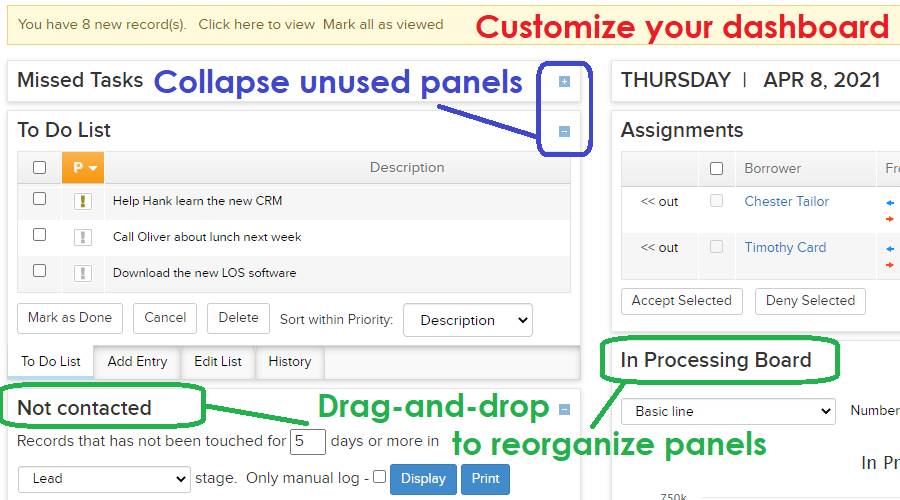
The “Custom” sub-tab can be used to configure your
own BNTouch dashboard. Panels from other Dashboard tabs can be found here, and
these panels can be dragged-and-dropped, collapsed and
expanded, and organized to fit your needs.
Finally, the “Calendar” sub-tab will display an expanded
version of the calendar panel from the “Tasks” sub-tab. This can be useful for
seeing an entire week or month at a glance,
rescheduling appointments, and more.
Other Helpful
CRM Tools
Outside the “Dashboard” tab, additional
convenient options are available to the right of your screen.
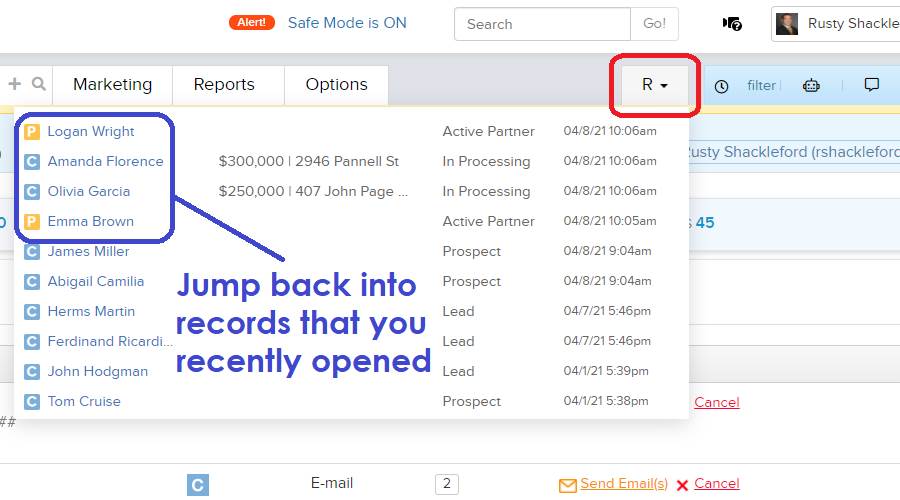
The “Recent Files” tab is a drop-down
menu that will show the last few records that you’ve opened. This list is
available wherever you are in the BNTouch CRM, and you can reopen any of these
records by clicking the record name.
The “Reports” screen can generate
informative reports of various information in your CRM, some of which can be
exported or downloaded for your records.
The panel on the far-right side of the
screen will show the latest relevant information in your BNTouch CRM. Clicking
the clock icon will show the Tracker, a list of all recent events in your
schedule. These results can be narrowed using the “Filter” checklist. The
speech bubble icon can be used to see all communications you have sent or
received from your clients, partners, and staff.
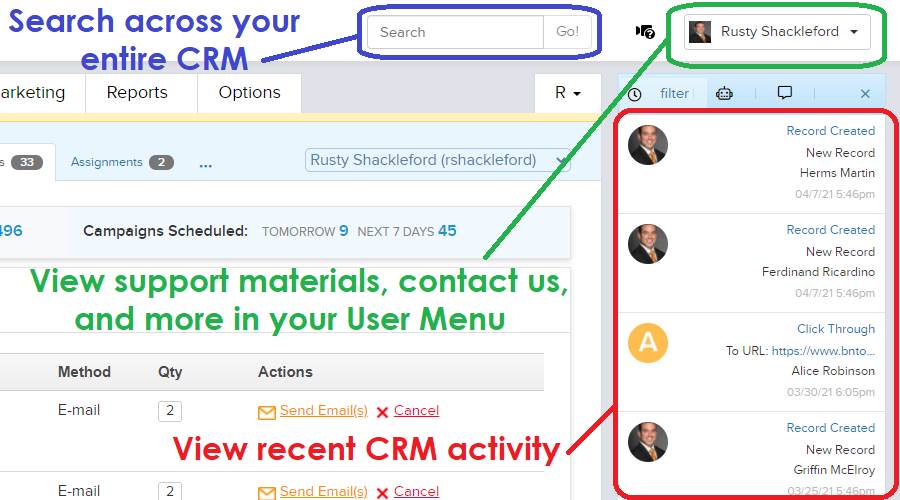
If you need to find anything in your
BNTouch account, you can use the search bar in the upper-right corner to access
records, campaigns, and much more.
If you can’t find what you’re looking
for, you can access BNTouch support by clicking the user menu. Here, you can
submit a ticket to our staff, view our training and support materials, or even
invite your colleagues to join BNTouch!
What should I do
next?
To learn more about the tools, features,
and options available in BNTouch, please continue with the rest of our Initial
Training series. These articles and videos will walk you through each tab of
your new CRM and show you common workflows you can use in your business. The
next step in your Initial Training focuses on the Mortgages Tab, the database that contains all
of your borrower records.
To learn more about any particular feature, check out our training video library and
online manual. You can access these at any time in the user menu in the
upper-right corner of your screen.
Want to Learn More?