Initial Training – Mortgage Records
Managing Mortgage
Records in BNTouch
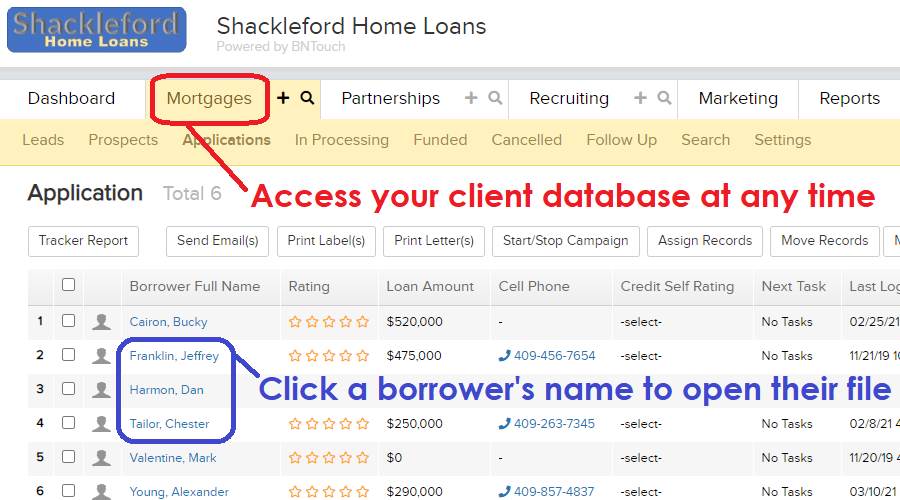
Each borrower will have a unique record
in the Mortgages Tab of your BNTouch CRM. No matter how the record was added to
your system, you can open them by clicking the Borrower Name links throughout
BNTouch--including the Dashboard,
the Mortgage
Record List, or anywhere else. This guide will focus on editing and using
existing borrower records; to learn more about adding mortgage records to your
system, please read the “Mortgages
Tab” Initial Training article.
Editing a
Borrower Record
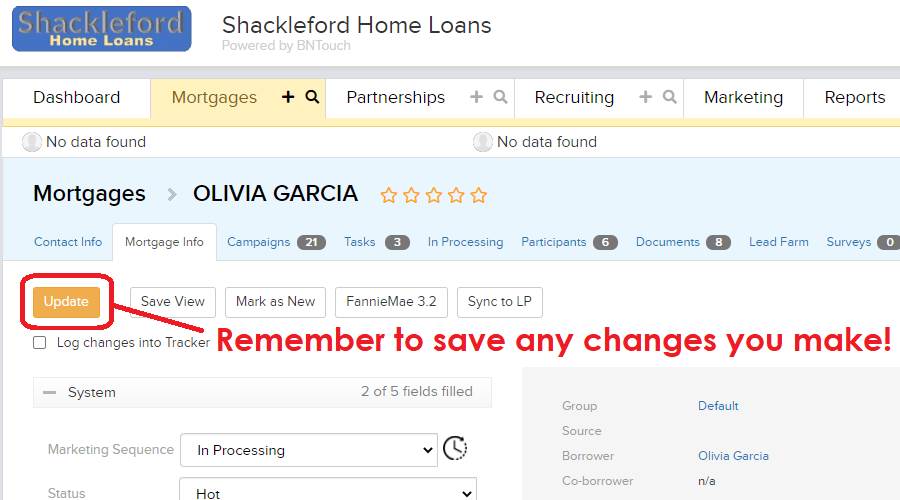
When you open a client’s file, you will
quickly notice that each record has several tabs of information that you can
add, edit, and use. Before we go through the sub-tabs and explain what options
are available in each one, remember that you can save any changes you make
while editing a record by clicking the “Update Record” at the top or bottom of
the page.
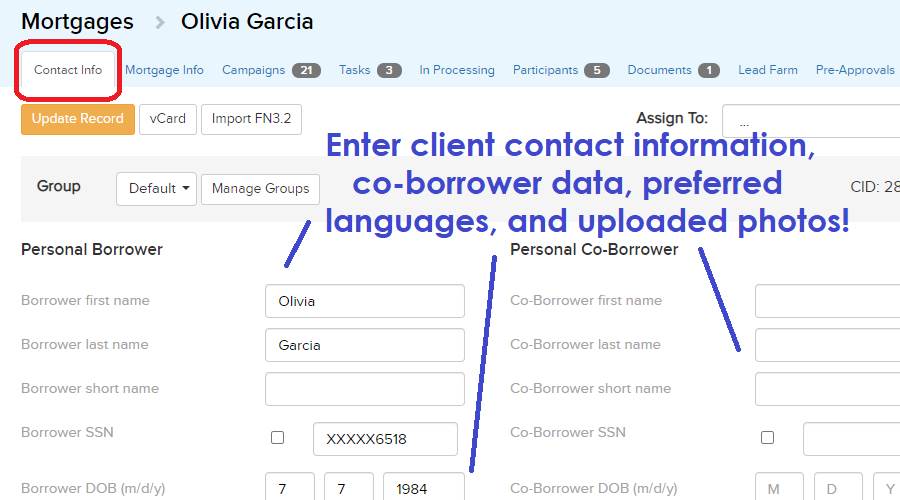
Contact Info
The first sub-tab, Contact
Info, contains basic information for the borrower, including their address,
co-borrower details, contact information, and social media links. The
“Preferred Language” field can be set here to ensure they receive the most
effective marketing material. A photo and logo can be uploaded for each record
to personalize each borrower in your CRM.
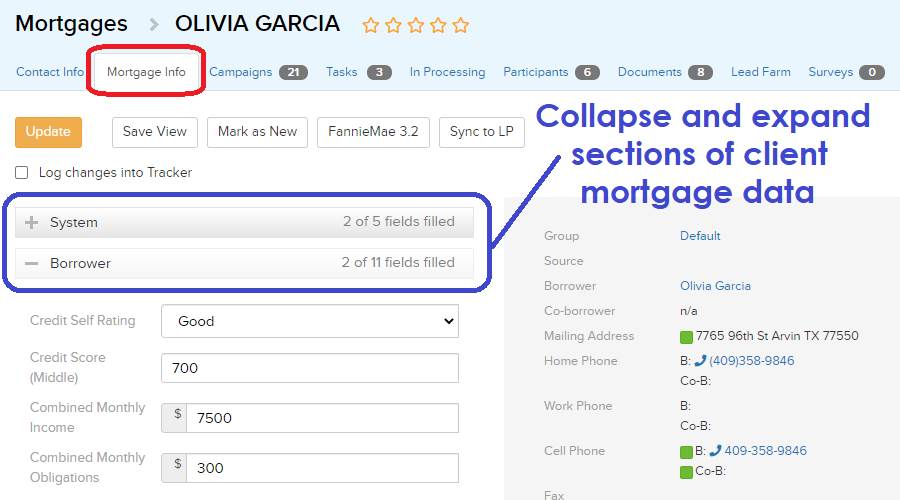
Mortgage Info
Specific details for the borrower’s
mortgage can be managed in the Mortgage
Info sub-tab. Here, data fields are organized into collapsible sections
that can be expanded or hidden by clicking the section header. The current status of collapsed and expanded fields can be saved
for the record using the “Save View” button at the top of the record. The “Mark
as New” button will make the record appear in bold in the Mortgage Record List
as if it had not been opened yet.
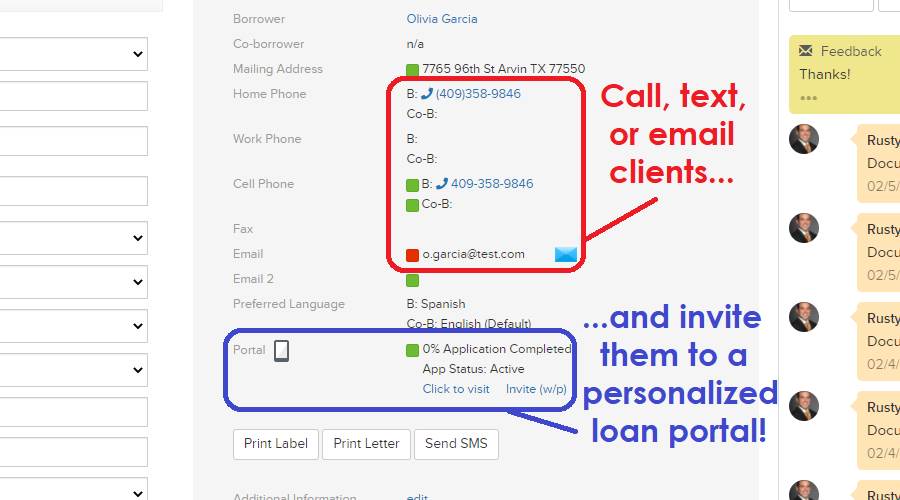
The area to the right will be an overview
of the record in your system. The green buttons can be used to opt the borrower
in or out for mailing, calling, emailing, or borrower portal communication. The
portal “Invite” link can be used to invite the borrower to access their portal
site. The buttons below can be used to instantly send an email, letter, or SMS
message to the borrower and/or co-borrower if you have the requisite modules
enabled.
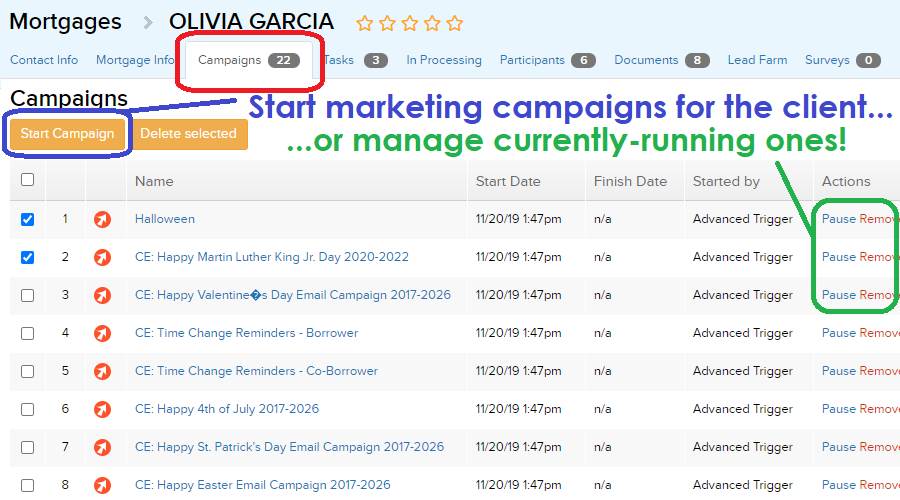
Campaigns
Any automated marketing campaigns that
have triggered for this record will be listed in the Campaigns
sub-tab. Campaigns that have been manually added to the record will also
appear. Depending on your user permissions, buttons will appear above the list
that can be used to start new campaigns or pause pending ones. Individual
campaigns can be paused or resumed by clicking the “Pause” and “Run” links to
the right. To view the status of a campaign, simply click the campaign name.
Tasks
The Tasks
sub-tab will display any tasks that have been linked to this record. New
tasks can be added for this borrower by clicking the “Add Task” button.
Existing tasks on the list can be rescheduled, marked “Done,” or canceled using
the links to the right. Below, separate tabs are available for viewing pending
tasks or all tasks for this borrower.
Tasks created here will appear in the “Tasks”
panel of the Dashboard tab. When you create a task from a borrower record, the
task can be linked to that record.

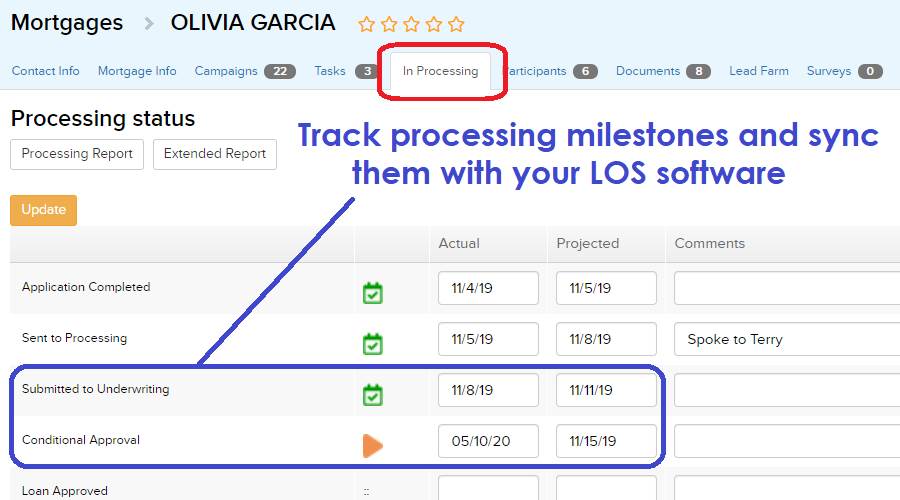
In Processing
The In
Processing tab is used to track the dates of each milestone the borrower
reaches in the loan process. Dates can be modified manually here by changing
information and clicking the “Update” button. If your CRM is set to sync with
your LOS or other services, these dates will automatically update. Any changes
to dates here can trigger relevant marketing campaigns.
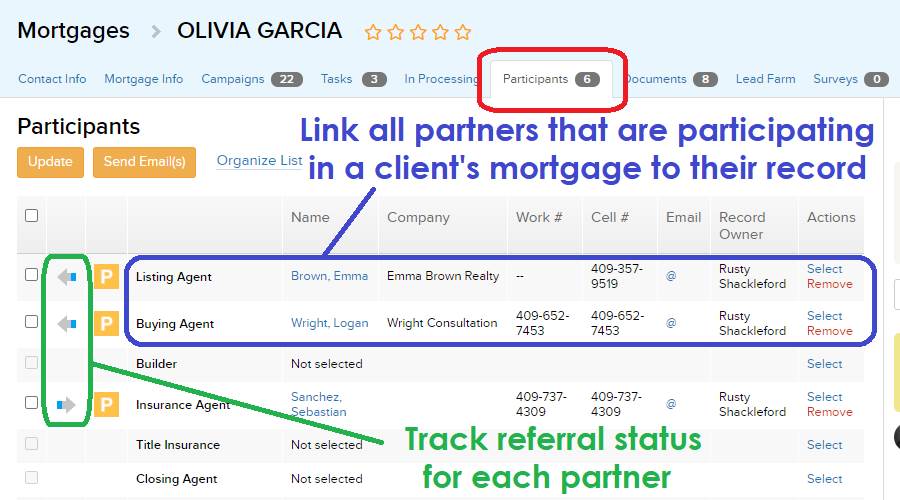
Participants
Any partners involved with a record will
be listed in the Participants
sub-tab. Partners can be added to or removed from the record from this list
using the links in the “Actions” column. Changes made to the record can be
saved using the “Update” button, and email messages can be sent to selected
partners using the “Send Emails” button.
Documents
In the Documents
sub-tab, files can be uploaded and managed for your own use or for
transmission to clients. This list will show files that you and other users
have uploaded as well as those submitted via borrower portals.
New files can be uploaded using the “Add
Document” button. Here, the file can be selected, a brief description can be
entered, and notifications can be sent to applicable clients and partners. The
file will be added to the record list once you click the “Upload Files” button.
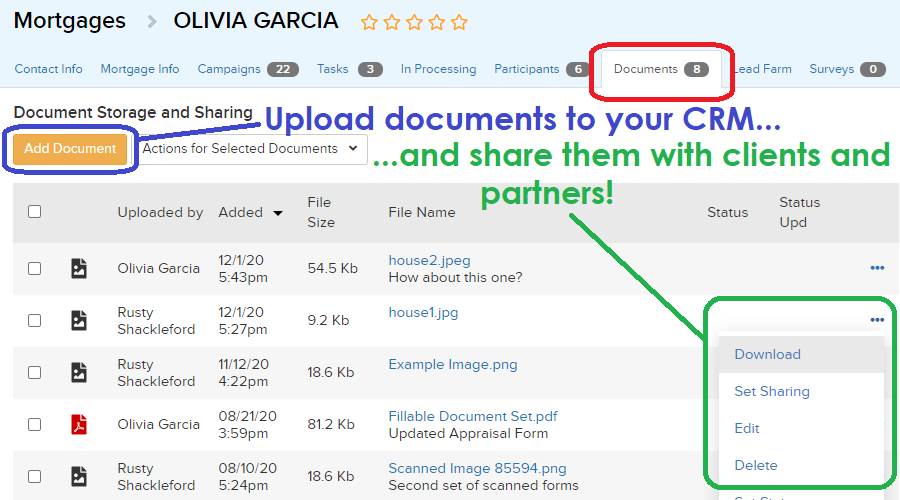
In the list, files can be downloaded by
clicking the “File Name,” editing by clicking the pencil icon, or deleted using
the “X” icon. Multiple files can be downloaded, deleted, shared, or given a
status using the checkboxes to the left and the buttons above the list.
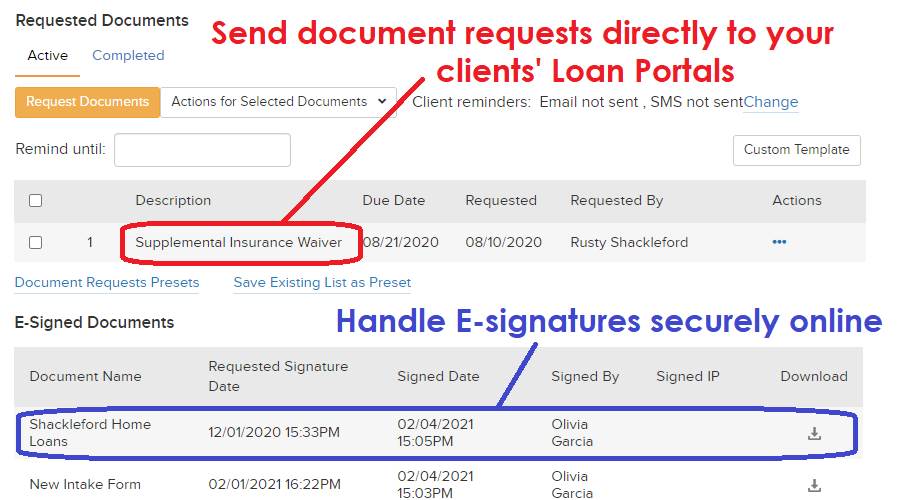
Documents can also be requested by
clicking the “Request Documents” button. Enter a description of the document
you are requesting and a date by which the borrower needs to upload it.
Checking the boxes below will send an email notification to the borrower and
co-borrower once you click the “Request Documents” button. Any documents you
have requested and that the borrower has uploaded to
their borrower portal will be accessible in the Requested Documents list.
If you routinely request similar sets of
documents from your borrowers, you can save them as a Preset by clicking the
“Save Existing List as Preset” link. You can then enter a name for the Preset
and click “Save Preset.” Later, you can click “Document Requests Presets” to
choose a Preset and instantly request all documents therein.
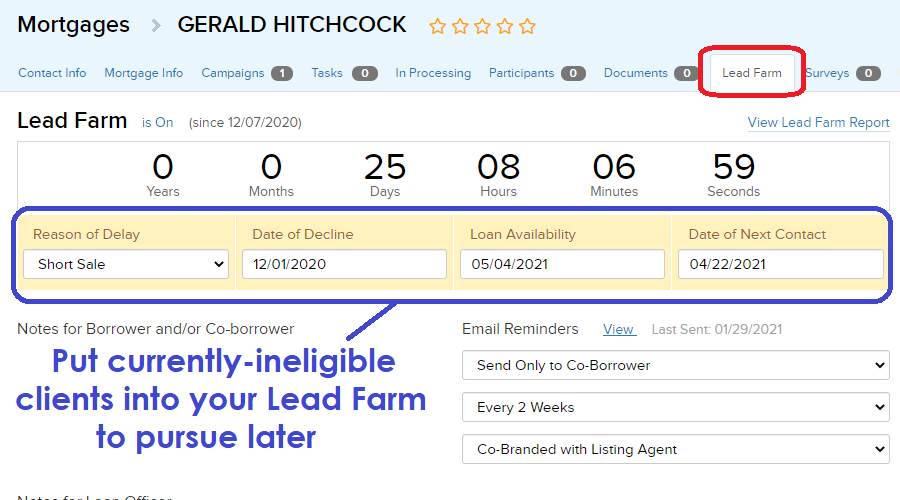
Lead Farm
If enabled, the Lead
Farm sub-tab can be used to help grow your leads into deals. Borrowers who
are not currently eligible for a loan can be placed into the Lead Farm for
future communications and tracking.
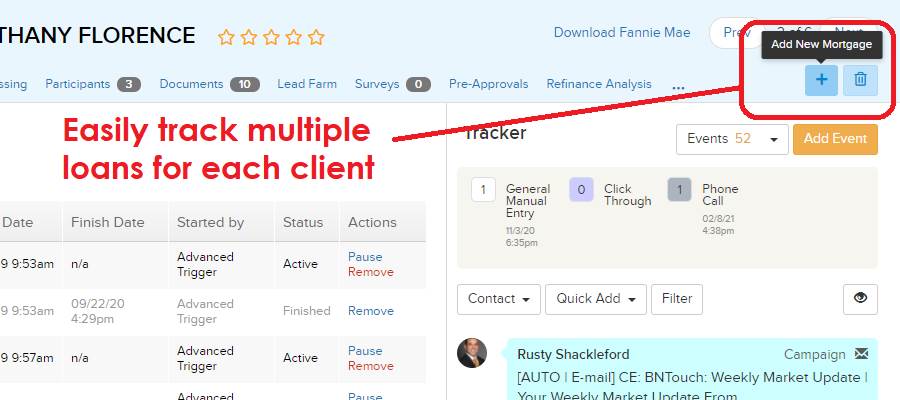
Select Loan
If a borrower has multiple
loans in your record, you can switch between them using the “Select Loan”
drop-down menu. New loans for a record can be added using the “Plus sign”
button, and additional loans can be removed from the record using the “Minus
sign” button.
Event Tracker
In addition to the sub-tabs available in
a record, a “Tracker”
column will appear to the right for each record. This tracker displays a list
of all communication and events that have taken place between the borrower and
your office, including tasks, marketing campaigns, emails, and more. The events
on this list are customized for your account by your administrator.
New tracker events can be added directly
to the borrower record using the “Add Event” button. The type of event can be
chosen from the drop-down menu, and a description can be entered. The
checkboxes below can be used to make the event visible to the borrower and
partner via Portal site or to send email notifications to the borrower,
co-borrower, and/or participating partners. Any of these options can be set as
the default for new tracker events using the “Save as Default Settings” button,
and this default can be removed using the “Reset” button. The event will be
added to the record’s tracker when you click the “Add” button.
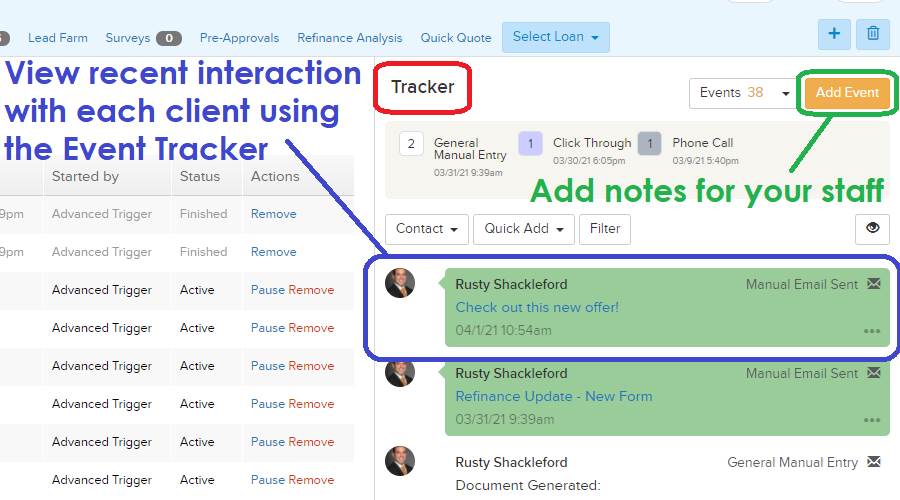
The box at the top of the tracker will
show a quick summary of recent events involving this record. The number of each
type of event will be displayed, and the types of events listed here can be
selected using the “Events” drop-down menu above.
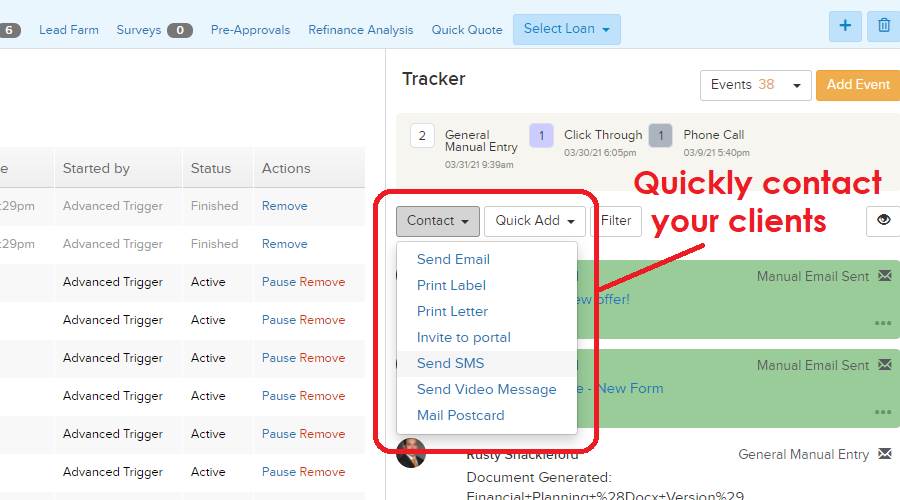
Various communications can be easily
generated using the “Contact” drop-down menu. The “Quick Add” menu can be used
to manage and create tracker events that can be added to records with a single
click. To change the number of recent events that appear in the tracker, click
the “Eye” button to the right.
What should I do
next?
To learn more about the tools, features,
and options available in BNTouch, please continue with the rest of our Initial
Training series. These articles and videos will walk you through each tab of
your new CRM and show you common workflows you can use in your business. The
next step in your Initial Training switches gears to focus on your Partnerships
Tab – where you can manage data for realtors, agents, and other loan
participants that you work with for mortgage clients.
To learn more about any particular feature, check out our training video library and
online manual. You can access these at any time in the user menu in the
upper-right corner of your screen.
Want to Learn More?