Administration – Mailboxes Tab
Customizing
Mailbox Settings
By default, BNTouch takes care of your
email server settings for communication through your CRM. This means that your
emails will be sent through the BNTouch server. The benefit of using the BNTouch
server is that everything is already set up for you. Some businesses prefer to
use their own private server for their email communications. If recipients of
your emails ever report your communications being erroneously reported as spam
or bulk, you may instead consider using a server associated with your domain
name. Custom mailbox settings can be customized on a per-user basis in the
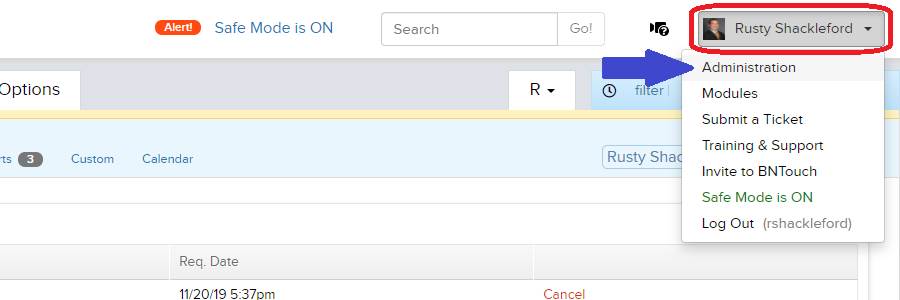
“Mailboxes” tab of your CRM Admin. In the User Menu in the upper-right corner
of the screen, click “Administration,” then open the “Mailboxes” tab.
Only administrative users can access this
area of the CRM; please contact your administrator if you need help and do not
have access. Also, we recommend that you only change these email settings if
you know exactly what you are doing and have the email server details easily
available.
User Mailbox
Settings List
Here, you’ll see a list of all users for
your BNTouch account sorted by name. For each user, default options for email
server settings will appear in rows below. The first row is a “default
settings” row; whatever you enter in the fields of this row will automatically
apply to any new user accounts you create. The settings here will not copy to
already existing accounts; any changes will need to be made directly to the
user’s settings below.
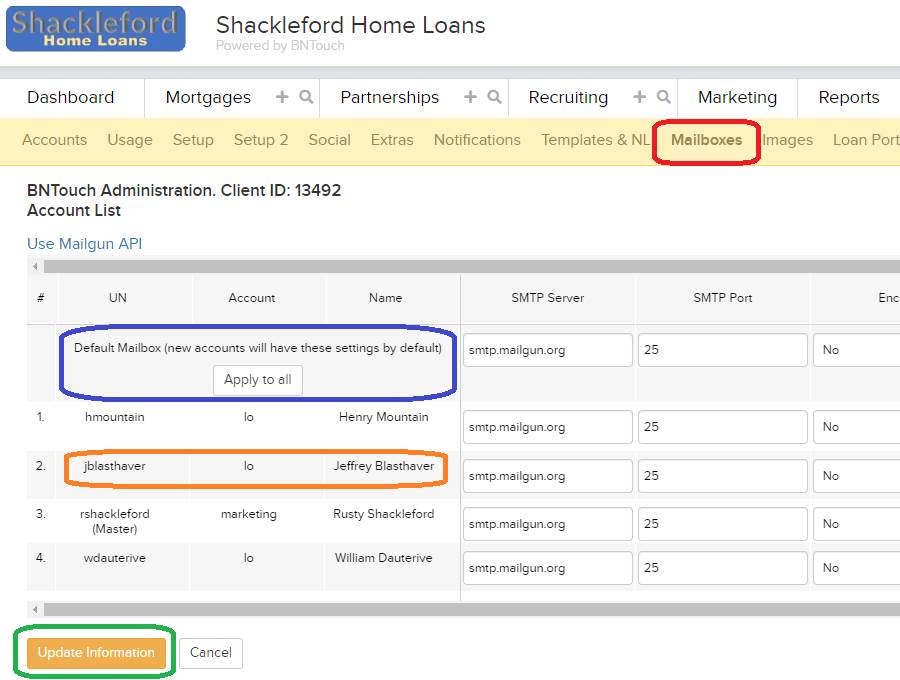
Each user will have fields listed to the
right for email server settings. If you have a corporate, GoDaddy, Gmail, or
other email server, you can enter the information for that server in these
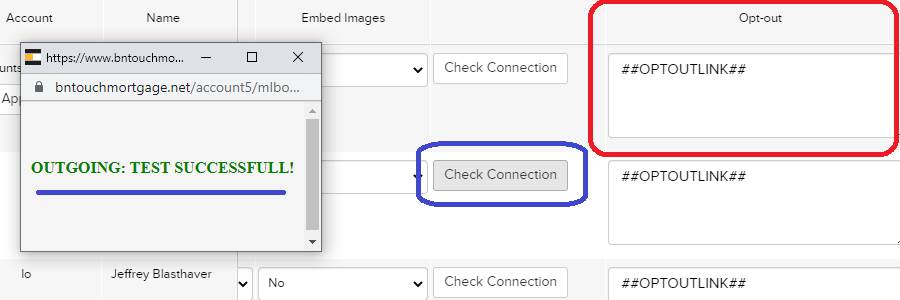
fields. You can also enter an Opt-out message for that user’s email
communications in the field to the right. Meta-tags can be used in this field
to automatically pull information from your CRM data. Be sure to always include
the “##OPTOUTLINK##” meta-tag in these messages; this tag ensures that the link
for opting out of this user’s emails will be specific to the particular
client it was sent to.
If you make any changes to fields on this
list, they will only be saved if you click the “Update Information” button
below. If you cannot see all of the fields in this
list, you can use the scroll bars to change which fields display; the username
and account type will still be visible when you do so.
Once you have saved the information on this
page, you can check the connection of your custom email server by clicking the
“Check Connection” button for a user. If so, you will see a “Connection is
Success” message.
Want to Learn More?
