Marketing – Social Media Integration
Managing Leads
and Audiences from Facebook
In BNTouch, you have
the ability to integrate your Facebook Ads account with your CRM,
allowing you to import leads from your company’s Facebook account and create
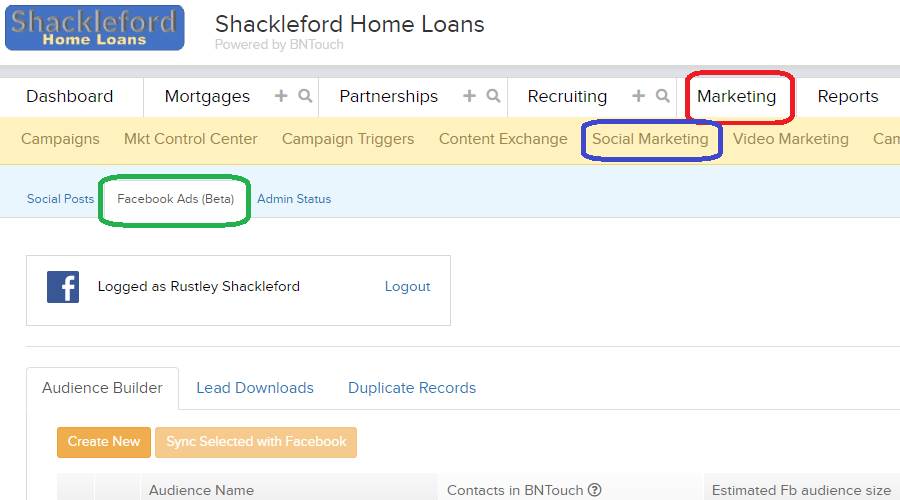
“Audiences” of CRM records for your advertising. To sync these accounts, open
your Marketing Tab and click the “Social Marketing” sub-tab. If you can’t see
this option, click the “More” drop-down menu in the upper-right corner of the
screen to display other sections.
Here, the options available for social
media integration are separated into three categories: “Social Posts”,
“Facebook Ads”, and “Admin Status”. The latter option will only display for
administrative accounts. This article will focus on the second section: “Facebook
Ads”.
Creating Audiences
for Facebook Ads
If you run ads using the Facebook Ads
service and would like to show them specifically to your BNTouch leads,
clients, and partners, you can add them as “Audiences” that will be eligible to
see these ads. These can be managed in your Facebook Ads account manager in the
“Audiences” section.
Before creating an Audience, you need to
sync your Facebook Ads account with your BNTouch CRM. This will be a similar
process to connecting your social media accounts before. If you already have
this account synced, you will see “Logged as” displayed here and have a
“Logout” option to disconnect the account.
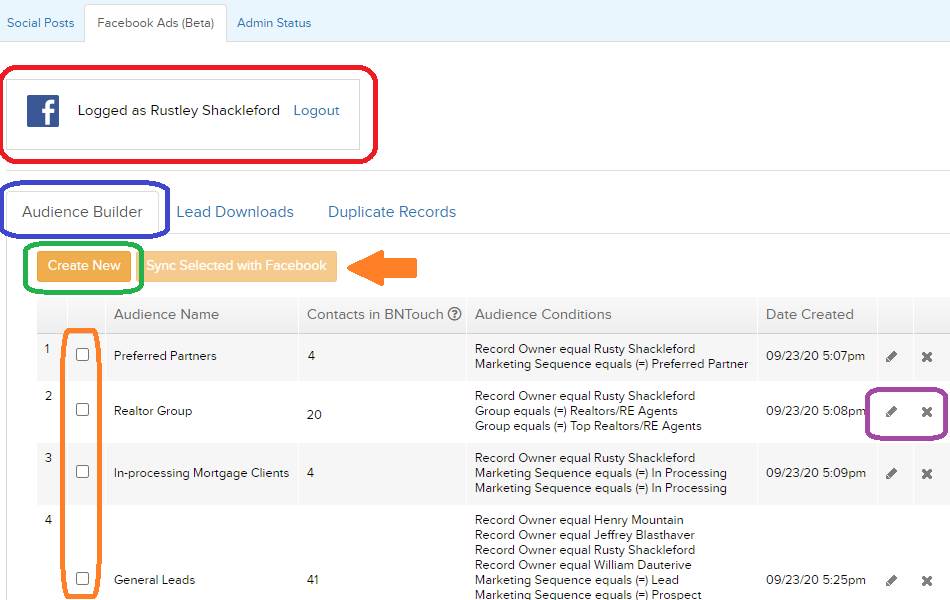
Below, you will see a list of any current
audiences created in your CRM that can be synced to Facebook Ads. To make a new
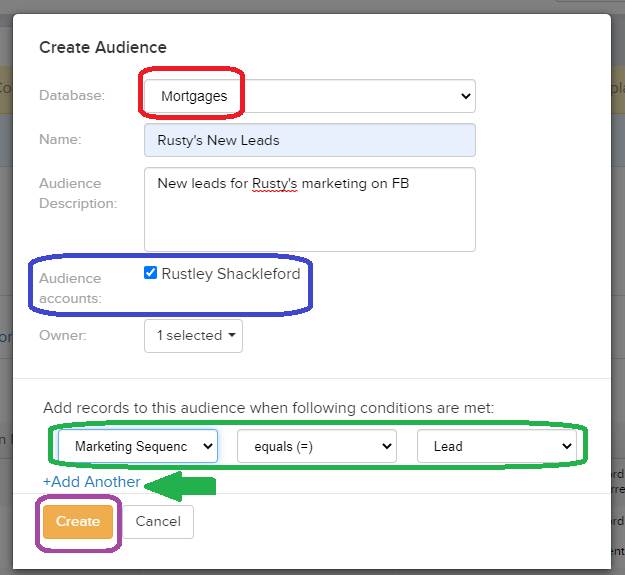
one, just click the “Create New” button above the list. In the pop-up that
appears, you can choose which database of records you want to include, enter a
name for the audience for your own organizational purpose, and add a brief
description. Use the checkboxes below to select which Facebook Ads accounts you
want to sync the audience with, then choose which CRM users’ records will be
included in the audience.
Below, you can enter filter criteria in
the same way you would add Campaign Triggers to a marketing campaign. Click
“Add Another” to add a filter. For the filters, choose what record fields will
be searched, how they will be searched, and what content will form the criteria
for inclusion in the audience. For example, you may wish to show some ads just
to clients whose “Marketing Sequence” “Equals” “Lead” or whose “Loan Purpose”
“Does not Equal” “Purchase”.
Once you have all filters entered, click
the “Create” button to add the audience to your list.
You can edit or delete audiences from
this list using the icons to the right, and you can sync them with your
Facebook Ads account at any time by checking the boxes to the left and clicking
the “Sync Selected with Facebook” button above. If you do not wish to do this
manually, your audiences will sync with Facebook overnight.
Importing Leads
from Facebook
In the “Lead Downloads” section, you will
see a separate list of imported records from Facebook. To import records this
way, you will need to create one or more campaigns in Facebook with a “Lead
Generation” objective. From your Facebook Ads Manager, be sure the ad you
create uses the “Lead Generation” form for the “Consideration” objective.
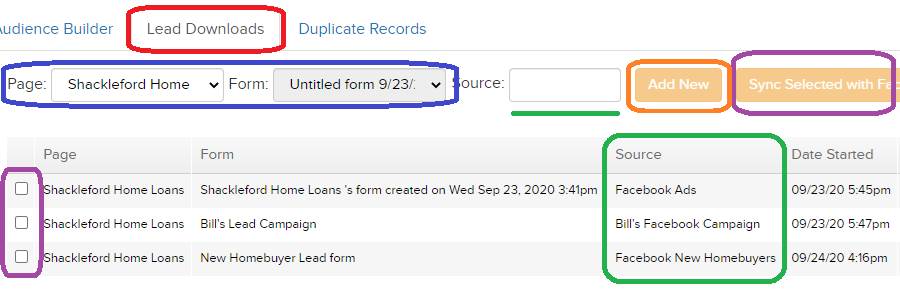
In your “Lead Downloads” list of your
CRM, choose the advertising page with your Lead Generation form from the “Page”
drop-down menu. Then, select the form from the next menu. In the “Source”
field, enter text that you would like to appear as the lead source for these
leads in your CRM. Once ready, click “Add New” to set up the lead download
source.
You can download new leads from Facebook
manually using the checkboxes to the left and the “Sync Selected with Facebook”
button above the list. Alternatively, the leads will be synced automatically
overnight. New leads from Facebook should be downloaded to your BNTouch account
within 15 minutes of their creation in Facebook.
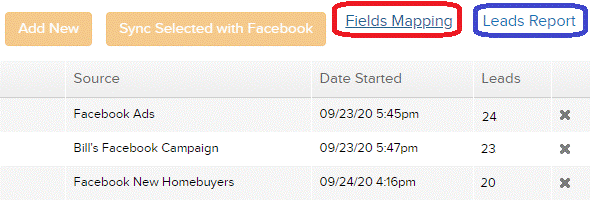
To customize which information is entered
to each record field in your CRM when importing leads from Facebook, click the
“Lead Mapping” link. Here, you can select which CRM record fields will be used
for each text field in the Facebook lead-generation form.
You can also view a report of leads that
have been imported from Facebook using the “Lead Report” link. Here, you can
filter the report by CRM user, view Lead IDs for the record, open the record in
your CRM, and check the status of the imported leads. Any leads that have not
successfully been imported to records in your CRM can be re-downloaded here.
Want to Learn More?