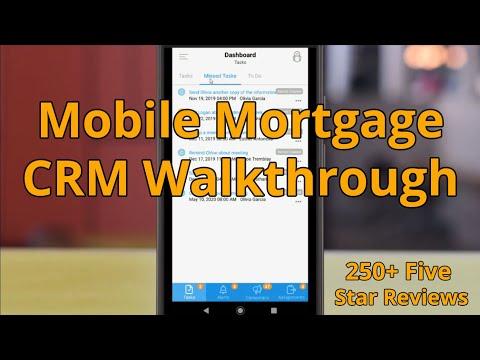
Initial Training – Mobile App
Using the
BNTouch Mobile App
In addition to the web client, BNTouch
offers a helpful mobile app, giving you access to your CRM data from the
comfort of your phone. The BNTouch mobile app can be downloaded from the iTunes
store for iOS devices or the Google Play store for Android devices.
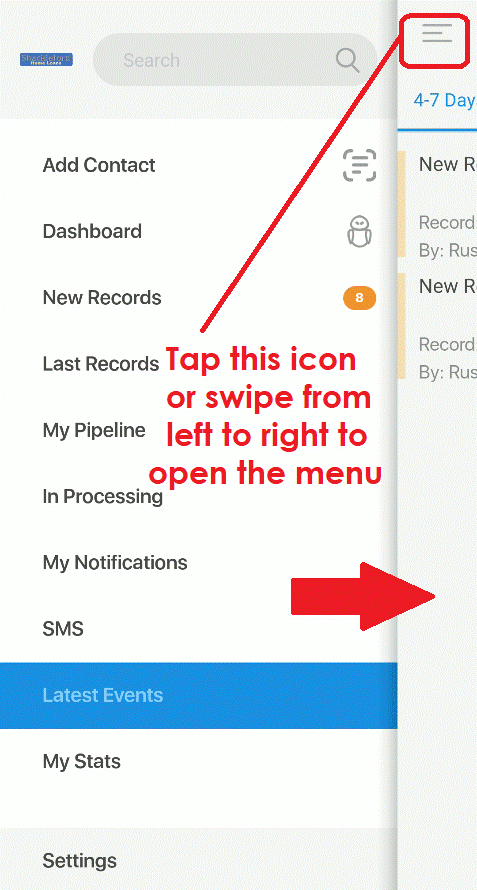
The mobile app uses the same login and
password information as the BNTouch website. Once you log into the BNTouch
mobile app, you can always access the menu by swiping to the right or tapping
the icon in the upper-left corner of the screen.
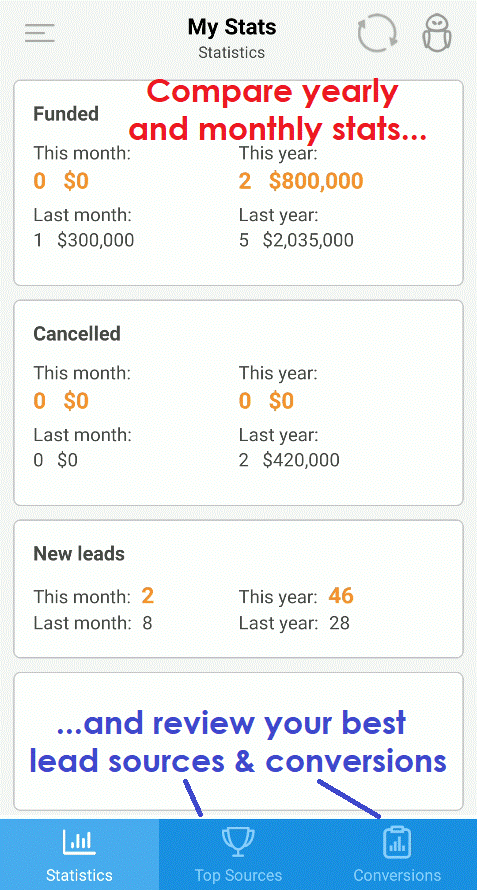
My Stats
The default screen when you first open
the app is “My Stats”, which will display various monthly stats for your
business. These stats will compare the current month with the previous month
and the current year with the previous year. This information is separated into
three sections. “Statistics” will give you a heads-up about funded and canceled
loans as well as new leads. “Top Sources” will break down these leads by the
top five sources, filtered either by month or year. “Lead Conversions” can help
you visualize how your leads are progressing through your pipeline.
You may have noticed a new icon in the
upper left corner of the Lead Conversion section. This “Filter” button will
help focus the results here by limiting the data to specific sources, date
ranges, and keywords. Anytime you see this button, you can filter the results
of whatever tool you are using in the app.
You can always return to this screen from
the left menu by tapping “My Stats.”
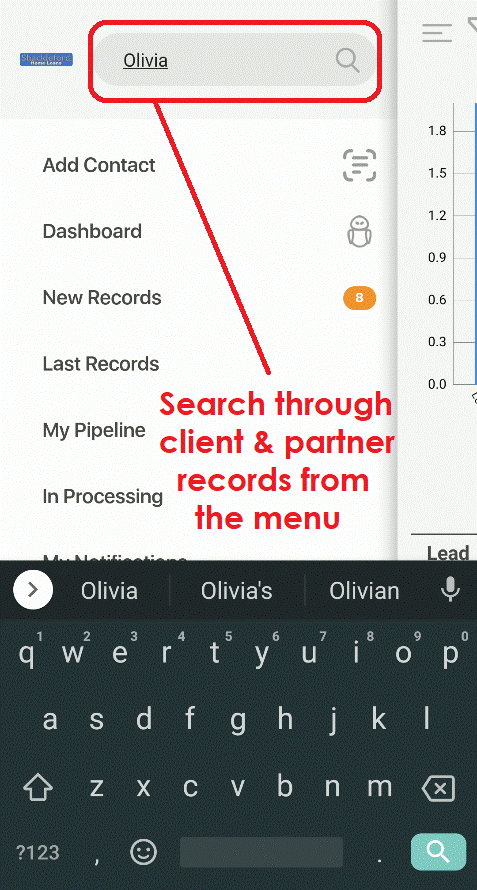
Contact Search
When you open the left menu, the top-most
option is a magnifying glass. You can search your Client, Partner, and
Recruitment records for matching criteria.
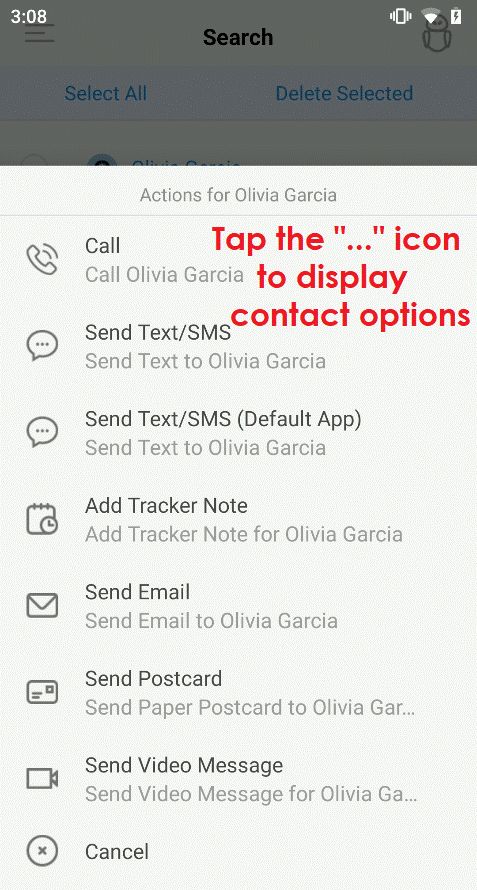
The three-dot button to the right of a
record is the Actions Menu. Tapping this will allow you to perform several
actions for that record, including contacting them by phone, text, email,
postcard, or video message. You can also add CRM tracker notes for your own
reference.
If you choose to contact the client by
Email, an in-app email client will open. You can now create and send your
emails directly from the BNTouch app. The plus sign buttons to the right can be
used to add recipients from your Contacts list, and the “Attach” option can be
used to add files to be sent with the email. You can tap “Choose from
Documents” to select from your BNTouch Documents Library or tap “Choose from
Gallery” to select from your phone’s file storage. This way, you can attach
pictures, .PDF files, or other files to your clients and partners from within
the app.
You can also send SMS text messages from
within the BNTouch app if you have the BNTouch Call & Text module active
for your account. As with emails, you can use the “Attach” option to add files
to send with the message. Using the checkboxes, you can opt to send a copy of
the message as an email and whether to send a text to just the borrower or the
listing agent, too. Below, you can enter your text message to be sent. If you
send similar messages frequently, you can use the “Add as Template” button
above to save your message for reuse later. You can then use the “Template”
option in future messages to copy the material you saved.
The “Send Postcard” option in the Actions
menu allows you to send actual paper postcards to your clients directly from
the app. You’ll need to have the BNTouch Mail module active for your account to
use this service. You can choose from several pre-made postcard images. Once
you do, you can choose to send a card to the borrower, co-borrower, or both.
Below, you can enter whatever text you’d like to appear on the card. When
you’re ready to send the postcard, hit “Confirm” at the top of the screen.
You can also send customized video
messages to your clients by tapping “Send Video Message” in the Actions menu.
These can be sent via SMS, email, or both. When you click the “Video” plus-sign
button, you’ll be able to choose from video messages you’ve already recorded or
record a new one from your mobile device. Once you’ve created the video, you
can add a message below and attach any other files as with the email or SMS
features. When ready, just hit “Send” above. You can instead use “Sent Test” if
you’d like to see it yourself before sending it to the client.
Adding Contacts
New records can be added manually from
the left menu by tapping “Add Contact.”
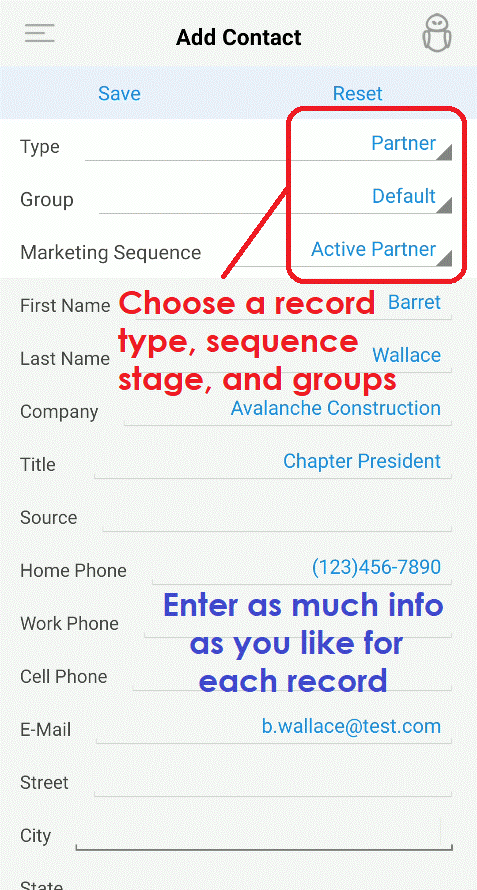
Each record must have a “Type” selected,
being either a “Client,” “Partner,” or “Recruiting.” Contacts can be assigned
to Groups and added to the Marketing Sequence using the menus below. Specific
campaigns can be started for the new contact using the “Start Campaign” menu.
The new record can be run against any existing marketing campaign triggers by
checking the “Enable Marketing Triggers” box.
Any amount of information can be added in
the following fields. Additional fields will become available once a record is
saved. The new record will be added to the database once you tap the “Save”
button at the top of the screen.
Contact Records
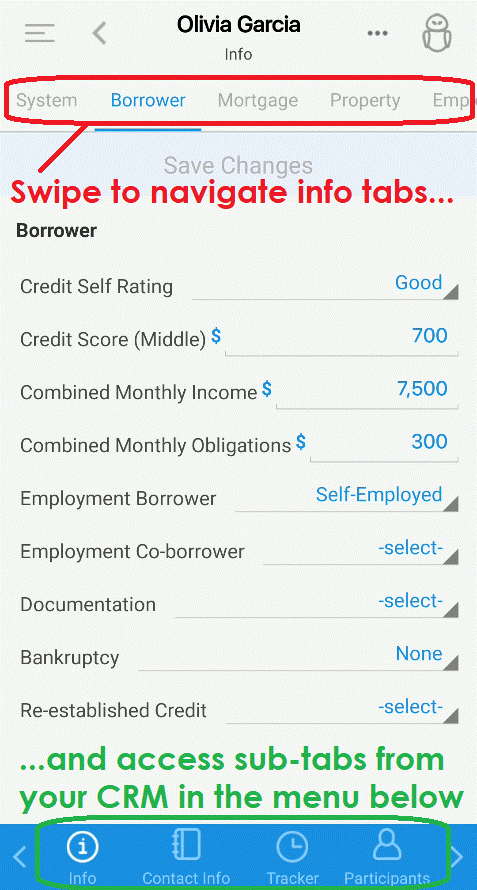
Wherever a contact is accessed in the
BNTouch mobile app, it can be opened by tapping the contact’s name. Once a
record is opened, you can edit information by tapping a field. Record
information is separated into several subsections that you can access from the
top bar, including Contact Info, System details, Borrower information, Mortgage
options, and more. You can hold and swipe from left to right to access more
options. If you change or add anything, remember to tap “Save Changes” at the
top of the record to lock them in and update the record.
At the bottom of each record, additional
options for the record will be available. All the record data we’ve gone over
so far is in the “Info” section.
“Tracker” will show all communication
with the contact. New notes and communications with the contact can be added to
the record using the “Add Event” button above.
The “Contacts” section gives you the
option of adding clients, partners, and staff to a Contacts list. Information
will populate here from the corresponding record fields in the “Info” section.
You can save the record to your Contacts list using the “Save” button above, or
you can assign a record to another user using the “Assign To” button above.
“Participants” will list any linked
Partners in a Client record (or assigned Clients in a Partner record). New
participants can be added using the “Select” link to the right. These
participants can be called, texted, emailed, or changed by tapping the Actions
menu. You can also use the checkboxes to
the left of these participants and the link above the list to send emails to
all selected participants.
More record information can be found by
tapping the arrow icons in the lower corners of the screen. “Processing” can be
used to track and update client records as the progress through the In
Processing stage of the mortgage pipeline. Dates can be selected by tapping a
field, and comments can be added for each stage.
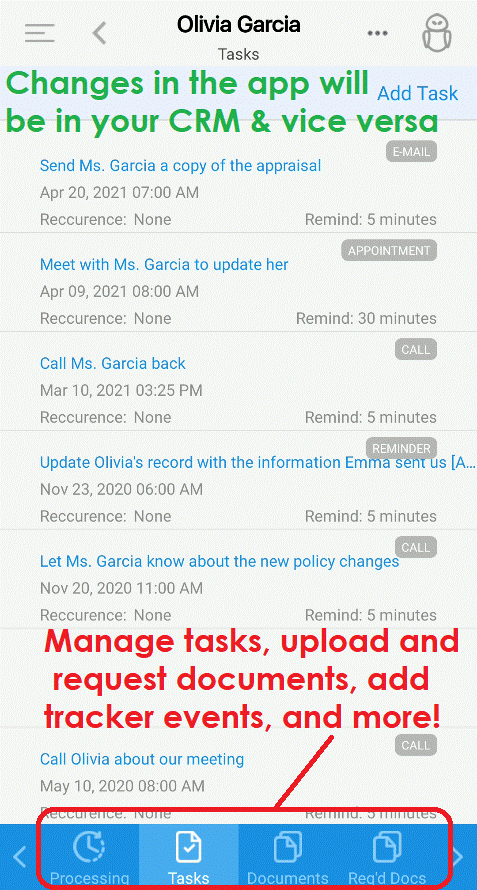
“Tasks” will show any tasks that have
been linked to a record. New tasks can be created from here using the “Add
Task” button at the top; these will automatically be linked with the current
record.
“Docs” will show any documents involving
this record, including those the client or partner has submitted and those that
you have requested of them. New documents can be added easily by tapping “Add
Documents” at the top of the screen. You can then find a file on your mobile
device or take a photo using your device’s camera.
“Campaigns” will list any campaigns that
are currently active for the record. You can pause or stop these campaigns
using the Actions menu to the right, and you can add start new campaigns for
the record using the “Start Campaign” button above the list. There, you can
choose a campaign from the drop-down menu and select a date for the campaign to
start.
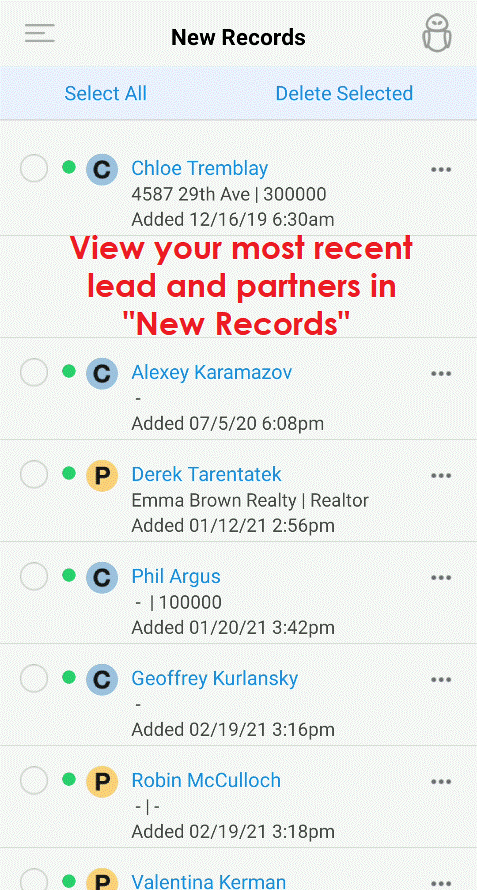
New Records
Now that we’ve explored a contact record
in-depth, let’s return to the left menu. Any records that have not been opened
yet in the web version of BNTouch will appear in the “New Records” section of
the left menu. A red notification number will display how many new records are
available. These can be records of any type, including Client, Partner, and
Recruiting. Records can be opened by tapping them, and they can be edited just
like new records. You can also use the Actions menu for these records just like
elsewhere in the app.
Last Records
Similarly, the “Last Record” option in
the left menu will display the last twenty records that have been opened in
your account. These can also be records of any type, can be opened
and edited just like new records, and can be contacted using the Actions menu.
Dashboard
Now that you know how to open, add, and
edit records, let’s look at the “Dashboard” feature. You can access it any time
by opening the menu and tapping “Dashboard.” This section provides a general
summary of your CRM for the current day. You can jump to a different day by
tapping on the date menu, and you can return to the current day by tapping
“Today”.
At the bottom of the Dashboard screen,
you’ll see four options, starting with “Tasks”. Current tasks will be listed
first, but you can also see your Missed Tasks and To-Do items using the options
at the top of the screen. Tasks can be tapped to view more details and edit any
information. The Actions menu for each task can be used to mark them as “done”
or cancel them. You can add new tasks at any time using the “Add Task” button
above the Current Tasks list. “Missed Tasks” will show you tasks that have
passed their listed date without being marked as “Done.”
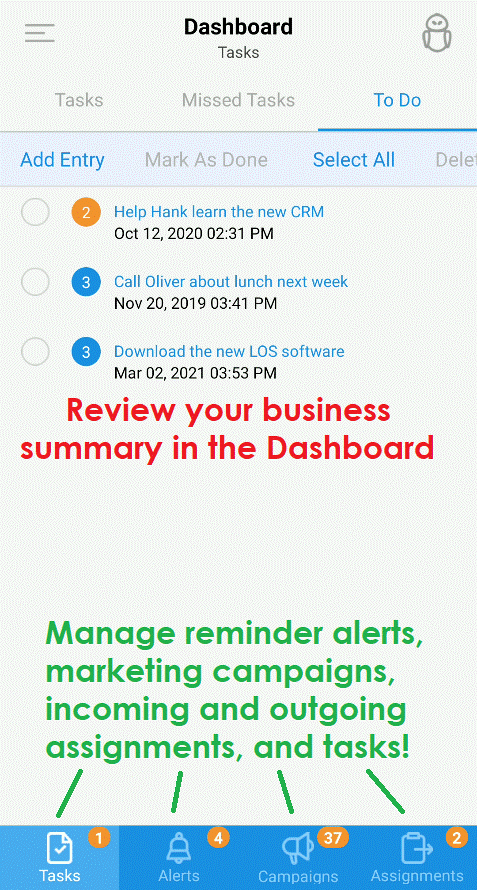
The “To-Do” list will show any pending
objectives from the BNTouch dashboard. You can add new To-Do items using the
“Add Entry” button, and you can quickly mark items as “done” or cancel them
using the checkboxes to the left and the buttons above the list.
In the “Alerts” section, you can check
whether any clients have upcoming birthdays or loan anniversaries. The
Refinance Monitor features will show any clients that could benefit from a rate
refinance. As before, you can tap any of these clients to open their records or
use the Actions menu to contact them.
In the “Campaigns” section, you’ll see some
general stats about your business’ ongoing campaigns. If “Safe Mode” is
enabled, any pending marketing campaigns will display below, and you can use
the Actions menu to the right of a campaign to start or cancel it.
Lastly, the “Assignments” section will
show any pending assignments to or from your partners. From this list, you can
use the checkboxes to the left and the buttons above the list to accept, deny,
or cancel any incoming or outgoing assignments. You can also see any previous
assignments in the “Assignment History” list.
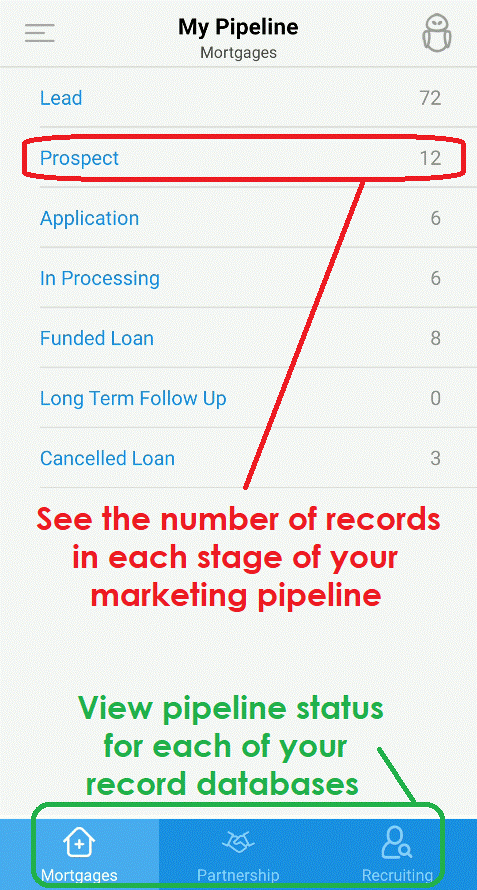
My Pipeline
The “My Pipeline” option in the left menu
can show you the number or clients, partners, and staff members in each step of
the mortgage process pipeline. These numbers match those in the Mortgages,
Partnerships, and Recruiting databases in your CRM. Additionally, you can tap
any of the pipeline steps to see a list of records in that step of the
pipeline. You can then open the records by tapping them or contact them using
the Actions menu to the right.
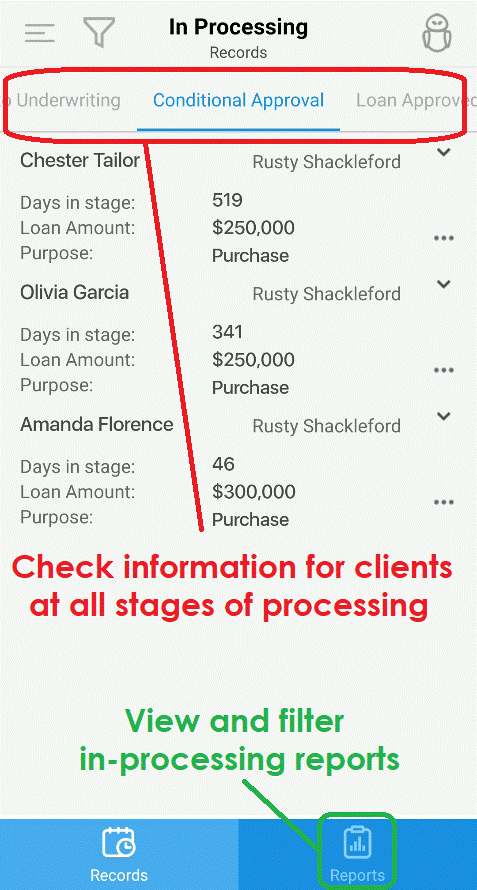
In Processing
Similar to the Pipeline view, you can use the “In-Processing” option in the left
menu to quickly see an overview of your various client records that are
currently in processing. In the “Records” section, you can see basic
information for clients in each stage of processing. These can be navigated
using the options above the list.
In the “Reports” section, you can view a
helpful summary report of your In Processing clients--again filtered either by
those in your account or those for all users. You can set the statistics below
to show either total loan amounts or the number or applicable records using the
options above the list.
Mobile
Notifications
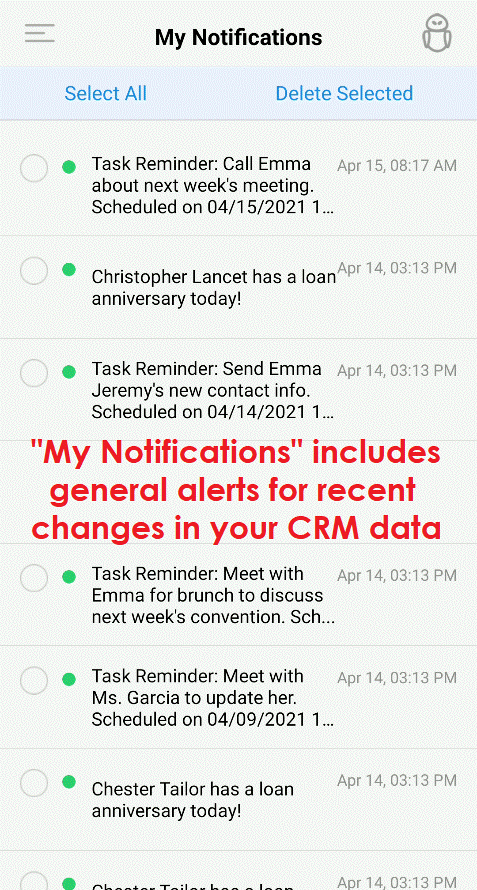
“My Notification” in the left menu will
show any messages you have received, including from assignments, portal sites,
leads from web forms, or elsewhere. If the message has an assigned record, it
can be opened by tapping the message.
SMS Text
Messaging
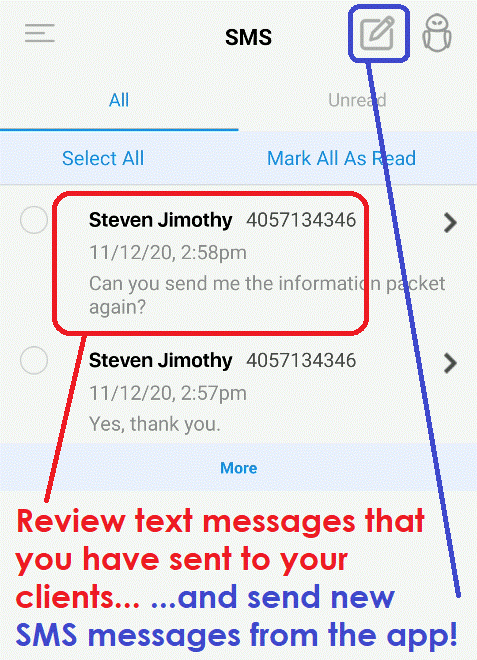
The “SMS” option in the left menu
functions like your text message inbox on your phone--but this one handles just
your communication through the BNTouch app. If you have received any SMS text
messages in response to those you send from the app, they will be listed here.
You can view either all received messages or only unread ones by using the
buttons above the list. You can send, reply, and attach files to SMS messages
here just like you would from the Actions menu elsewhere in the app.
Latest Events
In the “Latest Events” option in the left
menu, you can view a list of events from the Tracker in your CRM. Events will
be sorted by how many days have passed since they were created, and you can
easily navigate these sections using the options above the list.
Your Mortgage AI
Assistant
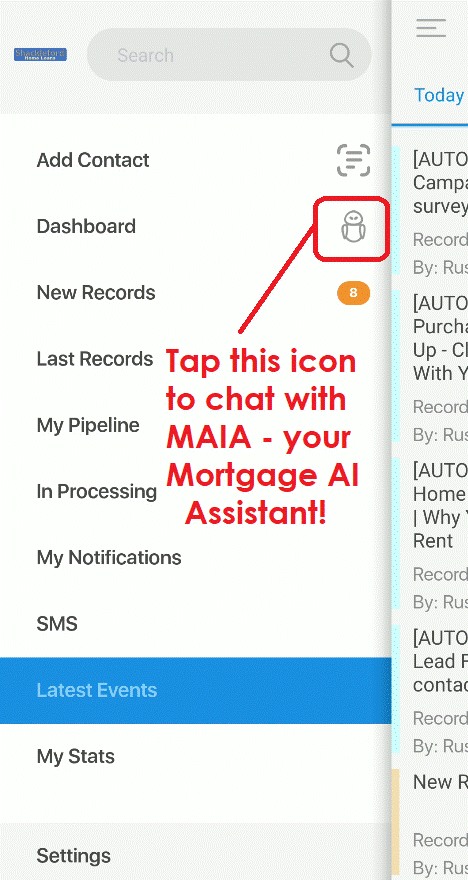
If your administrator has enabled the
feature, you may have noticed a friendly figure in the upper-right corner of
your screen through the BNTouch ap. This is Maia - your Mortgage AI Assistant -
and she is here to help you however she can. You can ask her questions about
your account, the CRM, or the mortgage industry. You can even ask her to help
you with various tasks in your CRM. For example, you could ask her to, “Remind
me to call Olivia tomorrow”. Maia will ask for any additional information
necessary, then she’ll create a reminder for you.
Maia is learning more and more ways to
help you, so be sure to ask her if you need a hand.
App Settings
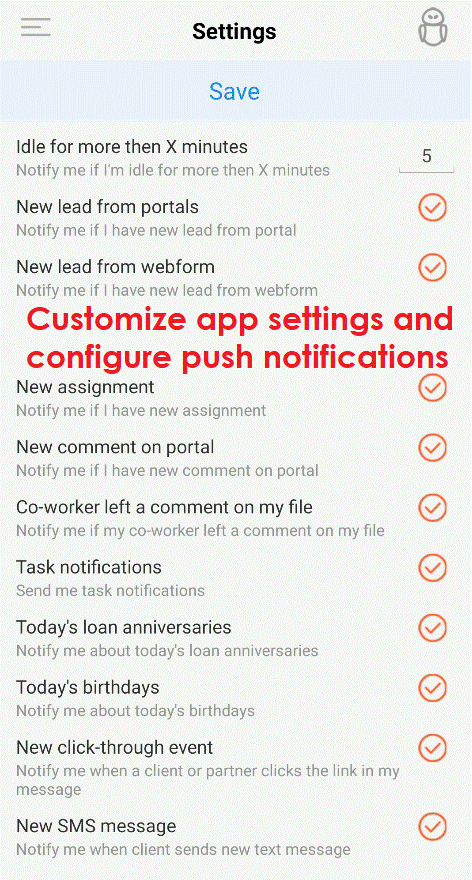
Notification settings can be changed in
the “Settings” section of the left menu. Tap the checkbox to enable or disable
notifications for any of the listed options. These preferences can be saved by
tapping the “Save” button above.
To contact BNTouch for support, tap the
“Submit Feedback” button in the left menu. Any comments and suggestions can be
submitted here to our support and development team.
What Should I Do
Next?
This should give you a basic
understanding of the tools available in the BNTouch Mobile App and how to use
them. This guide is the last part of our Initial Training series, but you can
always learn more about your CRM using the rest of our support materials. If
you have questions while using any particular feature
in your CRM, look for the Video Icon in the upper-right corner of your screen.
Here, you can find links to video training that focuses on features present in
the page you are currently viewing.
You can also check out our training video
library and online manual. You can access these at any time in the user menu in
the upper-right corner of your screen. Under “Training and Support”, you will
find links to our web manual, live training webinars, our YouTube channel, and methods
to contact our support technicians.
Want to Learn More?