Modules – BNTouch Connect
Live Chat with
your Clients Using BNTouch Connect
BNTouch Connect adds a live chat box to
your website so you can directly communicate with your clients and partners.
Whether your borrowers have questions about the mortgage process
or your loan participants need support, BNTouch Connect lets you provide direct
assistance and a personal touch.
If you are an administrator for your
account, you can enable BNTouch Connect from the user menu in the upper-right
corner of your CRM. This is a free module without any extra monthly cost, but
it is optional and must be enabled for your account if you wish to use its
features. To do so, open the “Modules” section, then scroll to the “BNTouch Connect”
panel. You can hover over the panel for support materials, and you can enable
the feature by clicking the “Activate Module” button.
Configuring a
Chat Widget
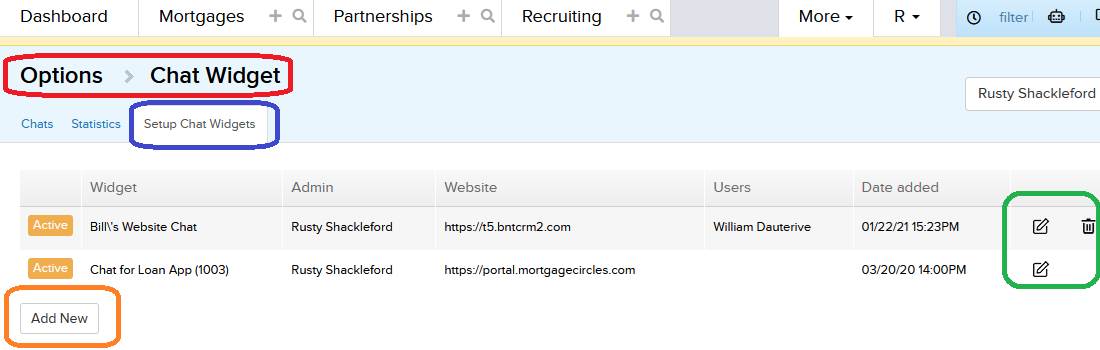
After BNTouch Connect is activated, you
will see extra option in your Options Tab titled “Connect Widget”. Here, you’ll see three sub-tabs at the top of the page that allow
you to manage the chat functionality for this module. To begin, click the
“Setup Chat Widgets” sub-tab.
Here, any live chat widgets that you have
enabled will be listed with details about their use. Any that already appear on
this list may come from other modules you have activated, like the Live Chat
feature for the 1003 Application Form of a client’s Borrower Portal. To create
a new chat source, just click the “Add New” button below the list.
You can now enter a title for the chat
widget (for your own reference) and welcome text that clients and partners who
open the widget will see. Next, you can set a custom source and record owner
for any leads that are generated via the chat widget. The text entered here
will appear in the new record’s “Source” field, which will be helpful when
determining where new leads are being generated for your business.
Below, enter the
full website address of the site that this chat widget will appear on. If you
want the widget to only appear on specific pages of your site, list them in the
box below; otherwise, leave it blank to have the widget available on all of your site’s sub-pages.
You can then customize where the chat
window will appear and what color the message prompt will be. “Collect Contact
Info” lets you determine how the chat widget requests contact information from
the user. Next, choose how much time should elapse before the widget maximizes.
When a user loads the page, the chat box will be very small;
after a set amount of time, it will grow larger to catch the user’s attention.
If you wish, you can set a “Time Range”
during which the chat feature is enabled for the site. Outside the hours set
here, the chat widget will not display for your site’s visitors. You can also
choose which CRM user will be connected to chat with each visitor. You can
choose to have each visitor talk with yourself, with a specified user account,
or with a user selected via round robin between all users who are currently
active at the time. Lastly, you can set the widget to ‘Active’ or ‘Inactive’ by
toggling the status indicator below. When finished, just click “Save” to create
your new chat widget and return to the list.
You will now see the new entry in the
widget list with the chat feature you just created. You can edit the settings
you configured at any time by clicking the “Edit” icon to the right. A new
field that will appear when editing saved widgets is the widget code box. You
can select all of the HTML text in this box, copy it,
and paste it into any website editor you use for your website to enable the
widget. If you have another person that managers your web presence, this script
is what you will need to send to them to add the feature to your website.
Lastly, you can delete widgets you no
longer need using the “Trash” icon.
Using Connect to
Talk To Visitors
Now that you have one or more chat
widgets enabled for your account, visitors to your websites can send you direct
chat messages when they type into the widget in the corner of their screen. To
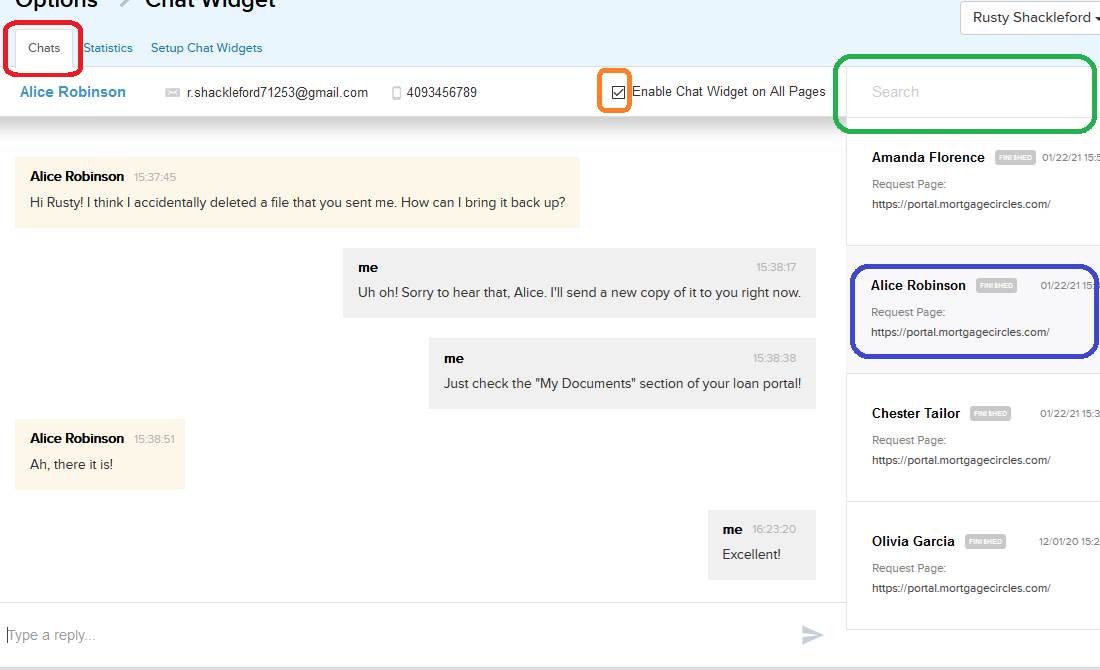
see any messages you are receiving through this
widget, open the “Connect Widget” section of the Options Tab again, but this
time look for the “Chats” sub-tab.
You’ll see a list of any visitors that have started communication with you to
the right. Here, you’ll see the name they gave the
widget, when they sent each message, and what page they are using to
communicate with you. You can search through this list using the text box at
the top, and you can click any of these panels to open chat with that user to
the left.
Here, anything you type will be sent to
the visitor, and anything they respond with will appear instantly. The
visitor’s name and contact information will appear
above if they entered it via the widget.
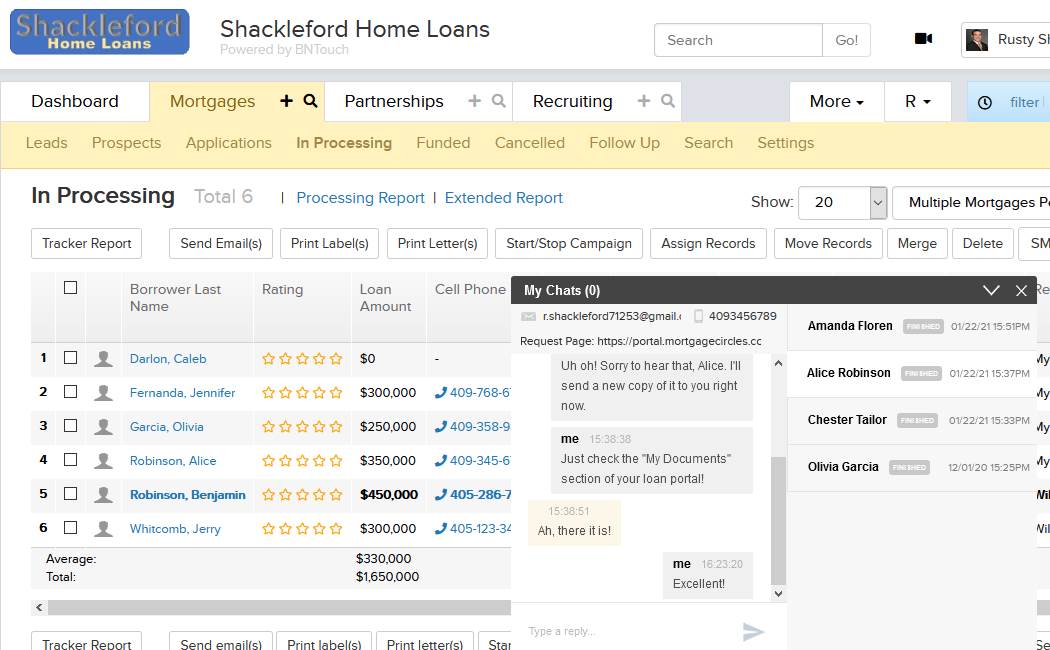
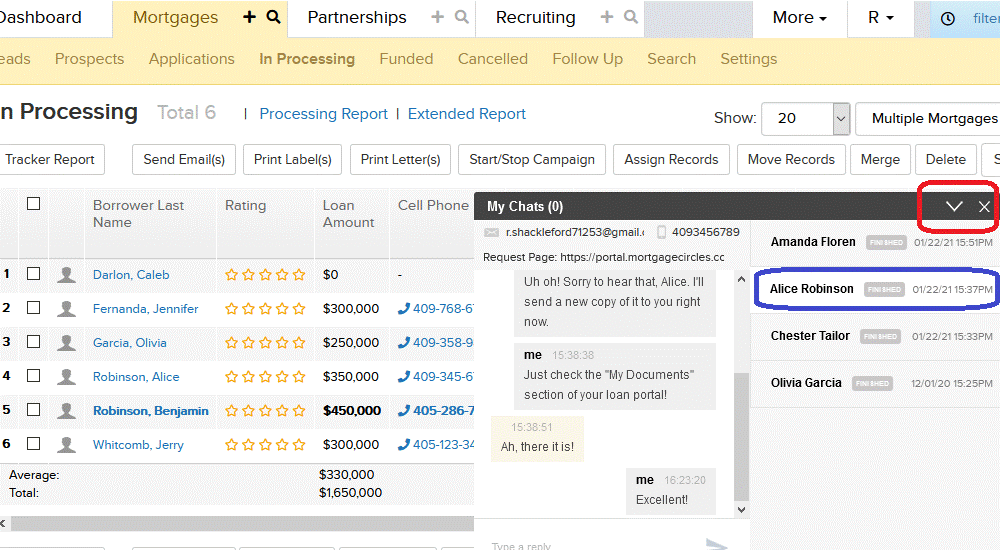
If you wish to be able to carry on
conversations with visitors and clients no matter where you are in your BNTouch
CRM, check the “Enable Chat Widget on All Pages” box at the top of the page.
This will open a floating chat message box for you throughout your CRM when
visitors message you via a chat widget. You can hide or show the widget using
the caret icon, and you can close the widget for this session using the “X”
icon. Just like the “Chat” sub-tab in the Options area, you can navigate
between visitor chats using the names to the right, and you can type directly
to these visitors using the field to the left.
Tracking Chat
Statistics
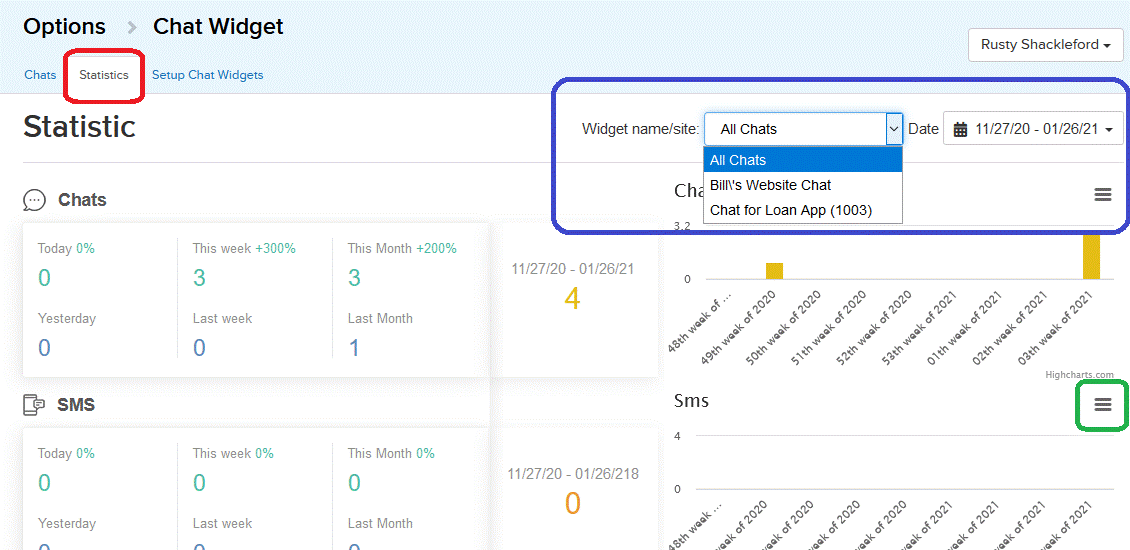
You can also see a summary report of all
chat activity for your account back in the “Connect Widget” section of the
Options tab. In the “Statistics” sub-tab, you’ll see a
comparative summary of chats, SMS messages, and leads generated via this widget
below. These comparisons let you see how many chats your CRM users have engaged
in today, yesterday, and in the last week and month.
You can narrow results for these
statistics by specific website widgets or by a specific timeframe using the
fields in the upper-right corner of the page. You can also print or download
any of these charts using the icon to the right of any image.
Want to Learn More?