Mortgages – Borrower Event Tracker
Reviewing
Tracker Activity in a Borrower Record
One of the most important functions of
the BNTouch CRM is to keep all of your borrower
information organized and accessible. Each mortgage record in your CRM stores relevant
data for that borrower, allowing you to communicate with clients, send
marketing materials, track mortgage updates, upload
and request documents, and more. Every action you take for that borrower is
logged in the Tracker, an easy-to-read, color-coded list of every update to a
client’s record. This allows you to see any messages sent between you and the
client, what actions other users in your business have taken, and other notable
events.
Where Can I Find
the Tracker?
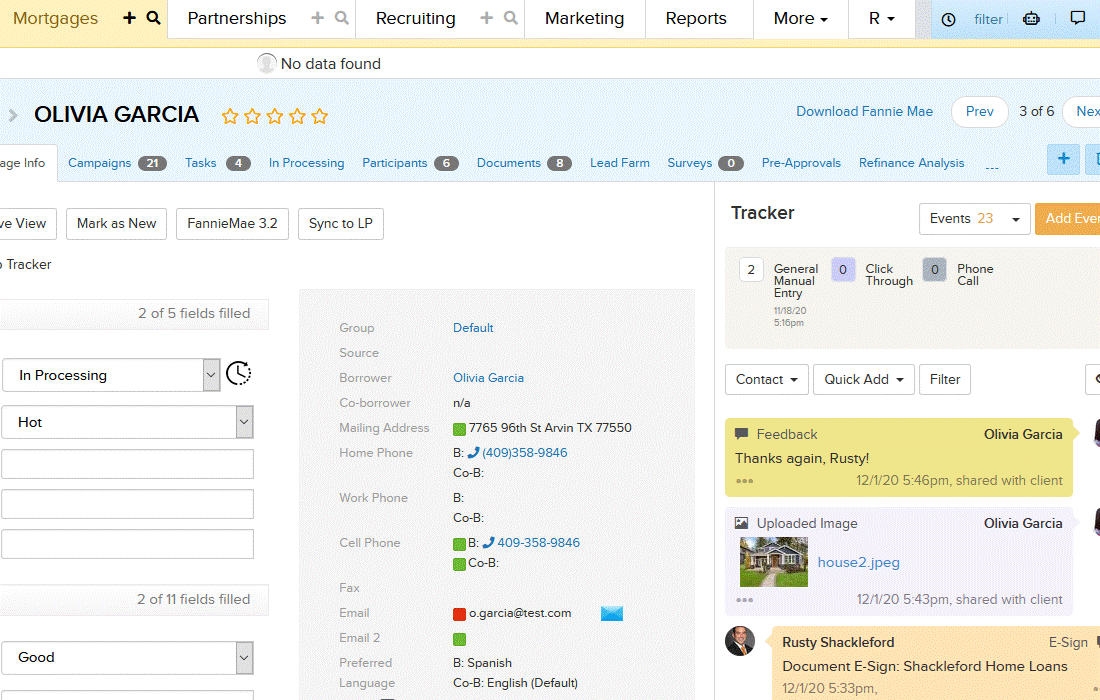
In the Mortgages tab of your CRM, you can
open a client’s record by clicking their blue “Name” link. In addition to the
various sub-tabs available in the record, a “Tracker” column will appear to the
right. This column will display while you are viewing any sub-tab of that
client’s record, and the events listed on it are specific to that borrower.
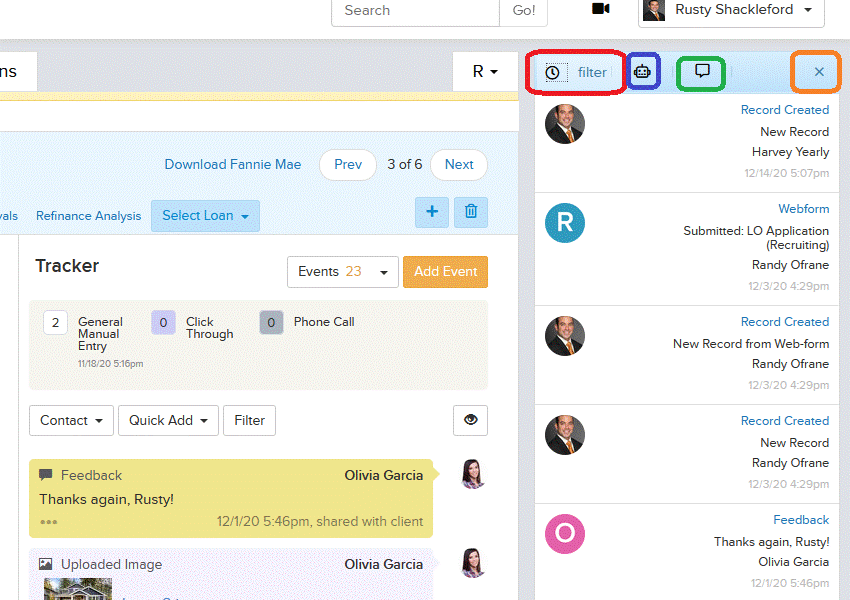
Depending on what viewing options you
have enabled, you may see another column on the right side of your screen. This
side-bar is not part of the Event Tracker, but it can
display multiple helpful features. First, it can show a “Recent” activity log
of various actions you have taken in your CRM. You can even filter this list to
show or hide different types of events!
Alternatively, this sidebar can show a
chat message log. Clicking the “Robot” icon will let you chat with Maia, your
Mortgage AI Assistant. She’s happy to help answer mortgage and CRM questions,
perform tasks for you, and help you find information. If you click the “Speech
Bubble” icon, you can see a list of all CRM, Portal, and SMS messages you have
sent and received. You can search for text in these messages, click individual
threads to open that conversation, or mark messages as read or unread using
this chat log.
You can always hide this side-bar by clicking the “x” icon in the upper-right corner.
What Events are
Tracked?
This tracker displays a list of all
communication and events that have taken place between the borrower and your
office, including tasks, marketing campaigns, emails, and more. Most events are
automatically logged into the tracker when they happen in your CRM. For
example, when a campaign triggers for a client, a tracker event will appear in
their record with the “Campaign” type, the title of the campaign, and the date
and time it was sent. The same will occur when a borrower messages you from a
Borrower Portal, when you send an SMS text message to a client, or when one of
your staff members changes the status of a document in the mortgage file.
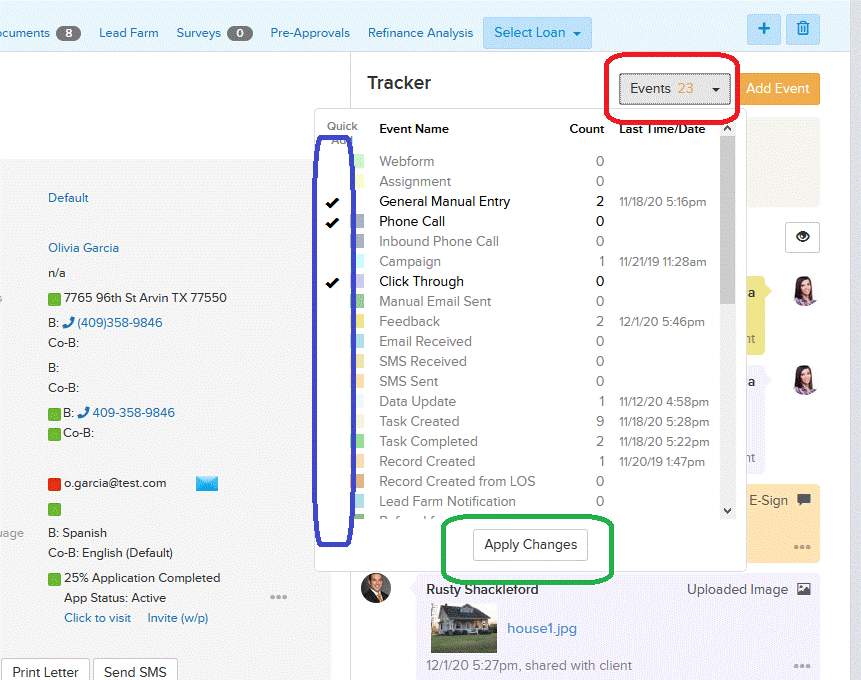
The “Events” menu above the tracker
contains all of the various events that are logged by
the tracker. When you open the menu, you can see the event types, the number of
events of each type that have been logged for this record, and the date and
time of the last event of that type. You can also check the “Quick Add” box to
the left to keep that event type at the top of the tracker. When you click
“Apply”, the box will show how many of each of the selected event types are
logged in the record.
Most of the event types in your CRM are
available by default, but they can also be customized for your account by your
administrator. If you are the administrative user for your account, you can add
new event types, change the color used for each event type, and more in the
Options tab. To learn more about customizing your tracker, please watch the “Tracker
Options” video in the “Options Tab” series.
Can I Add
Events?
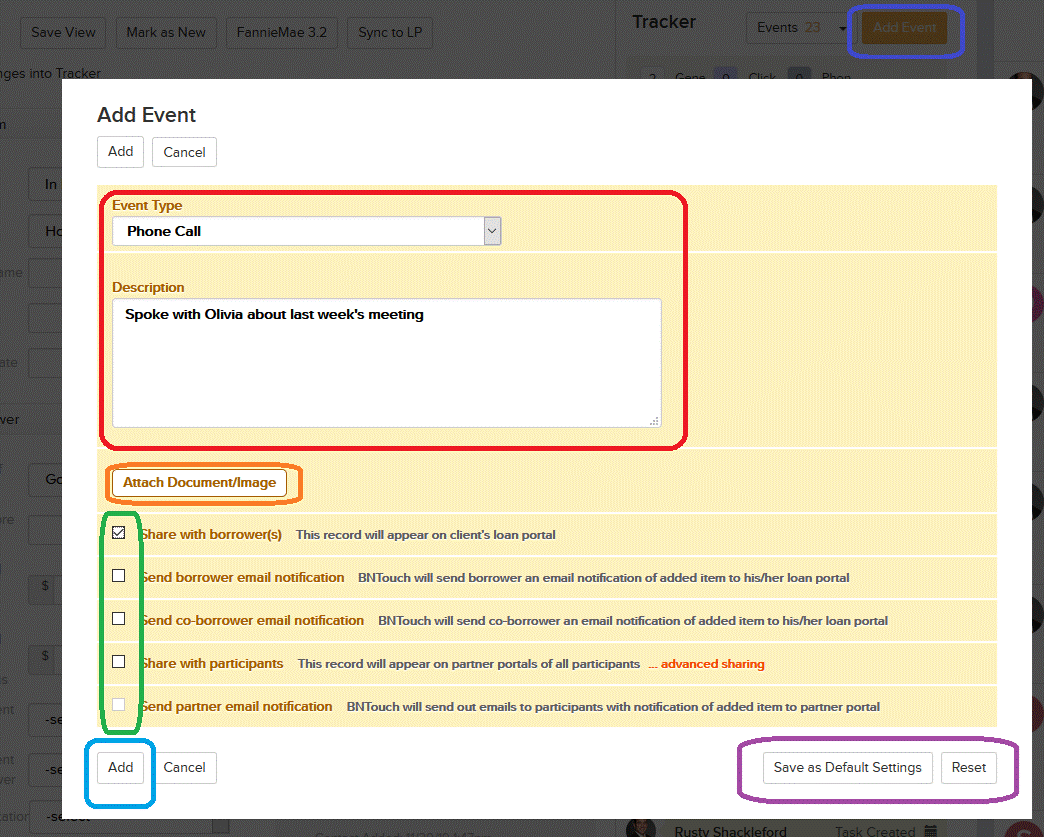
In addition to automatically-logged
events, new tracker events can be added directly to the borrower record using
the “Add Event” button. The type of event can be chosen from the drop-down
menu, and a description can be entered. You can also upload a file from your
computer to the client’s record using the “Attach Document/Image” button.
The checkboxes below can be used to set
sharing and notification settings for the new event. The “Share with” options
will make the event visible to the borrower and participating partners via
Portal sites. The “Email Notifications” options can be used to send an email to
the Borrower, Co-Borrower, and participating Partners when the event is
created. For partners, you can use the “Advanced Sharing” link to select
specific partner types you want to share or notify.
Any of the options you have checked and
unchecked can be set as the default for new tracker events using the “Save as
Default Settings” button, and this default can be removed using the “Reset”
button. The event will be added to the record’s tracker when you click the
“Add” button.
If you attached a file to the tracker
event you added, you will be able to see a preview of it in the new event. You
can click the thumbnail of an image to view the entire image. The file will
also be added to the borrower’s “Documents” tab just like any other uploaded
file.
Tracker Tools
Various communications can be easily
generated for a borrower using the “Contact” drop-down menu. This includes
sending an email directly to the client, printing a mailing label, letter,
flyer, or postcard, inviting the client to access their Borrower Portal,
sending an SMS text message, or recording a video message for the borrower.
Some of these options are only available if the corresponding modules are
enabled for your account; if you do not have access to these options, please
contact your administrator.

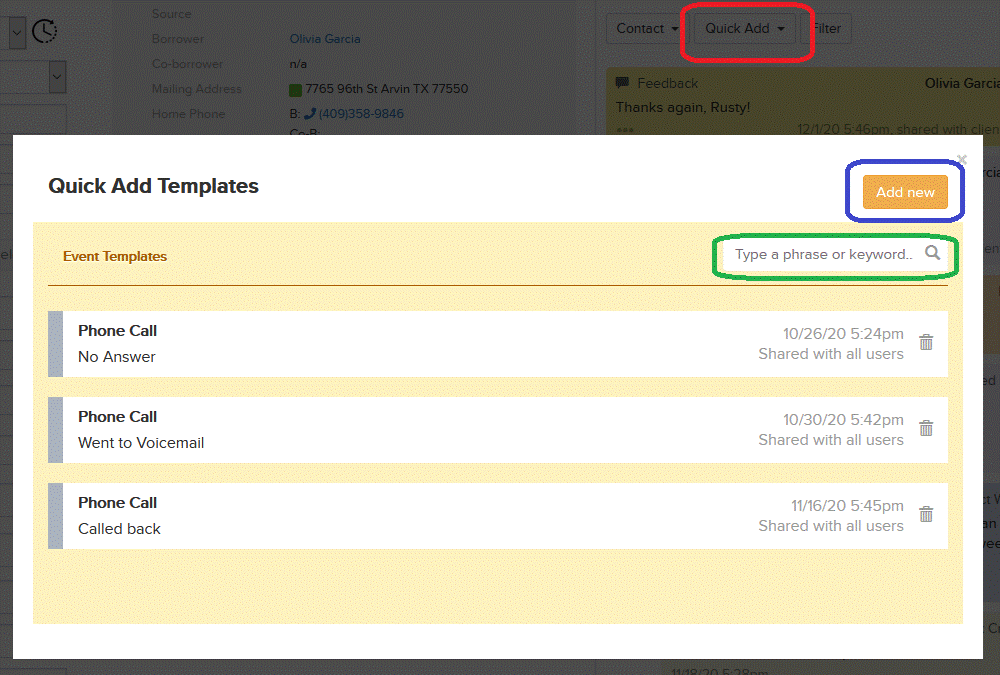
The “Quick Add” menu can be used to
manage and create brief tracker events that can be added to records with a
single click. These events can be added and configured by opening the menu and
clicking “Manage Quick Add”. Here, any simple template events that have been
created for your account will be listed. You can create a new one by selecting
a text event type from the menu above, entering the text you want to appear for
that event, and clicking the “Add” button. Once you have created a Quick Add
event, you can easily add these to any client’s tracker by choosing it from the
“Quick Add” menu.
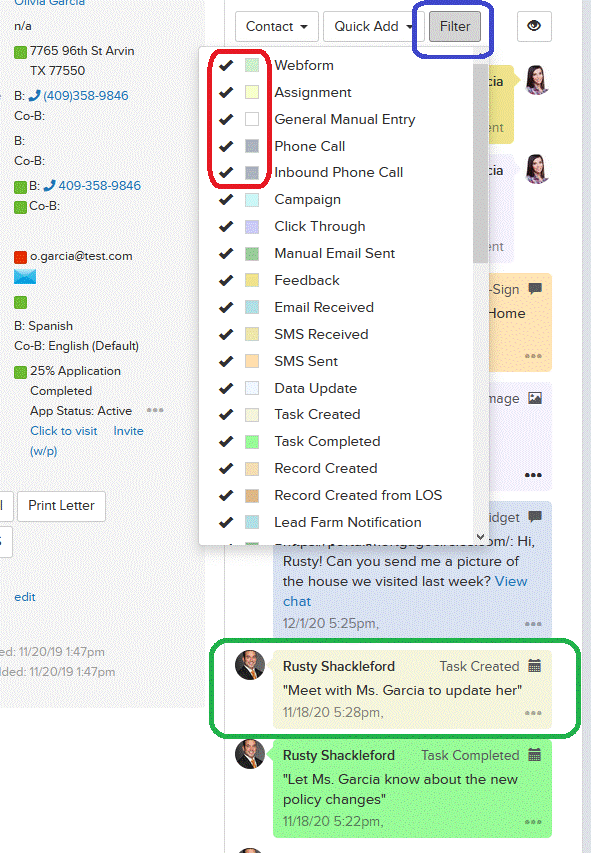
You can limit the event types that
display on a client’s tracker using the “Filter” button at the top. Any event
types that are checked on this list will appear, and any that are not will be
hidden. Hidden events will still be logged and tracked, but they will not be
visible on the tracker unless the event type is later checked. You can also
change the number of recent events that appear on the tracker by clicking the
“Eye” button to the right.
Each tracker event will have the name of
the creator of the event listed first, along with that person’s picture if one
is available. The event type will appear in the upper-right, and the time and
date of the event will appear in the opposite corner. Events relating to text
messages, emails, reminders, and other text-based communications will be listed
in the event body. For events with files or external materials, a link will
appear in the tracker so you can access that document. The ellipsis icon in the
lower-right corner of a tracker event will allow you to share that event with
clients or partners, notify them via portal sites, or send a push notification
to them in the Mortgage Circles mobile app. These sharing options will be saved
when you click the “Apply Sharing Options” below.

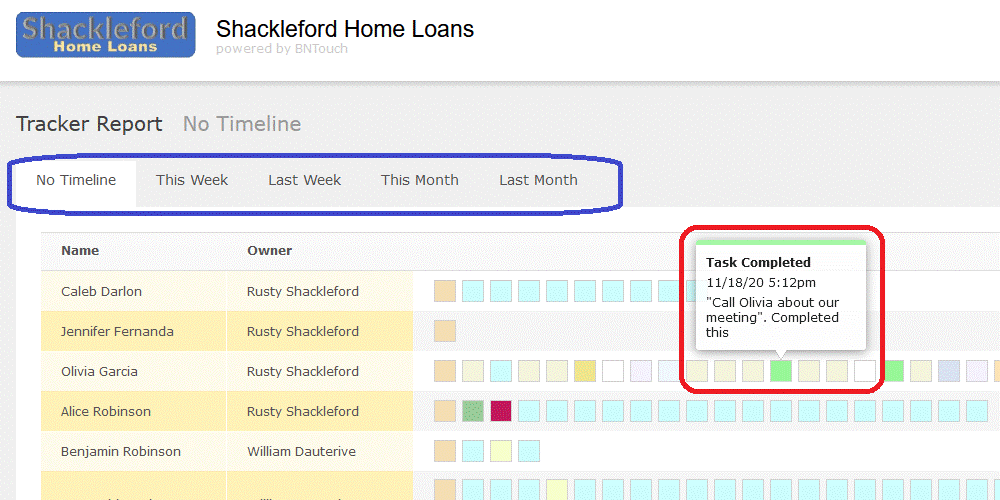
Tracker Report
In a client’s record, tracker events you see
are all connected to that specific borrower. You can also view a summary of
several client tracker events at once directly from the Mortgages Tab. To do
so, just check the boxes of the clients you want to include, then click the
“Tracker Report” button above the record list.

A new report will be generated that will include
all tracker events for each of the selected clients. You can use the tabs above
the report to view events logged in the current or last week or month, but the
default report will show total events in the “No Timeline” tab. For this
report, each client will have a row, and the record owner will be listed to the
right of the borrower’s name.
To the right, all events for that client will
appear as color-coded boxes according to the default colors for that event
type. You can hover your mouse over these boxes to view the event type, the
date and time of the tracker event, and the included text for text-based
events.
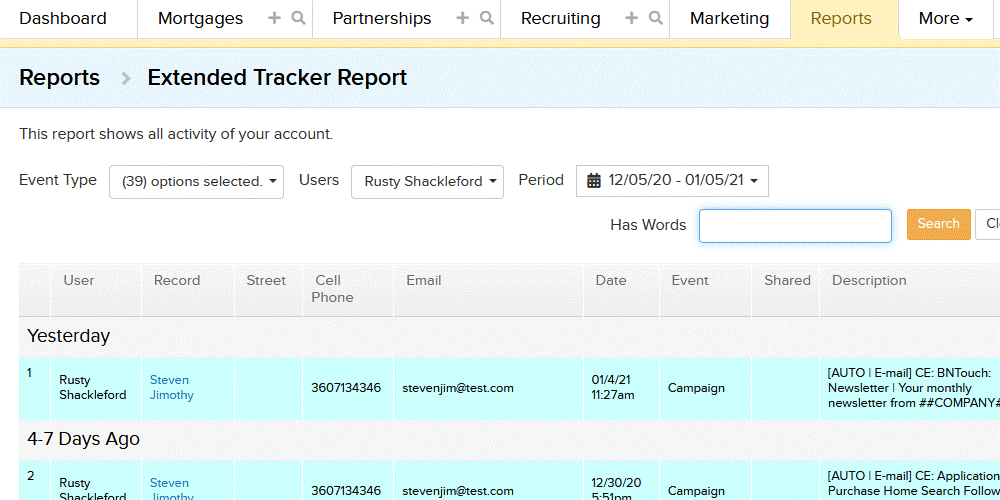
Extended Tracker
Report
For a more detailed report for all tracker
activity in your account, open the “Reports” tab and click the “Extended
Tracker Report” link. This report will show all tracker events that have been
entered for all clients and partners in your account by any user, starting with
the most recent and organized into time-frame sections.
Rows are color-coded according to the event
type, and the user that generated the event will be listed to the left. The
“Record” link can be used to access that borrower’s or partner’s record, and
additional details for the record and event will appear to the right.
You can filter this list using the menus
above, allowing you to narrow events to specific types, created by specific
users, or made during a specific time period. You can
also search for words in text-based events using the search box to the right.
Tracker Summary
Report
Administrative users can also view a per-user
tracker event report in the “Reports” tab by clicking “Tracker Summary Report”.
This report lets you select a time period, relevant
event types, and particular users. When you click “Search”, a spreadsheet report
will appear below with the number of each type of tracker event that was logged
for each day in the selected time period. Below that,
a graph will show how many events of each type were logged on each day. You can
change the graph type using the hamburger icon to the upper-right.
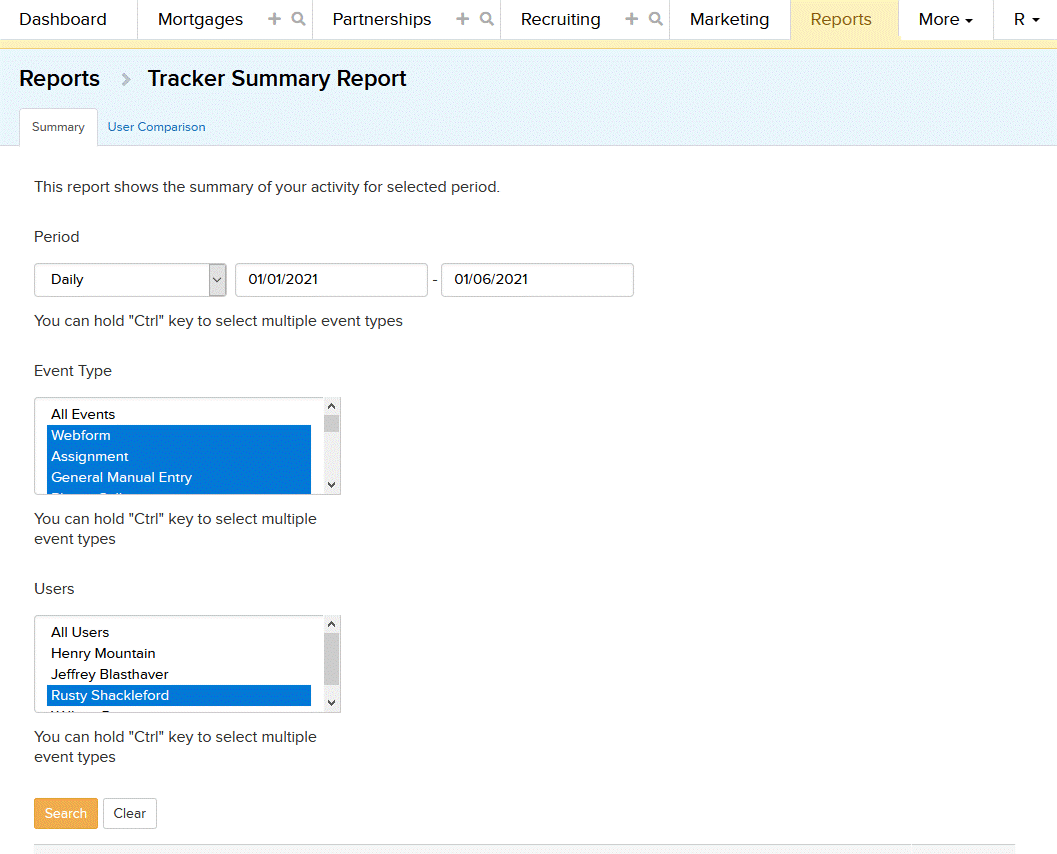
Similarly, the “User Summary” sub-tab of this
report will display the same spreadsheet and graph report, but the rows will
instead represent the users in your office. For each day, you can then see how
many tracker events that user has made.
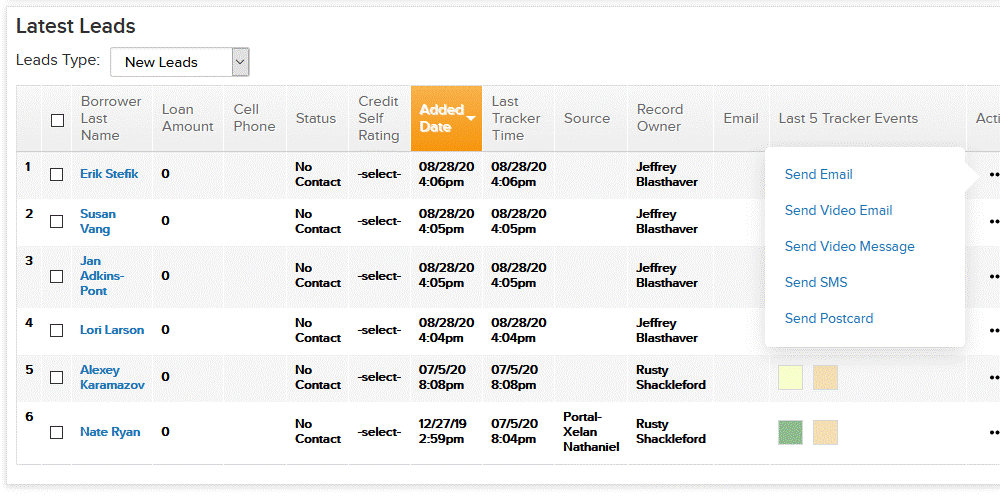
Dashboard
Tracker Features
To help you stay on top of your business, you
can also see what recent events have been added to client event trackers from
the Dashboard Tab of your CRM. In both the “Quick View” and “Leads” sub-tabs of
the Dashboard, you can see a brief summary of recent
tracker activity for your client records.
For each row representing a mortgage client,
you can see when the last Tracker Event was posted to their record as well as
the most recently-added five events in that client’s
tracker. Just like the Tracker Report in the Mortgages Tab, you can hover over
the color-coded event boxes to see details about each event. To the right, you
can also add new tracker events directly to a client’s record from the Dashboard
tab! Just past the “Actions” menu icon, click the “Add Tracker” link to create
a new event. This functions just like manually adding a text-based event in the
Mortgages tab, and you can still set sharing and notification settings along
with your message.
Want to Learn More?