Marketing – Advanced Marketing Triggger
Examples
Advanced
Marketing Triggers and How to Use Them
In BNTouch, “triggers” are criteria that
you can use to automate your marketing. A trigger is simply a rule that tells
BNTouch when to add someone to a marketing campaign and when to remove them.
Every time you add or update someone’s information in BNTouch, your CRM will
compare that information to these triggers and decide if that person needs to
be added to a campaign, removed from a campaign, or if they need to switch the
campaign they are currently on.
Advanced Triggers are the most powerful
triggers. These triggers allow you to create a rule based on any field or
combination of fields in the system. For example, you can tell BNTouch to add
someone to a campaign when their credit score is below 650, or to put someone
on an investor campaign when the “occupancy” on their loan is “investor”. You
could even create a trigger to add someone to a campaign when their monthly
income is over $10k and they prefer coffee over tea!
To learn more about what “Triggers” are
and how to use them in your marketing, please watch our “Creating New Campaigns – Triggers (Step 3)”
training video.
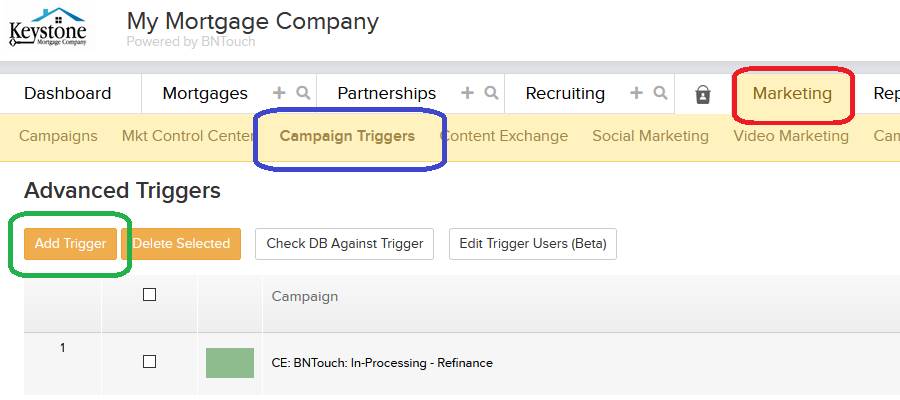
To create an advanced trigger in BNTouch,
go to your Marketing Tab, open a campaign by clicking the blue “Campaign Name”
link, and click the “Triggers” sub-tab. You can also click the “Campaign
Triggers” sub-tab of your Marketing Tab, choose the campaign you want to set a
trigger for, then choose whether to create a trigger for the Mortgages or
Partnerships database.
The examples below show how to setup
“Add” and “Remove” conditions of Advanced Triggers for specific
cases. Examples listed here will include explanations of how and why the
trigger will “Add” and “Remove” records from the campaign.
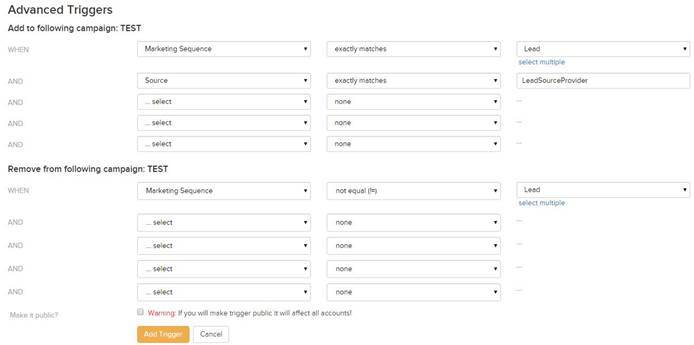
1. New Lead from
Lead Provider
Add: New leads are usually posted
into the “Lead” marketing sequence; that is why we have the first condition set
to “Lead”. The second condition should be specified to “Source” and look for
the specific provider’s name. You can disregard the second condition if you
want to set up a trigger for all leads.
Remove: When you move your records
out of the “Lead” marketing sequence, you will want to stop the “New Lead”
campaign and start some other follow-up campaign.
2.
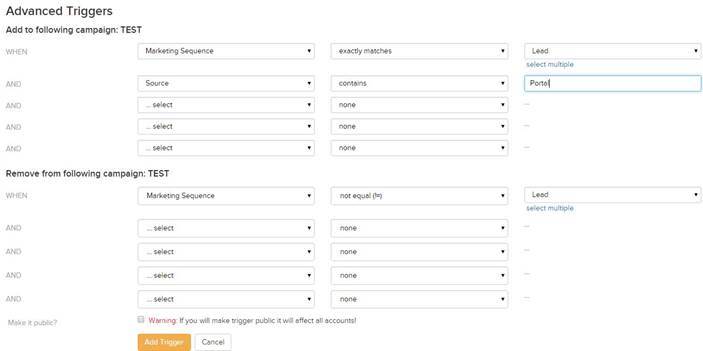
NEW LEAD FROM BORROWER & PARTNER PORTALS
ADD: When the lead is coming from a
Portal site, the “Source” field contains following data: “Portal – REFERRAL
NAME”. “REFERRAL NAME” is the name of the person who submitted the lead. If
your second condition is set to “Source” “contains” “Portal”, it will include
all leads that are coming from Portals.
REMOVE: When you move your records
out of the “Lead” marketing sequence, you will want to stop the “New Lead”
campaign and start some other follow-up campaign.
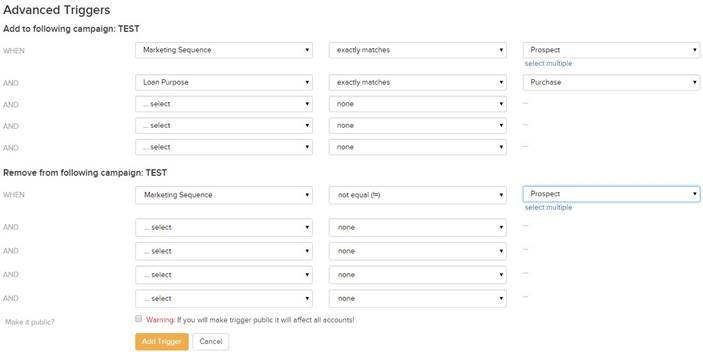
ADD: The first condition is set to
“Marketing Sequence” “exactly matches” “Prospect”, and the second condition
should be set to “Loan Purpose” “exactly equals” “Purchase”. You can also set a
similar trigger for “Loan Purpose” “exactly equals” “Refinance”.
REMOVE: When you move your records
out of the “Prospect” marketing sequence, you will want to stop this campaign.
4.
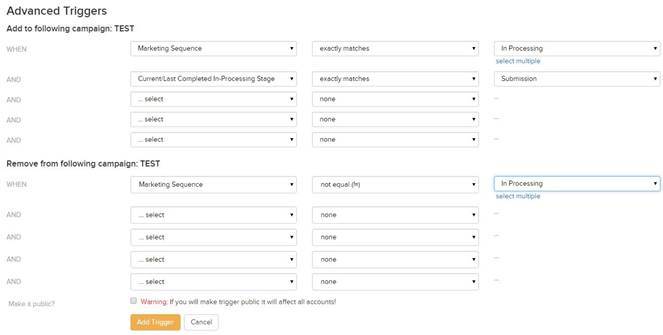
IN PROCESSING – LOAN SUBMITTED TO UNDERWRITER
ADD: The first condition is set to
“Marketing Sequence” “exactly matches” “In-Processing”. The second condition is
set to “Current/Last In-Processing Stage” (very bottom of the field list)
“exactly matches” “Submission”. Your stage name can be different as the
processing stages are fully customizable.
REMOVE: This trigger does not
necessarily need a removal condition, but we still advise you to set it to stop
the campaign when the record is moved out of the “In-Processing” stage.
5.
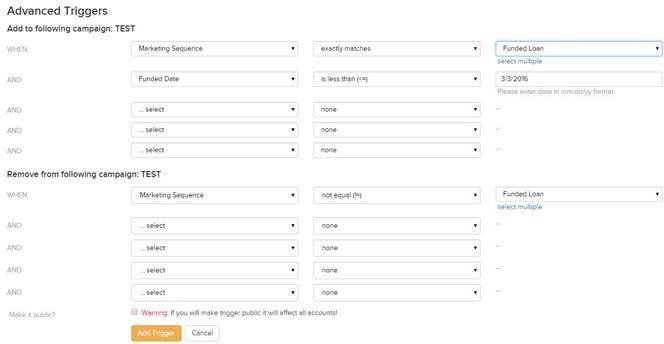
PREVIOUSLY FUNDED LOANS
There should be a difference in your marketing
message if it is sent to the previously funded loan or newly funded loan. This
“previously funded loan” campaign doesn’t have any “thank you” emails, and it
starts on the next anniversary of the loan.
ADD: The first condition should be
set to “Marketing Sequence” “exactly matches” “Funded”. The second condition
should be set to “Funded Date” with the “less than” option. The value for the
“Funded Date” condition should be the day the trigger is set up (or close to
it).
REMOVE: This trigger does not
necessarily need a removal condition, but we still advise you to set it to stop
the campaign when the record is moved out of the “Funded” stage.
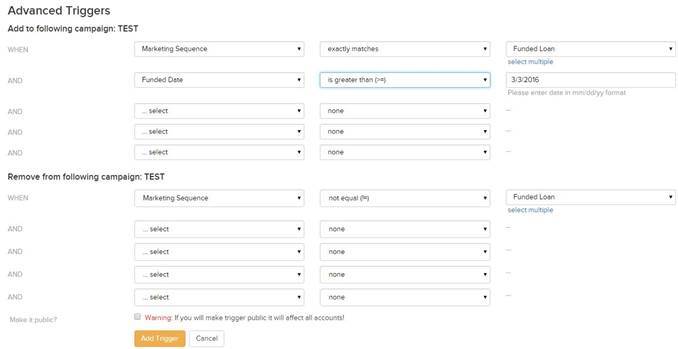
This campaign should be set for all loans that
will be closed after the initial setup of your CRM.
ADD: The first condition should be
set to “Marketing Sequence” “exactly matches” “Funded”. The second condition
should be set to “Funded Date” with the “more than” option. The value for the
“Funded Date” condition should be the day of the trigger is set up (or close to
it).
REMOVE: This trigger does not
necessarily need a removal condition, but we still advise you to set it to stop
the campaign when the record is moved out of the “Funded” stage.
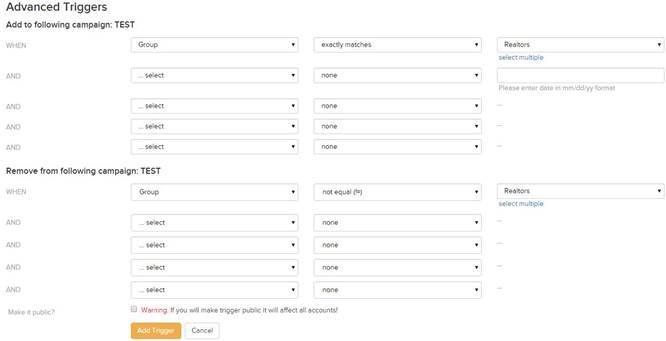
7.
NEWSLETTER FOR REALTOR GROUP
ADD: The only condition for this
trigger should be set to “Group” “exactly matches” “Realtors”. This could be
set to any group depending on the purpose of the campaign. You can create
an unlimited number of groups in your CRM.
REMOVE: The only condition should be
set to “Group” does “not equal” “Realtors”.
8.
NEWSLETTER OR BIRTHDAY CAMPAIGN FOR WHOLE MORTGAGE DATABASE
If you would like to start any campaign for an
entire database (mortgages in this example), you can use following condition:
ADD: In this case, the only condition
will be that “Marketing Sequence” “is greater than” “Lead”.
REMOVE: You don’t need do add a
removal condition for this campaign example.

Want to Learn More?