Modules – Rate Refinance Miner
Customize your
Daily Refinance Alerts
Many of your current mortgage clients
could benefit from refinancing without knowing about it. The BNTouch Rate
Refinance Miner can discover new refinance opportunities for your borrowers for
you, checking your database automatically each night to find records based on
current rates and goal rates. You can configure your own rates for various
scenarios, set a minimum change in rate that will trigger alerts in your
Dashboard tab, and even receive regular email summaries for these potential
refinances.
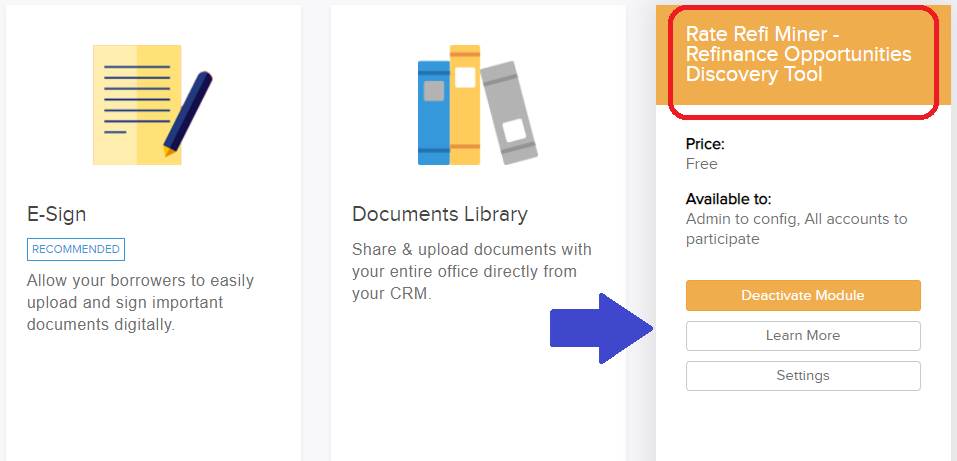
This is a free module without any extra
monthly cost, but it is optional and must be enabled for your account if you
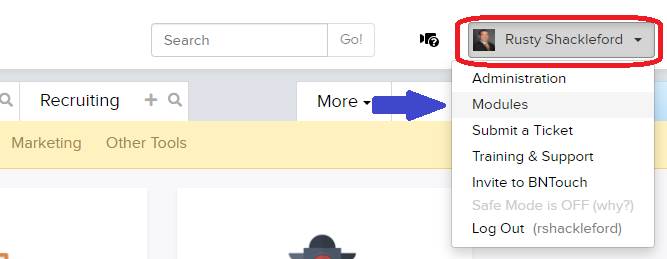
wish to use its features. If you are an administrator for your account, you can
enable the Rate Refinance Miner from the user menu in the upper-right corner of
your CRM. To do so, open the “Modules” section, then scroll to the “Rate Refi
Miner” panel. You can hover over the panel for support materials, and you can
enable the feature by clicking the “Activate Module” button.
How Does the
Refinance Miner Work?
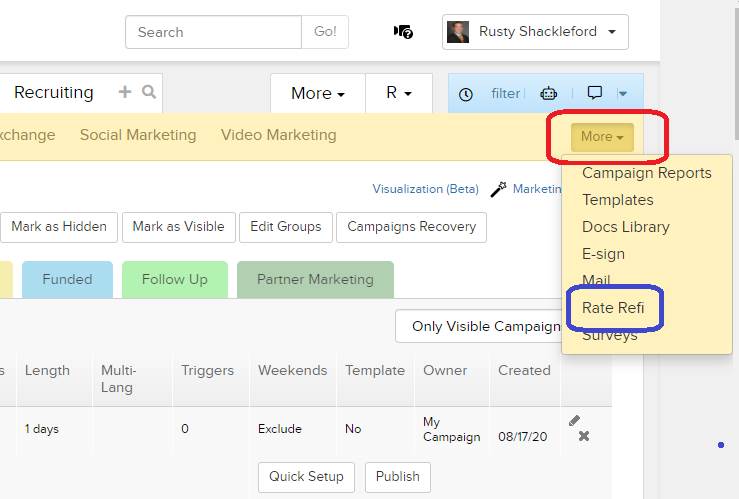
After the Refinance Miner is activated,
you will see an extra option in your Marketing Tab titled “Rate Refi”. Here,
you will see a list of alerts active for your account. This list will be empty
at first, but each night, the Rate Refi Miner will check all records in your
account for rates that have changed by a certain, specified amount. It will
create a new alert here for each matching record it finds, letting you know
exactly which clients you can get in contact with about a potential savings
through refinancing.
Please note that the Refinance Miner
looks at particular fields in your clients’ records in
your CRM, so it will only create alerts if you have filled in these relevant
fields. These include the Loan Amount, Loan Term, Property Type, Loan Program,
Loan Type, and Rate fields in the “Mortgage Info” sub-tab of a mortgage record.
When you first enable the Refinance Miner
for your CRM, it will be pre-populated with a series of alert values based on
the most popular loan scenarios. You can customize any of these alert criteria
and create new alert triggers by clicking the “Config” button on this page.
Configuring Your
Refinance Alerts
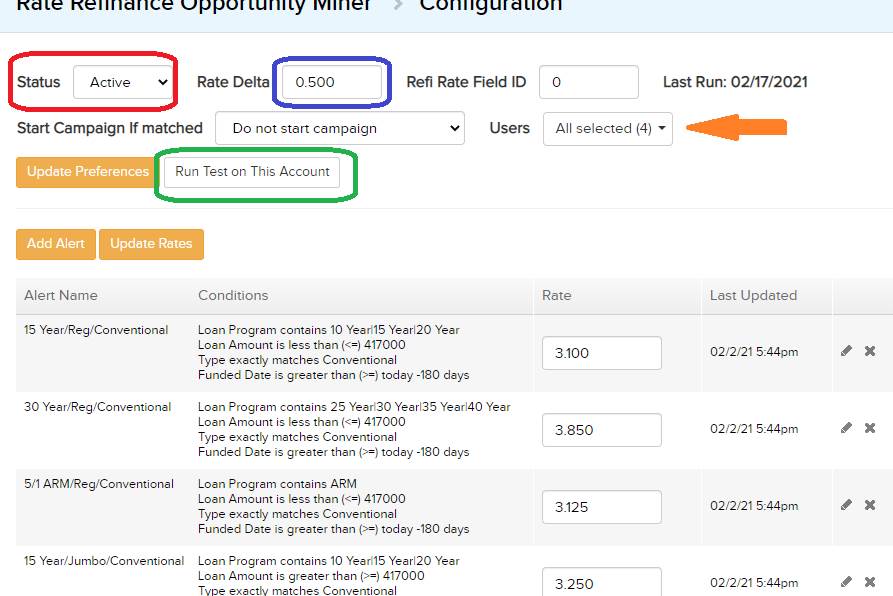
On the Configuration page, you’ll see a
series of options above and a list of alert types below. The menus at the top
of the page let you determine how the miner checks through your mortgage record
database. The “Status” indicator lets your turn this feature on and off.
The “Rate Delta” is the minimum amount of
change that a rate needs to differ from that in a client’s record in order to trigger an alert. By default, this value starts
at “0.5”. This means that if the miner finds a record with a rate that is more
than 0.5 percent away from the current rate you have listed, it will make an
alert for you to contact that client about refinancing.
The “Rate Field ID” will determine what
field in the client’s record the miner will look at for their current rate.
This will default to the “Rate” field from the “Mortgage Info” sub-tab. The
date of the last rate check will be shown to the right.
If you would like a campaign to
automatically run for any clients that are matched by the miner, you can choose
it from the “Start Campaign if Matched” drop-down menu. Similarly, you can set
the miner to only look for records belonging to specific users in your CRM
using the second menu.
Once you have configured the miner settings
to your liking, click the “Update Preferences” button to save these changes.
You can also use the “Run Test on This Account” button to do an immediate check
of the records in your database and generate alerts accordingly.
Creating and
Editing Alerts
Below, you will see a list of all alert
criteria set for your account. This will originally include only those added by
default with the module, but you can always add new alerts using the button
above the list. As you see below, each alert has a name for your own reference,
trigger criteria in order to identify records that
will activate the alert, and a rate.
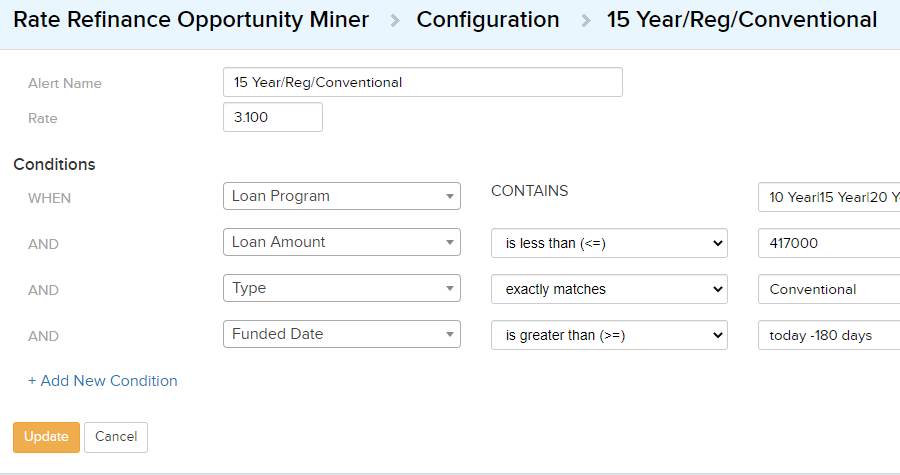
When you click “Add Alert” or edit an
existing alert using the pencil icon to the right, you can change the name and
rate for that alert. You can also modify trigger conditions below. These
triggers function similarly to marketing campaign triggers, so you can use the
rows labeled “When” and “And” to set any values that must be matched in client
records to cause an alert.
Using the drop-down menu, find an
appropriate field. Next, use the second menu to determine whether the value you
set to the right must match, be greater than, be lesser than or equal to, or be
contained in that client’s record for this field. Make sure to compare the
values listed here to those you use for your funded loans. For example, when
the miner looks at the “Program” field, it will not see “10-yr” and “10 Year”
as “Exactly Matching”.
You can add as many conditions as you
need to further narrow the alert selection, and you can use the “Add New
Condition” link to add more rows to the list. When finished, click “Create” or
“Update” to save the alert.
Setting New
Rates for the Miner
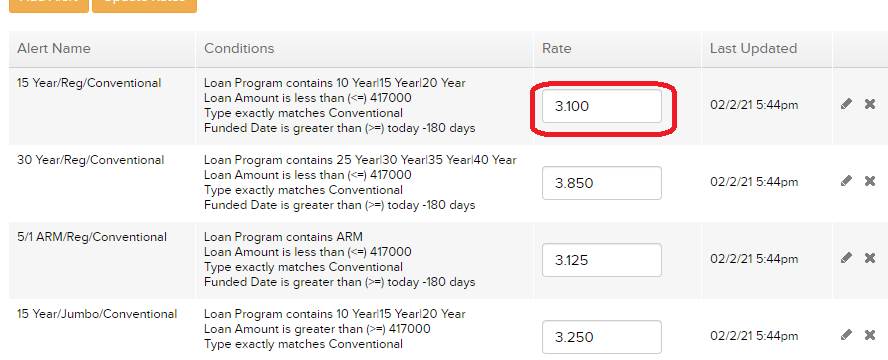
Now that you have configured settings for
the miner and created a list of criteria for it to use, you can simply update
it with new rates here to use in its nightly checks. For existing alerts, you
can simply change the rate value in the list below, then click the “Update
Rates” button to save the changes. The miner will now use the updated values
when it searches through records overnight and add alerts for records that match.
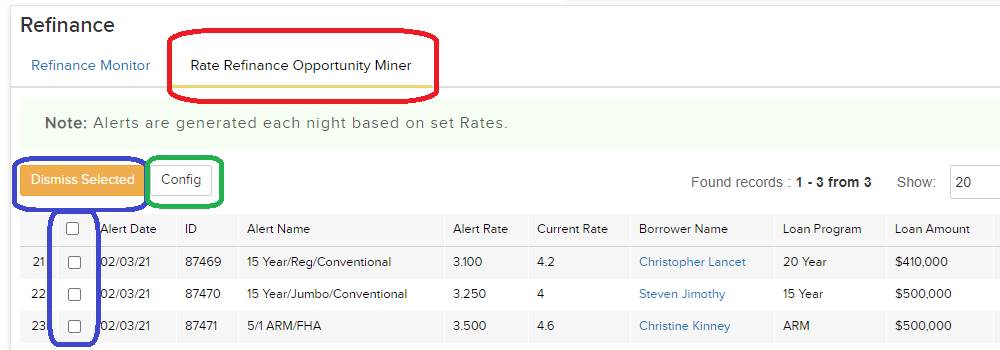
Where to Find
and Use Refinance Alerts
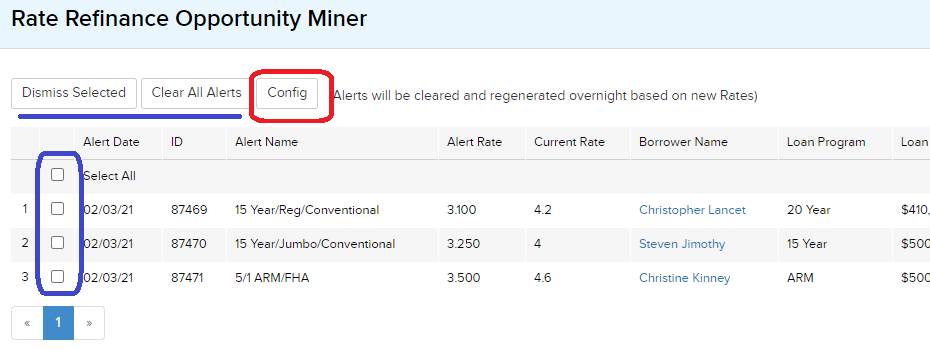
Once the miner generates alerts from your
client database, you can find them in the “Rate Refi” section of your Marketing
Tab. These same alerts can also be seen in your Dashboard Tab when you first
log in. In the “Alerts” sub-tab, you’ll see a “Rate Refinance Opportunity
Miner” section added to the “Refinance” panel.
Wherever you view these alerts, you’ll see the
date the miner found the matching client, which alert the record triggered, the
new rate and the one currently listed for the client, a link to the client’s
record, and additional details for that borrower. You can dismiss any of these
alerts once you have contacted the client by checking the boxes to the left and
clicking the “Dismiss Selected” button above the list. You can also remove all
current alerts using the “Clear All Alerts” button.
Want to Learn More?